
A Comprehensive Guide to Mastering iPogo for Pokémon GO On Apple iPhone 11 Pro | Dr.fone
A Comprehensive Guide to Mastering iPogo for Pokémon GO On Apple iPhone 11 Pro
Pokémon Go is one of the most popular gaming apps of the present times, which is based on augmented reality. Developed by Niantic for iOS and Android, this single console game lets us catch all sorts of Pokemons in different areas. Though, to catch Pokemons, users are expected to visit different places and step out. Needless to say, it restricts the scope to catch Pokemons , and users often look for Pokémon Go spoofing apps for iOS. This would let you change your location and spoof Pokémon Go on iOS pretty easily.
In this guide, I will teach you how to use reliable Pokémon Go spoof apps for iOS and the risks related to them.
If you own an iOS device and would like to spoof your location on Pokemon Go, then iPogo could be an option. While the iPogo iOS app has gained a lot of popularity, it also suffers from security and accessibility issues. Therefore, in this post, I will let you know how to use iPogo for Pokemon Go and would also make you familiar with a better alternative for Pokemon Go location spoofing.
Tips: Discover the best iPogo alternatives! Try Dr.Fone - Virtual Location and take your location-based gaming experience to the next level. Get started now!
Part 1: What is iPogo and How can it help you?
Ideally, iPogo is a dedicated iOS app that can help you play Pokemon Go remotely from anywhere you like. It is a modified version of Pokemon Go that includes numerous hacks and cheats that would let you level up in the game.
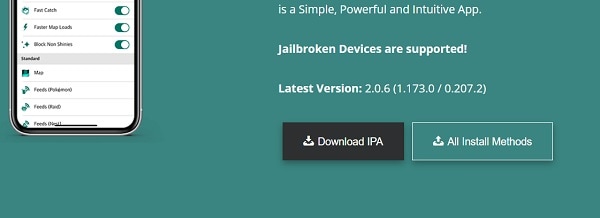
- To install iPogo on your iOS device, you must have to jailbreak your Apple iPhone 11 Pro (it doesn’t support standard devices).
- The iPogo iOS app can spoof your Apple iPhone 11 Pro location to anywhere you like and reflect it on Pokemon Go.
- There is also a provision to simulate the Apple iPhone 11 Pro device movement of your Apple iPhone 11 Pro on Pokemon Go.
- Other features of the iPogo iOS app are feeds for raids and quests, enhanced throws, fast catch, and more.
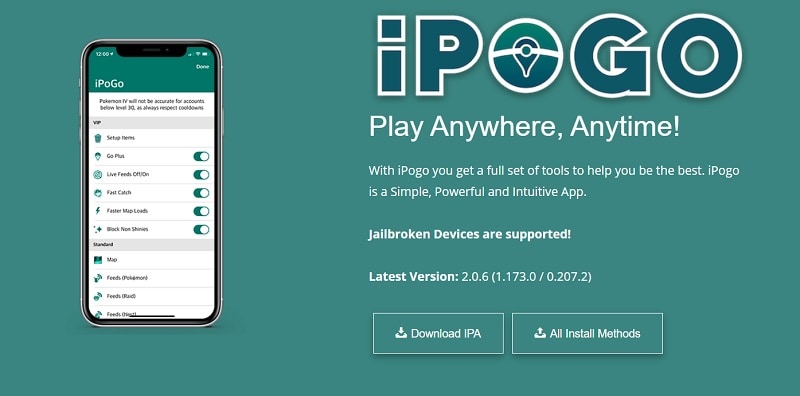
Price: The basic version of iPogo is available for free that would let you teleport your location in Pokemon Go. To access more features of iPogo for Pokemon Go, you can get its premium subscription for $4.99 per month.
Part 2: How to Use iPogo to Improve your Pokemon Go Gameplay?
If you also want to use the iPogo iOS app, then you first need to jailbreak your Apple iPhone 11 Pro. Also, since the use of iPogo for Pokemon Go can lead to an account ban, you can consider creating a new account before using it. Here’s how you can use the iPogo iOS app to spoof location on Pokemon Go.
Step 1: Download and Install the iPogo iOS app
At first, you can just jailbreak your device by using any freely available resource that would install Cydia Impactor on it. Later, you can go to the website of iPogo to download the IPA file and complete its installation. You can also use third-party sources like 3uTools, Rickpactor, or Signulous to install iPogo on your iOS device.
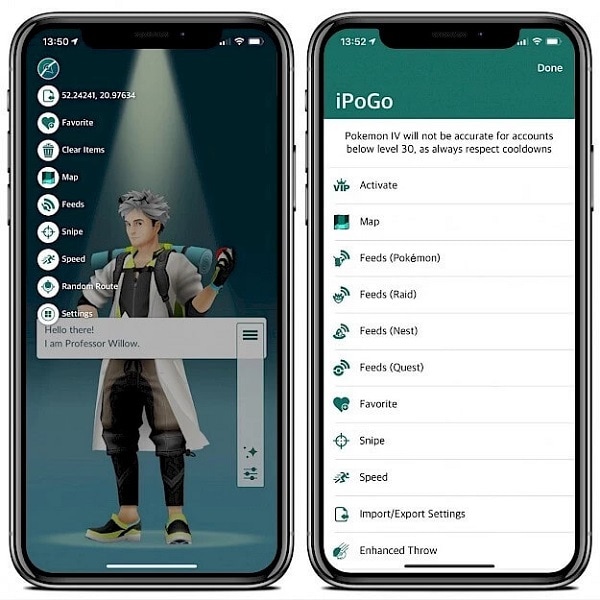
Step 2: Set up your Pokemon Go account
Great! Once the iPogo iOS app is installed, you can launch it and log-in to your Pokemon Go account. Afterward, you can go to its Settings and “Activate” your account. On your Pokemon Go screen, you can view various options on a floating sidebar to access its features.
Step 3: Spoof your location on Pokemon Go with iPogo
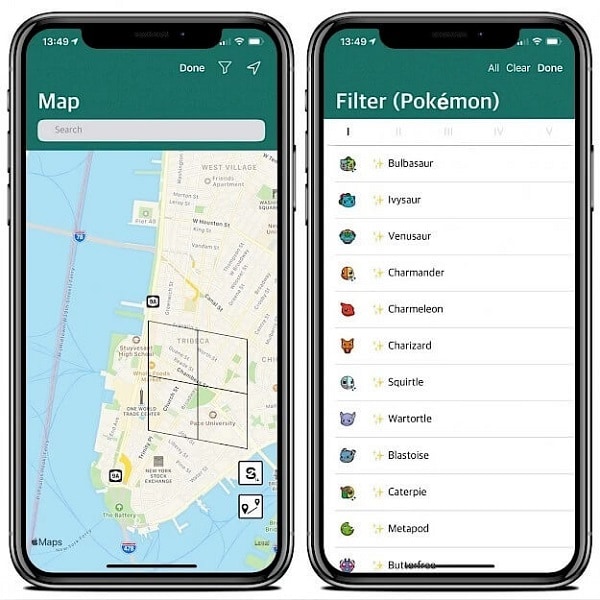
Now, to change your location, you can tap on a map icon, which is located at the top of the iPogo interface. This will open a map where you can look for the target location via its address or coordinates.
You can further use the filter option to search for specific Pokemons on the map and can even move the pin around. This will automatically switch your location, letting you catch Pokemons from your home.
Part 3: Why you Should Look for iPogo Alternatives?
Even though iPogo would let you access all kinds of Pokemon Go hacks, it has numerous pitfalls. Here are some of the reasons that would make you look for a better iPogo alternative instead.
- Firstly, the iPogo iOS app would need jailbreak access on your Apple iPhone 11 Pro which can compromise its security.
- As of now, iPogo is only available for iOS devices and not Android. If you are looking for an iPogo Android alternative, then you can try PGSharp as well.
- Ideally, iPogo for Pokemon Go is against the terms and conditions of Niantic and its constant use can cause a permanent ban on your account.
- Since the installation process for the iPogo iOS app is a bit complicated, it would need prior technical experience.
- Please note that iPogo is not a reliable service and it can stop working anytime (like iSpoofer ). This can cause a sudden loss of your money and progress in Pokemon Go.
Part 4: How to Spoof iPhone Location without Jailbreak Using the Best iPogo Alternative?
Since iPogo needs jailbreak access and is not that reliable, a lot of players look for its alternative. For instance, you can use Dr.Fone - Virtual Location to easily spoof the location on your Apple iPhone 11 Pro without jailbreaking it. The application is super easy to use and also provides a GPS joystick to stimulate your movement between multiple spots. Besides that, you can also mark any location as a favorite and can even import/export GPX files using the desktop application.
Step 1: Connect your Apple iPhone 11 Pro and launch Dr.Fone – Virtual Location
Simply connect your Apple iPhone 11 Pro to the computer and launch the Dr.Fone – Virtual Location application. You can now agree to its terms and conditions and select the connected device.

Step 2: Spoof your Apple iPhone 11 Pro location to anywhere you like
The application will automatically detect and display the present location of your device. You can now click on the Teleport Mode feature from the top to spoof your Apple iPhone 11 Pro’s location.

Afterward, you can just enter the name, address, or coordinates of the target location on the search bar and load it on the map.

You can now adjust the location on the map by moving the pin around or even zoom in/out. Lastly, click on the “Move Here” button and wait as your device’s location would be updated on Pokemon Go.

Step 3: Simulate your Apple iPhone 11 Pro’s movement between multiple spots
Apart from that, you can also simulate the movement of your device by selecting the One-stop or Multi-stop modes from the top. This will let you drop the pins on the map to create a route for Pokemon Go.

Furthermore, you can enter the number of times to cover the route and even select a preferred speed for the movement. Once you click on the “March” button, the simulation of the movement would be started. You can also access a GPS joystick at the bottom to move realistically on the map in any direction.
 safe & secure
4,039,074 people have downloaded it
Conclusion
I’m sure that after reading this post, you would be able to know more about iPogo for Pokemon Go and its use. Since the iPogo iOS app would need jailbreak access on your device, you can consider using an alternative. I would recommend using Dr.Fone - Virtual Location as it is a user-friendly solution that won’t need jailbreak access on your device. Besides spoofing your location on Pokemon Go, it can also simulate your device’s movement at a preferred speed and offers tons of features to level up in Pokemon Go , and other games.
Here’s Everything You Should Know About Pokemon Stops in Detail On Apple iPhone 11 Pro
If you are just starting with Pokemon Go, then you might see Pokemon stops all around you! Well, Pokemon Go stops are extremely essential in the game as they would help you collect items or even catch Pokemons. Therefore, in this post, I will let you know how to find Pokemon Go stops near me and would also discuss a solution to explore Pokemon stops in any other place.
Part 1: What are Pokemon Stops in Pokemon Go?
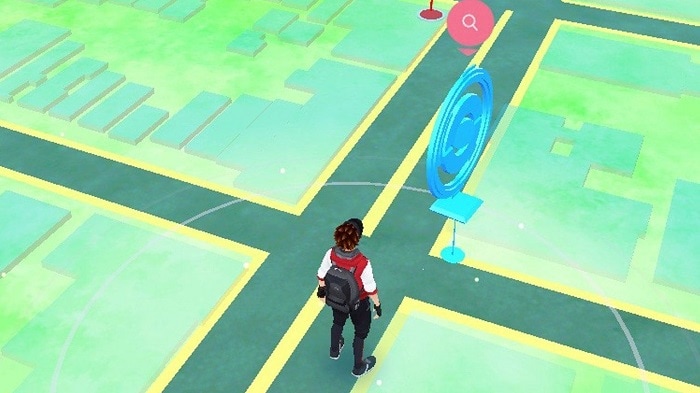
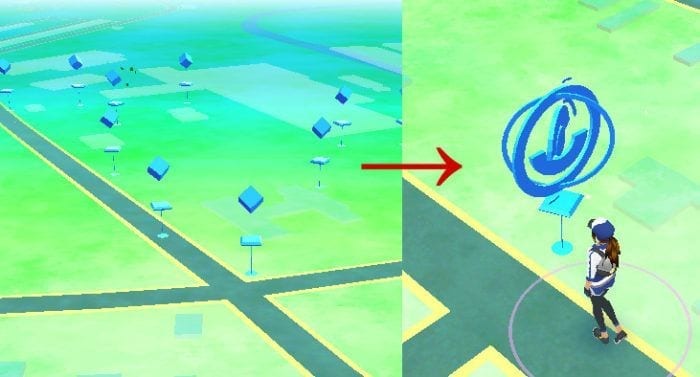
In nutshell, Pokemon Go stops are dedicated places in the Pokemon Go map that can be visited to collect valuable items. For instance, you can obtain eggs, Poke balls, potions, and other game-related items from a Pokemon Go stop near you. At times, even a Pokemon can be found roaming nearby a Pokemon Go stop.
Mostly, Pokemon stops are located at important buildings, monuments, art installations, and other vital areas. On your map, you can see Pokemon stops near me depicted by a blue triangle icon. As you would approach the Pokemon stop, it will change to a disc icon and you can obtain various features by tapping on it in the game.
Part 2: How to use Lure Modules on Poke Stops in Pokemon Go?
Lure Module is a beneficial in-game item in Pokemon Go that can lure the nearby Pokemons to a Poke stop. Ideally, you can place a Lure Module at any Poke stop in Pokemon Go and it will be helpful to other players as well. As of now, the effect of a single Lure Module will last for 30 minutes, but you can install another module to prolong its effect.
These days, a lot of brands and businesses also place Lure Modules to create Pokemon Go sponsored stops that would attract players to a designated location. Here’s how I installed a Lure Module at Pokemon Go stops near me.
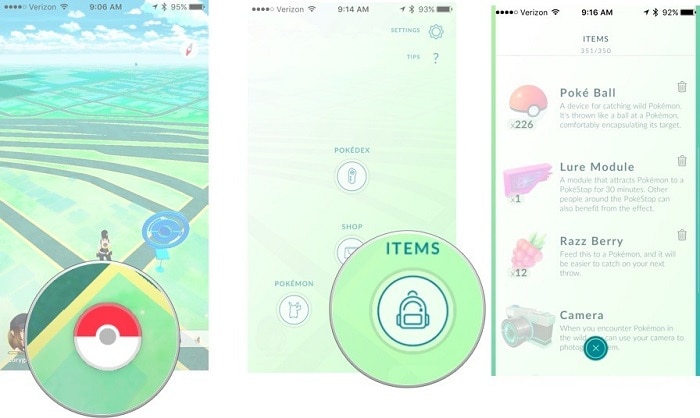
Step 1: Buy Lure Modules from the Pokemon Go Store
Before you install a Lure Module to a Pokemon stop, you need to purchase it on your account. For this, just launch Pokemon Go, tap on the Pokeball icon, and visit the “Items” store. From here, you can look for Lure Module and purchase any number of modules.
Step 2: Set up Lure Modules at Pokestops in Pokemon Go
Great! Once you have purchased Lure Modules, just step out and find Pokemon stops near me. After finding the Pokemon stop of your choice, tap on the disc icon to get more options. Now, tap on the Lure Module slot icon (white bar) at the top and go to the Pokemon Module feature.
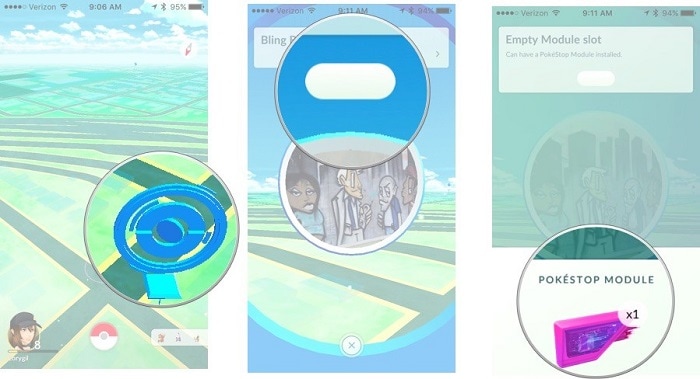
That’s it! You can now select Lure Module from the Pokemon Module options and simply place it at the designated Pokemon stop. The Pokemon Go stop’s icon would change with rose petals to attract the nearby Pokemons.
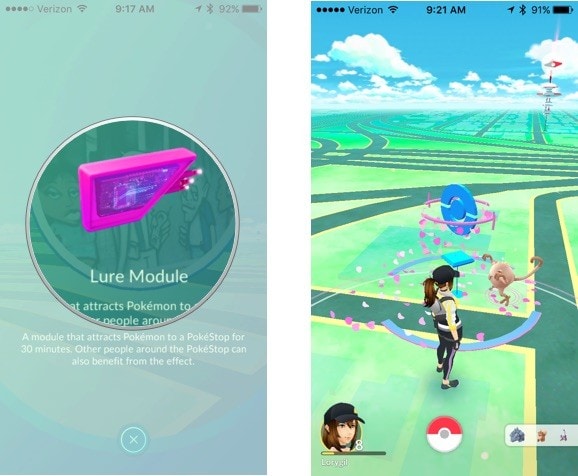
For the next 30 minutes, the nearby Pokemons will automatically come to the designated Pokemon Go stop. This will benefit you and any other trainer who would visit the Pokemon Go stop until the allocated time.
Part 3: How Can You Make Pokestops into Farming Spots in the Game?
With the help of Lure Modules and other techniques, players can make Pokemon Go stops into farming spots to catch more Pokemons. Ideally, you can also apply these suggestions that I followed to enhance Pokemon Go stops near me.
Explore Multiple Pokemon Go Stops nearby
You might already know that trainers with Level 38 or above can nominate places to become Pokemon Go stops. Therefore, you and your friends can also help create multiple Poke stops in Pokemon Go nearby.
In this way, you can simply explore multiple Pokemon Go stops by walking. In a single walk, this would let you replenish items in Pokemon Go and you might end up catching more Pokemons as well.
Use Lure Modules with Friends
Instead of solely using Lure Modules, you can go with your friends to catch Pokemons. For instance, you and your friends can install Lure Modules at the nearby Pokemon Go stops. This will automatically create a farming spot for that place, attracting all kinds of nearby Pokemons. Not only would this benefit you/your friends, but let other trainers to catch tons of new Pokemons easily.
Part 4: How to Explore Pokemon Go Stops Remotely (without Walking)?
While Pokemon Go is all about exploring and going out to find Pokemon and Pokestops, not everyone can step out or walk so much. In this case, you can use a dedicated tool like Dr.Fone – Virtual Location (iOS) that can spoof your Apple iPhone 11 Pro’s location to anywhere you want. You can simply change your location to any other spot where a Pokemon stop is located or even simulate your movement in the following way:
Step 1: Connect your Apple iPhone 11 Pro and Launch the Application
At first, just install the application, launch the Dr.Fone toolkit on your PC, and click on the “Virtual Location” module from its home.

Subsequently, also connect your Apple iPhone 11 Pro to the system using a working cable and trust the system. On the interface of Dr.Fone – Virtual Location (iOS), just agree to its terms, and click on the “Get Started” button.

Step 2: Enter the Details of the Target Location
Once your Apple iPhone 11 Pro is detected by the interface, its present location would be displayed with other details. To spoof the location of your Apple iPhone 11 Pro on Pokemon Go, you can click on the Teleport Mode icon from the top.
Now, you can go to the search options on the top-left side and enter the address or exact coordinates of the Pokestop. You can find the location of a Pokestop from several freely available online sources.
Step 3: Spoof your Apple iPhone 11 Pro Location to a Pokemon stop
As you would enter the location, the interface will automatically change to the designated spot. You can now move the pin around on the map and even zoom in/out to drop it at the exact spot. In the end, just click on the “Move Here” button to spoof your Apple iPhone 11 Pro’s location and visit the Pokemon stop virtually.
Besides that, you can also use the one-stop or multi-stop modes of the application to simulate your movement and visit the nearby Pokemon Go stops.
I’m sure that after reading this post, you would be able to know about Poke stops in Pokemon Go. I have included several tips that I implement to find Pokemon stops near me in this guide. Though, if you want to catch more Pokemons via Pokemon Go stops, then you can simply use Lure Modules. Apart from that, you can also use a dedicated location spoofer like Dr.Fone – Virtual Location (iOS) to visit Pokemon stops anywhere in the world and replenish unlimited items without any trouble.
Catch or Beat Sleeping Snorlax on Pokemon Go For Apple iPhone 11 Pro
Embracing new challenges and seeking out rare creatures to add to their Pokédex consistently excites Pokémon GO players. The coveted reward for players globally, Snorlax, a legendary Pokémon, is widely recognized as the iconic Sleeping Snorlax. Despite being one of the original 151 Pokémon in Pokémon GO, capturing Snorlax remains exceptionally challenging. It falls under Z’s category of Pokémons, which also includes Komala and Abra.
This makes it a unique challenge for trainers seeking to add this heavyweight Pokémon to their collection. In this guide, we will go through the latest strategies and updates in the Pokémon GO universe. The aim is to reveal the secrets to catching a Pokémon Sleeping Snorlax in 2024. Read the article as we explore the techniques, locations, and special events that will increase your chances of capturing this Pokémon.

Part 1: What Is a Sleeping Snorlax in Pokémon GO
Part of the original 151 creatures in Pokémon GO, Snorlax is a Pokémon from the Pokémon franchise. It stands out as a normal type with notable Combat Power (CP) and endurance. Its substantial Hit Points (HP) and powerful moves make it a formidable defender in gyms, earning it a reputation as a resilient fighter.

Being one of the Z’s category Pokémon, known for their sleepy and relaxed nature, is reflected in its appearance. Snorlax Pokémon sleeping is a large, bear-like Pokémon with a big belly and is often found blocking paths in mainline Pokémon games.
In Pokémon GO, Snorlax can be encountered in the wild, but it is more commonly obtained through special events or raids. Like other Pokémon, Snorlax can be powered up and used in battles against other trainers or in raids. Below is a detailed table explaining everything about Snorlax:
| Specs | Snorlax |
|---|---|
| Pokédex No | 143 |
| Generation | 1st |
| Region | Kanto |
| Height | 6’11” or 2.1 m |
| Weight | 1014.1 lbs. or 460.0 kg |
| Stamina | 143 |
| Pokédex No | 330 |
| Attack | 190 |
| Defense | 169 |
| Max HP | 285 |
| Max CP | 3384 |
| Abilities | Thick Fat & Immunity |
| Best Moves | Lick & Hyper Beam |
| Evolves From | Evolves From |
Part 2: Is It Possible To Capture a Sleeping Snorlax in Pokémon GO?
When it comes to whether it is possible to capture a Snorlax sleeping Pokémon, the answer is a resounding yes. Being rare, the chances to encounter and capture have steadily risen compared to past years. With its formidable stats, Snorlax reaches an impressive maximum Combat Power (CP) of 3884.
At Pokémon Z’s Event 2023, participants had the chance to capture not only Snorlax but also its rare shiny variant. Moreover, after completing the special research task, users were able to encounter a Snorlax with a nightcap. To get Snorlax more easily, users are recommended to use Pokémon Go Plus +.
Utilizing advanced Bluetooth and low-energy technology, the Pokémon GO Plus + device establishes connections with both the Pokémon Sleep and Pokémon GO mobile applications. Its functionality extends to monitoring sleep, a feature it shares with Pokémon Sleep. All you need to do is hold the central button, put it near you, and go to sleep. It includes a Pikachu to sing you lullabies and work as a morning alarm.
Moreover, the Pokémon GO Plus + accessory facilitates the spinning of PokéStops. It enables the automatic throwing of different Poké Balls, Great Balls, and Ultra Balls. Thus eliminating the need to press any buttons. Below is a detailed table about the specifications of Pokémon GO Plus + to capture Snorlax sleeping Pokémon:
| Specs | Pokémon GO Plus + |
|---|---|
| On Sale | America: July 14, 2023 / Europe: July 21, 2023 |
| Package Contents | Pokémon GO Plus + strap with clip, Pokémon GO Plus + device, operations manual, USB charging cable |
| Device Size | |
| Diameter: 64.5mm |
Thickness: 18.3mm
|
| Device Weight | 50g |
| Internal Battery |
Lithium-ion battery
Charges via USB Type-C
|
| Battery Charging Time | 3.5 Hours |
| Functions | Vibration and sounds |
| Platform/OS |
Android 7 and up
iOS 14 and up
|
Part 3: How To Catch a Sleeping Snorlax With the Help of Pokémon GO Plus+
With the release of Pokémon GO Plus + in July 2023, Nianticreleased a week-long “Catching Some Z’s” event. The main part of the event was to increase the spawned rate for Snorlax and a special encounter with a Snorlax with a nightcap. While the event has long finished, Pokémon GO Plus + remains.
Many users have reported increased sightings of Snorlax even after the event when using Pokémon GO Plus +. As discussed earlier, Pokémon GO Plus + uses Bluetooth to remain connected with the Pokémon GO app. Here are the steps you need to follow to pair Pokémon GO with the Pokémon GO Plus + for help in catching Pokémon Snorlax sleeping:
- Step 1. Begin by enabling Bluetooth, opening the Pokémon GO app on your device, and tapping the central Pokéball button. Now tap “Settings” from the top right corner and select “Connected Devices and Devices.”

- Step 2. On the following screen, press “Accessory Devices” to access the pairing menu. Now, move to Pokémon GO Plus + and press the main button. Once it appears in the “Available Devices” section of the Pokémon GO app, begin the pairing process following the on-screen instructions.

Part 4: Enhance Your Gaming Experience With One-Click Location Spoofer of 2024
Are you having issues with capturing Pokemon Snorlax sleeping despite employing Pokémon GO Plus +? Given the rarity and low spawning rate, capturing Snorlax can be hard. This becomes especially difficult if you are unable to travel long distances. To come to your rescue, there’s another useful tool at your disposal named Wondershare Dr.Fone - Virtual Location. Enabling you to simulate your location anywhere globally, it also incorporates lifelike movement.
With just one click, modify your GPS location effortlessly using this tool that smoothly integrates with both iOS and Android devices. This means you can easily explore diverse in-game terrains. It increases your chances of encountering Snorlax Sleeping Pokemon in various locations. Wondershare Dr.Fone gives you precise control over your virtual location, ensuring that you can navigate the Pokémon GO map with accuracy.
Standout Features of Dr.Fone - Virtual Location
- Effortlessly import/export GPX files containing diverse paths, enabling you to save and view your preferred routes with a simple click.
- When spoofing your GPS location on an iOS device, you don’t need to jailbreak it when using Dr.Fone - Virtual Location.
- It offers you the flexibility to traverse at various simulated speeds, such as walking, cycling, driving, etc., ranging from 3.6 km/h to 108 km/h.
Steps To Enhance Your Gaming Experience With One-Click Location Spoofer of 2024
Save time and energy by using Wondershare Dr.Fone - Virtual Location feature. There is no need to physically travel to different places by simply adjusting your virtual location.
When coupled with powerful Pokémon GO Plus +, it can increase your chances of encountering Sleeping Snorlax significantly. Here is how to enhance your gaming experience and get help in capturing Pokémon sleeping Snorlax via Dr.Fone - Virtual Location:
- Step 1. Activate Teleport Mode in Dr.Fone - Virtual Location
Open Wondershare Dr.Fone - Virtual Location, connect your smartphone with an original USB cable, and choose the “Teleport Mode” option located in the top-right section. The specific icon for Teleport Mode is the first one from the left in that section. Once Teleport Mode is activated, click on the search bar at the top-left to input the desired location. After entering the location, press “Enter” to continue.
- Step 2. Teleport to the Chosen Location
As you enter the desired location, the map will confirm your selection. If you wish to teleport to this designated location, click on “Move Here.” The smartphone’s location will promptly switch to the chosen destination and reflect on the map. You can then verify that the Apple iPhone 11 Pro device’s current location matches the updated location by opening the maps app on the Apple iPhone 11 Pro device.
- Step 3. Simulate Movement with One-Stop Route
To simulate movement, navigate to the top-right section and click “One-Stop Route.” It is the third icon from the left. After moving to the desired location, tap anywhere on the map to designate your destination. Specify the number of round trips and opt for either a Round or Loop trip. Adjust the walking speed by sliding the speed option. Finally, tap “Move Here” for the movement simulation.

- Step 4. Enable the Multi-Stop Route Feature
If you want to visit more than one stop, enable the Multi-Stop Route mode. You can do it by accessing the top-right section adjacent to the One-Stop Route mode. Once activated, designate multiple locations on the map by selecting your desired points. Specify the number of trips and speed settings. Initiate the process by clicking on “Start Moving.” During the simulation, you can “Pause” the sequence at any point.
Conclusion
In conclusion, the pursuit of capturing a Snorlax Pokémon sleeping in Pokémon GO is an ever-evolving adventure. To enhance your gaming experience and increase your chances of success, consider incorporating Wondershare Dr.Fone - Virtual Location. With its one-click location spoofer, Dr.Fone adds versatility and efficiency to your exploration. It allows you to enjoy the thrill of the hunt without physical constraints.
Also read:
- [New] In 2024, Essential Budget Gaming Hardware The Ultimate Keyboard List
- [Updated] Filmmaking Made Simple Crafting an Impactful YouTube Subscribe Button for 2024
- [Updated] In 2024, Elevate Everyday Fashion Expert Edits for Haul Videos
- Detailed guide of ispoofer for pogo installation On Apple iPhone 12 mini | Dr.fone
- Here Are Some Reliable Ways to Get Pokemon Go Friend Codes For Lava Blaze Curve 5G | Dr.fone
- How to Fix Android.Process.Media Has Stopped on Vivo Y100t | Dr.fone
- How to Get and Use Pokemon Go Promo Codes On Apple iPhone 11 Pro | Dr.fone
- Maximize System Speed with Efficient Hard Drive Cleanup Strategies From YL Software Experts
- Pokemon Go No GPS Signal? Heres Every Possible Solution On Apple iPhone 6s Plus | Dr.fone
- The Ultimate Guide to Get the Rare Candy on Pokemon Go Fire Red On Apple iPhone 13 Pro | Dr.fone
- Transforma Tus GIFs en Vídeos MP4 Gratis Manteniendo La Alta Calidad Desde Tu Navegador Web
- Will Pokémon Go Ban the Account if You Use PGSharp On Apple iPhone 14 Pro | Dr.fone
- Title: A Comprehensive Guide to Mastering iPogo for Pokémon GO On Apple iPhone 11 Pro | Dr.fone
- Author: Iris
- Created at : 2024-11-30 19:23:31
- Updated at : 2024-12-03 03:29:32
- Link: https://ios-pokemon-go.techidaily.com/a-comprehensive-guide-to-mastering-ipogo-for-pokemon-go-on-apple-iphone-11-pro-drfone-by-drfone-virtual-ios/
- License: This work is licensed under CC BY-NC-SA 4.0.