
A Comprehensive Guide to Mastering iPogo for Pokémon GO On Apple iPhone XS | Dr.fone
A Comprehensive Guide to Mastering iPogo for Pokémon GO On Apple iPhone XS
Pokémon Go is one of the most popular gaming apps of the present times, which is based on augmented reality. Developed by Niantic for iOS and Android, this single console game lets us catch all sorts of Pokemons in different areas. Though, to catch Pokemons, users are expected to visit different places and step out. Needless to say, it restricts the scope to catch Pokemons , and users often look for Pokémon Go spoofing apps for iOS. This would let you change your location and spoof Pokémon Go on iOS pretty easily.
In this guide, I will teach you how to use reliable Pokémon Go spoof apps for iOS and the risks related to them.
If you own an iOS device and would like to spoof your location on Pokemon Go, then iPogo could be an option. While the iPogo iOS app has gained a lot of popularity, it also suffers from security and accessibility issues. Therefore, in this post, I will let you know how to use iPogo for Pokemon Go and would also make you familiar with a better alternative for Pokemon Go location spoofing.
Tips: Discover the best iPogo alternatives! Try Dr.Fone - Virtual Location and take your location-based gaming experience to the next level. Get started now!
Part 1: What is iPogo and How can it help you?
Ideally, iPogo is a dedicated iOS app that can help you play Pokemon Go remotely from anywhere you like. It is a modified version of Pokemon Go that includes numerous hacks and cheats that would let you level up in the game.
- To install iPogo on your iOS device, you must have to jailbreak your Apple iPhone XS (it doesn’t support standard devices).
- The iPogo iOS app can spoof your Apple iPhone XS location to anywhere you like and reflect it on Pokemon Go.
- There is also a provision to simulate the Apple iPhone XS device movement of your Apple iPhone XS on Pokemon Go.
- Other features of the iPogo iOS app are feeds for raids and quests, enhanced throws, fast catch, and more.
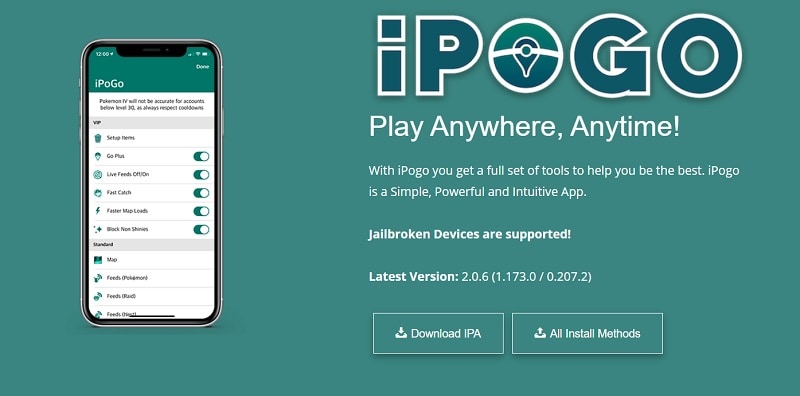
Price: The basic version of iPogo is available for free that would let you teleport your location in Pokemon Go. To access more features of iPogo for Pokemon Go, you can get its premium subscription for $4.99 per month.
Part 2: How to Use iPogo to Improve your Pokemon Go Gameplay?
If you also want to use the iPogo iOS app, then you first need to jailbreak your Apple iPhone XS. Also, since the use of iPogo for Pokemon Go can lead to an account ban, you can consider creating a new account before using it. Here’s how you can use the iPogo iOS app to spoof location on Pokemon Go.
Step 1: Download and Install the iPogo iOS app
At first, you can just jailbreak your device by using any freely available resource that would install Cydia Impactor on it. Later, you can go to the website of iPogo to download the IPA file and complete its installation. You can also use third-party sources like 3uTools, Rickpactor, or Signulous to install iPogo on your iOS device.
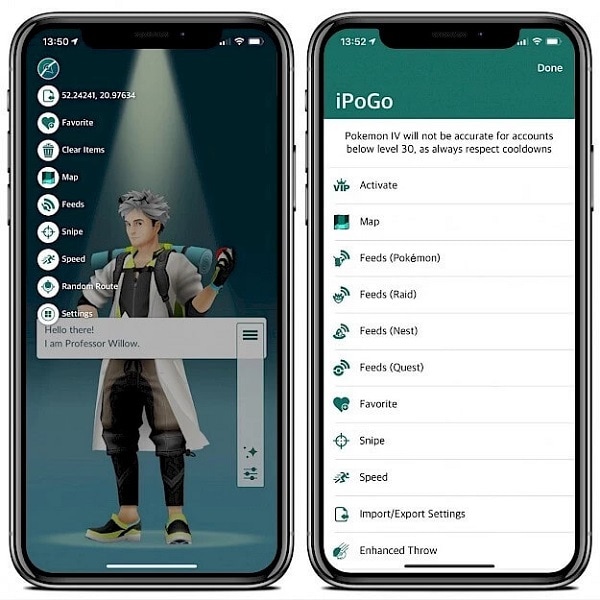
Step 2: Set up your Pokemon Go account
Great! Once the iPogo iOS app is installed, you can launch it and log-in to your Pokemon Go account. Afterward, you can go to its Settings and “Activate” your account. On your Pokemon Go screen, you can view various options on a floating sidebar to access its features.
Step 3: Spoof your location on Pokemon Go with iPogo
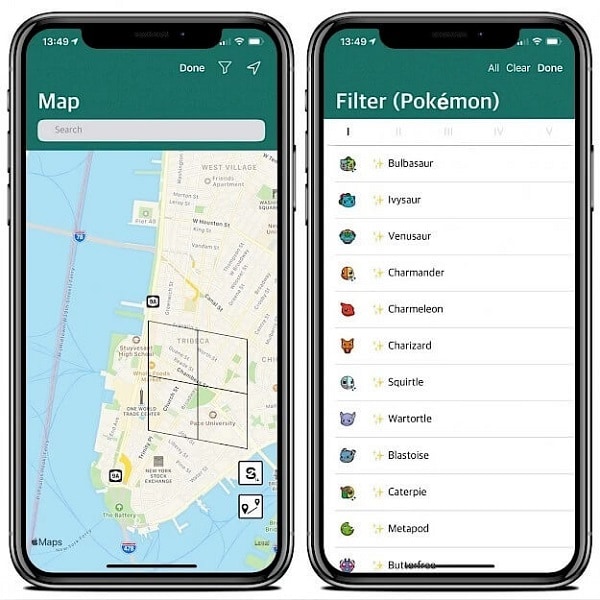
Now, to change your location, you can tap on a map icon, which is located at the top of the iPogo interface. This will open a map where you can look for the target location via its address or coordinates.
You can further use the filter option to search for specific Pokemons on the map and can even move the pin around. This will automatically switch your location, letting you catch Pokemons from your home.
Part 3: Why you Should Look for iPogo Alternatives?
Even though iPogo would let you access all kinds of Pokemon Go hacks, it has numerous pitfalls. Here are some of the reasons that would make you look for a better iPogo alternative instead.
- Firstly, the iPogo iOS app would need jailbreak access on your Apple iPhone XS which can compromise its security.
- As of now, iPogo is only available for iOS devices and not Android. If you are looking for an iPogo Android alternative, then you can try PGSharp as well.
- Ideally, iPogo for Pokemon Go is against the terms and conditions of Niantic and its constant use can cause a permanent ban on your account.
- Since the installation process for the iPogo iOS app is a bit complicated, it would need prior technical experience.
- Please note that iPogo is not a reliable service and it can stop working anytime (like iSpoofer ). This can cause a sudden loss of your money and progress in Pokemon Go.
Part 4: How to Spoof iPhone Location without Jailbreak Using the Best iPogo Alternative?
Since iPogo needs jailbreak access and is not that reliable, a lot of players look for its alternative. For instance, you can use Dr.Fone - Virtual Location to easily spoof the location on your Apple iPhone XS without jailbreaking it. The application is super easy to use and also provides a GPS joystick to stimulate your movement between multiple spots. Besides that, you can also mark any location as a favorite and can even import/export GPX files using the desktop application.
Step 1: Connect your Apple iPhone XS and launch Dr.Fone – Virtual Location
Simply connect your Apple iPhone XS to the computer and launch the Dr.Fone – Virtual Location application. You can now agree to its terms and conditions and select the connected device.

Step 2: Spoof your Apple iPhone XS location to anywhere you like
The application will automatically detect and display the present location of your device. You can now click on the Teleport Mode feature from the top to spoof your Apple iPhone XS’s location.

Afterward, you can just enter the name, address, or coordinates of the target location on the search bar and load it on the map.

You can now adjust the location on the map by moving the pin around or even zoom in/out. Lastly, click on the “Move Here” button and wait as your device’s location would be updated on Pokemon Go.

Step 3: Simulate your Apple iPhone XS’s movement between multiple spots
Apart from that, you can also simulate the movement of your device by selecting the One-stop or Multi-stop modes from the top. This will let you drop the pins on the map to create a route for Pokemon Go.

Furthermore, you can enter the number of times to cover the route and even select a preferred speed for the movement. Once you click on the “March” button, the simulation of the movement would be started. You can also access a GPS joystick at the bottom to move realistically on the map in any direction.
 safe & secure
4,039,074 people have downloaded it
Conclusion
I’m sure that after reading this post, you would be able to know more about iPogo for Pokemon Go and its use. Since the iPogo iOS app would need jailbreak access on your device, you can consider using an alternative. I would recommend using Dr.Fone - Virtual Location as it is a user-friendly solution that won’t need jailbreak access on your device. Besides spoofing your location on Pokemon Go, it can also simulate your device’s movement at a preferred speed and offers tons of features to level up in Pokemon Go , and other games.
Pokemon Go Error 12 Failed to Detect Location On Apple iPhone XS?
Pokemon Go is a popular game that has taken the world by storm. It is an augmented reality game that allows players to catch Pokemon in the real world using their smartphones. However, many players have reported encountering the “Failed to detect location (12)” error while playing the game. This error can be frustrating as it prevents players from playing the game properly. In this article, we will discuss what causes the “Failed to detect location (12)” error in Pokemon Go and how you can fix it on your Apple iPhone XS.
Pokémon Go has been on the nerves of its players and this is all because of the AR notion that it presents. The failed to detect location 12 is one of the most common errors that are faced by the players while playing this game. You might not believe but the GPS signals and the location settings on iPhone or Android are the two main reasons for this error. It can be resolved with ease and this article has been written to get the work done with ease. Applying the methods explained will ensure that you get the best results overall.
Part 1: Why is Location Important in Pokémon Go?
The best part of this game is that it has been compiled keeping in view the location mechanics. The location analytics of the game has made sure that it becomes the overnight sensation. Three main attributes are associated with the location framework of the game. These attributes also show how important the location is for the game. Understanding these attributes will also make sure that the user can overcome the errors such as failed to detect location 12 GPS joystick 2019.
i. Physical World Attribute
The best part of this attribute is that it is the center of the user experience of the game. The second part is the fact that this map has evolved and there are no shortcuts to its success. Ingress was the previous game that was developed by Niantic and the crowdsourcing of this map started with the evolution of this application. This was developed by the same team that is working on the core of Google Earth.
ii. Real World Gestures
The augmented reality is another important aspect that is related to Pokemon Go and this also means that the location services are relied on when it comes to this application. The android and the iOS location services are continuously used by the game to provide the pinpoint locations as well as the game features that are not found in other applications. The use of location through GPS satellites even becomes more important for such gestures. Especially when the player is outdoors it becomes too important to deal with using GPS location.
iii. Place Attribution
The system within the system that has been designed by the game developers makes sure that the location inaccuracies are accounted for. This also means that the 4-meter accuracy of the GPS is further enhanced to deal with the perfect location identification of each player.
Part 2: Ways to Fix Error 12 on Pokémon Go
Several ways can be used to make sure that the subject error is resolved with ease. This section of the article will deal with all such ways that can be used to get the work done with ease and perfection.
Method 1: Enable Mock Locations
As the name suggests it is to set the fake location using the build-in iPhone feature. It will also make sure that the feature of the game continues to work perfectly.
Step 1. Go to the developer options of your device. To get to the developer options simply head over to the settings > About Phone > Software Info > Build number and tap it 7 times to enable the mock locations.
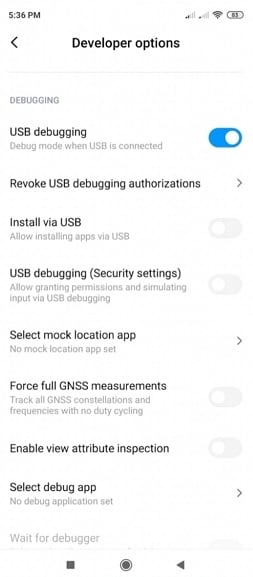
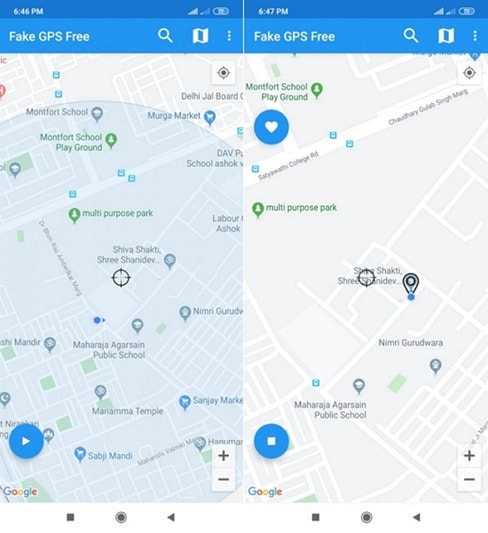
Step 2. Install the Fake GPS that is a free application and can easily be found on the Play Store.
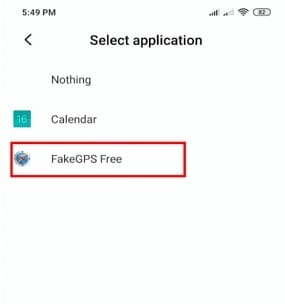
Step 3. Launch the application and you can easily enjoy Pokémon Go without any hassle and trouble and resolve the Pokémon go failed to detect location 12 fake GPS error.
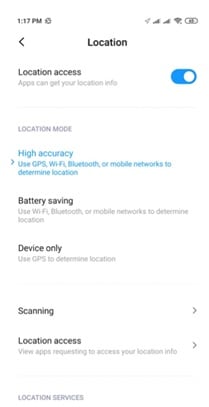
Method 2: Location Activation
This is another important and easy way to make sure that the Pokémon failed to detect location 12 error is resolved with ease and perfection. To execute the process the steps are mentioned as follows:
Step 1. Open the settings on your Phone to start with:
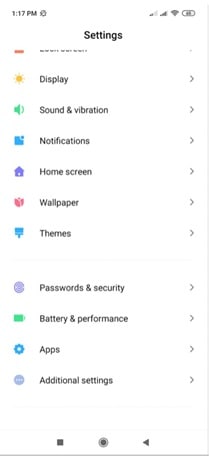
Step 2. Tap on the passwords and security to proceed with the process:
Step 3. Tap to turn on the location to finish the process and eliminate the failed to detect location 12 Pokémon Go errors.
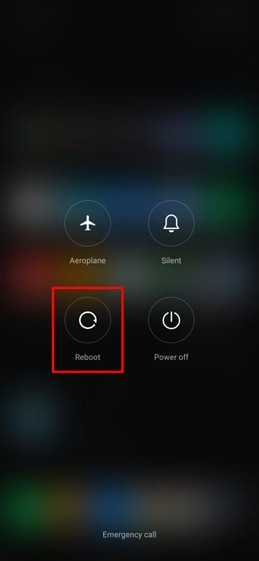
Method 3: Reboot the Apple iPhone XS device
This might seems weird but this trick has been working to quiet some time now and has been proven to eliminate the failed location 12 Pokémon Go issue. There is a possibility that the server location is not synced with the Apple iPhone XS device. Restarting the Apple iPhone XS device will make sure that both the locations are sync and the problem is resolved with ease.
Just long-press the power button and choose the reboot option from the menu that appears to complete the process in full.
Part 3: Best Way to Overcome Location Error 12 on Pokémon Go for iOS Devices
Dr. Fone Virtual location is the best tool to overcome issues such as failure to detect location 12 Pokémon go on iPhone. The program has been designed to make sure that the GPS location is spoofed and you get the perfect outcome in resolving the error under discussion.
The Process
Step 1: Program Installation
To begin the process, download and install the program to get going with the process.

Step 2: Enable Virtual Location
Connect your Apple iPhone XS and enable virtual location from the options of the program. Hit get started to begin the spoof.

Step 3: Locate yourself
The center on the button on the next screen is to be clicked to get the accurate location.
Step 4: Teleportation
On the upper right corner click the icon on the third to begin teleportation or spoofing to be precise. Enter the name of the place where you want to teleport to.
Step 5: Move to the teleported location
Click on move here and the system will move you to the location that has been entered.
Step 6: Validate and Completion
The location will be locked by the program and your Apple iPhone XS will also show the same location as on Dr. Fone. This also completes the process in full:

Conclusion
Dr.Fone - Virtual Location is the best and the state-of-the-art program to overcome Pokémon go unable to detect location 12 on iOS devices. It has an intuitive interface and it also allows the users to overcome the issues that traditional spoofing programs present. It is being updated constantly which also means that you will be able to get the best results. There is no program on the internet that can resolve the error that failed to detect location 12 in Pokémon go as easily as this one does.
How can I get more stardust in pokemon go On Apple iPhone XS?
Pokemon Go is one of the most popular games worldwide, with over 80 million active players. The game will present tasks you should complete to collect items and Pokemons, thus improving your skill levels and making you better in the game.
One of the essential items you can get is Stardust, which will help you become the best trainer in the Pokemon Go industry. If you’re new to the game and are wondering what the importance of Stardust is in Pokemon Go, read ahead. We’ll teach you all about it and present methods to collect this item faster.
Part 1. What Is Stardust in Pokemon Go?
Stardust is a consumable item that allows you to strengthen your Pokemon. This item will help you reach the maximum of your Pokemon, making them more resilient and ready for potential fights. Moreover, Stardust is essential for trading – you must have a specific Stardust level to trade your valuables with another trainer.
Part 2. How Is Stardust Used in Pokemon Go?
Stardust can come in handy in several different scenarios in the Pokemon Go game. We’ll present all the use cases below to help you navigate your journey and learn the importance of collecting Stardust.
- Power up– the most crucial feature of Stardust is that it can power up your Pokemon to its maximum CP. It’s ideal for PVP games, and you’ll get the most out of your experience with this consumable.
- Trading– Stardust is essential for trading, and the amount of the item you need will depend on the Pokemon and the friendship level with the trader.
- Second Charged Attack– you can unlock the second charged attack if you have a couple of them up your sleeve.
- Purification – this consumable is used to purify the Shadow Pokemon left by Team Go Rocket.
- Changing the form– you can use Stardust to change the form of your Pokemon character.
As you can see, Stardust is crucial for numerous gameplay experiences, so you should check out the guide below to learn how to collect these consumables.

Part 3. Best Ways to Get Stardust in Pokemon Go
Since having Stardust is crucial for your Pokemon Go experience, you may be looking for the best ways to accumulate as many consumables as possible. We’ll present a couple of ways to reach your goals below.
Through Pvp Rewards
One of the best ways to earn Stardust is through Player versus Player features. When you’re playing with other users, you can earn Stardust based on the number of your previous wins, your game level, and the PVP outcome.
For instance, if you’re a Rank 2, you can earn around 2,000 Stardust points by winning a battle, and if you’re Rank 24, the number increases to about 200,000. You can also use a Star Piece to multiply your winnings by 1.5.
Another method is to play with your friends, and the Stardust points can vary from 300 to 1000, depending on your opponent’s rank.

By Opening Gifts
Opening gifts is one of the main components of the Pokemon Go experience. You’ll get daily gifts you can open for free, earn valuable items, and support your gameplay. Each gift can carry a certain amount of Stardust particles, so you don’t have to do anything to accumulate these items.
The maximum Stardust you can get in one gift is 300, which may not seem like a lot. However, if you open your gifts regularly, you’ll have the desired Stardust amount in no time. You should also combine this method with others mentioned in this article for the best experience.

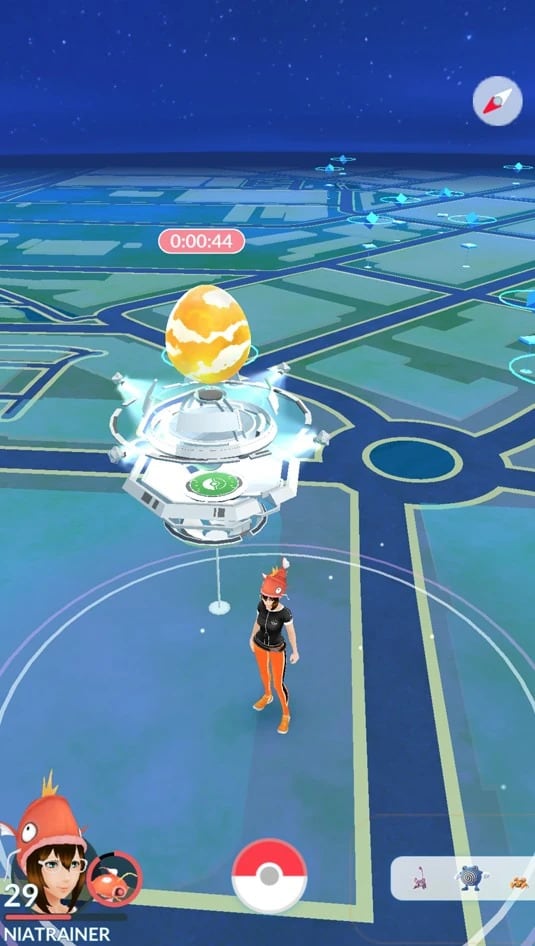
By Hatching Pokemon
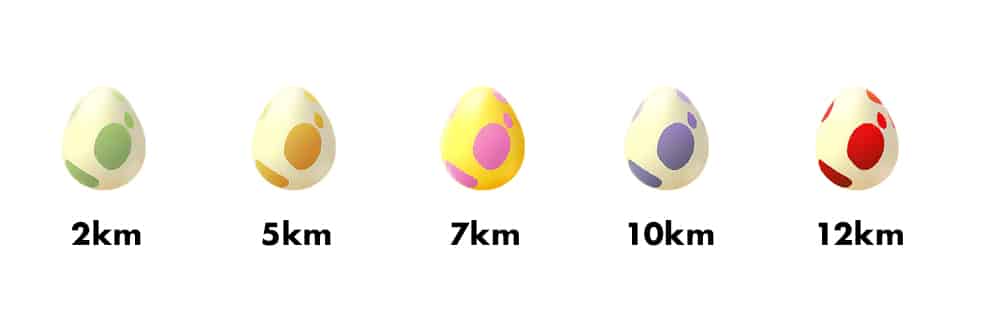
Hatching a Pokemon is also one of the essential parts of your Pokemon experience. Every time you hatch an egg, you’ll get Stardust points you can spend on numerous instances. The Stardust amount will depend on the egg itself; the higher the rank, the better the prices.
You can check out the list below to determine how much Stardust you’ll collect through your egg hatching:
- 400–800 Stardust for hatching a 2km egg;
- 600–1,600 Stardust for hatching a 5km egg;
- 800–1,600 Stardust for hatching a 7km egg;
- 1600–3200 Stardust for hatching a 10km egg;
- 3200–6400 Stardust for hatching a 12km egg.
You can also use the Star Piece item to multiply the Stardust amount by 1.5.
By Catching Pokemon
Catching Pokemon is one of the most efficient ways of earning Stardust points. Each Pokemon has a base rate of 100 Stardust points, but you can earn more points depending on the Pokemon’s evolution stage. For instance, if the Pokemon is in the second stage, you’ll earn an additional 500 Stardust points.
Another thing you should look out for is specific Pokemon characters – some may carry more than 100 Stardust points as their base. For instance, you can get a whopping 2,100 Stardust points if you catch Audino, 950 for Garbodor, 1,000 for Chimecho, etc.
If you stay consistent and catch at least one Pokemon daily, you can get up to 9,000 Stardust points on the seventh day. Moreover, the first catch of the day will bring you an additional 1,800 points.

By Claiming Raid Rewards
When the Boss enters your Gym, you may think it’s a stressful scenario. However, you should consider the bright side and fight to earn valuable rewards, such as Stardust points.
Once you and your team defeat the Boss, you can collect the prizes. You’ll win 1,000 Stardust points each time a Boss enters, even if it leaves the Gym without a fight.
If you defeat the boss, you’ll also get a chance to catch the Pokemon, which can bring you even more Stardust points!
By Getting Rocket Rewards
Rocket rewards are sets of items you get after fighting the Team Go Rocket. Each time you beat this criminal group, you’ll be rewarded with either 500 or 1,000 Stardust points, depending on whether you were fighting Grunt or Team Go Leader.
Additionally, if you ever face Giovanni, you’ll get 5,000 points for fighting and beating him.

By Earning Research Rewards Through Completed Tasks
Each player will get their daily to-do list depending on their skill and game level. Once you enter the app, you can complete these daily tasks for Stardust points.
The amount of points you will win depends on the task’s difficulty and duration. However, you should complete all the daily tasks to accumulate as many consumables as possible.
For instance, if you’re on level 45, you can head to the Go Battle League 45 times to earn 4,500 Stardust points.

By Visiting the Gym
While on your daily walk in the Pokemon world, you should check out whether you can find some Gyms around you. If you do, stop by to hang around with some of the most precious Pokemon characters and give them a berry while you’re there.
You’ll earn 20 Stardust points for each berry you give a Pokemon. It may be the easiest way to earn and use these points for your experience. Plus, you’ll meet new characters and fully experience what the Pokemon world offers.

Claim Stardust Quickly in Pokemon Go by Using Location Spoofing
If you live in a rural area and don’t get too many chances to walk around and catch Pokemon characters, you can use a classic trick of location spoofing. It will allow you to change your virtual location and wander the streets of another city to discover more Pokemon opportunities.
However, you’ll need a reliable tool to realize your Pokemon goals. One of the best options is Wondershare Dr. Fone, which provides a Virtual Location feature suitable for this quest. Aside from the obvious, you can use this application to manage your smartphone, recover data, and improve your overall smartphone experience.
Virtual Location will allow you to head to any city in the world, collect the rarest Pokemon characters, and earn the most Stardust points possible. Thus, download Dr. Fone Virtual Location from an official source, connect your phone, and follow the steps below to learn how to enable Virtual Location:
- Open Dr. Fone Virtual Location and select the mode in the top right corner (One-Stop, Multistop, or Joystick Route).
- Set the desired parameters.

- Click the Start Movingor Move Here
- You can also click on the Joystick feature to control your movements.
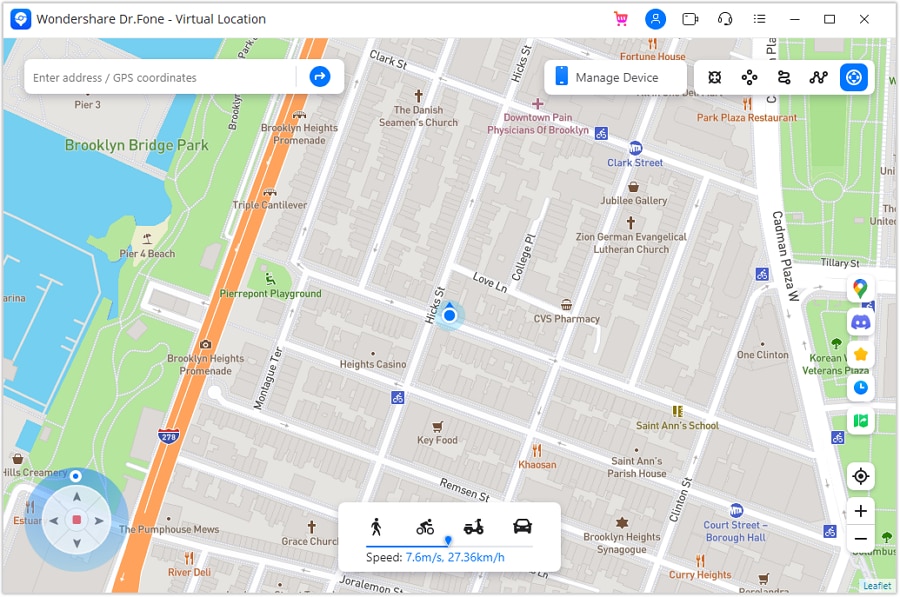
Once you turn the virtual location on, you’ll become an unbeatable Pokemon Go player.
Pokemon Go may be one of the most engaging games in the world. It requires you to move, complete tasks, catch Pokemon figures, and face numerous challenges daily, which is why it’s so popular in the gaming industry.
One of the features that contributes the most to your growth is Stardust, a consumable able to make your Pokemon dreams come to life.
If you’re searching for ways to collect these items as quickly as possible and gain incredible power, check out the guide below. We’ve discussed all the options you can try to obtain Stardust points, including changing your virtual location to get the most out of your journey.
Also read:
- [New] Immersive Worlds Unveiled Delving Into MR, AR, and VR's Distinctions
- Effortlessly Elevate Your AI Experience: Free, Powerful and Smart with GPT-4 & Copilot
- Free Methods to Change or Edit MXF File Format: A Comprehensive Guide
- How to Come up With the Best Pokemon Team On Apple iPhone 6 Plus? | Dr.fone
- In 2024, 15 Best Strongest Pokémon To Use in Pokémon GO PvP Leagues For Apple iPhone 6 | Dr.fone
- In 2024, Additional Tips About Sinnoh Stone For Apple iPhone XS Max | Dr.fone
- In 2024, Crafting Compelling Spotify Campaigns A Compreran Guide
- In 2024, How to Fix Pokemon Go Route Not Working On Apple iPhone X? | Dr.fone
- In 2024, Latest way to get Shiny Meltan Box in Pokémon Go Mystery Box On Apple iPhone 11 Pro | Dr.fone
- In 2024, The Most Useful Tips for Pokemon Go Ultra League On Apple iPhone 12 | Dr.fone
- Insights on the Affordable Yet Stunning Performance of the Samsung Galaxy S1amobile=android&platform=ios>S10e
- New In 2024, Switch It Up The Best Face Swap Apps for iPhone and Android Users
- Reasons why Pokémon GPS does not Work On Apple iPhone X? | Dr.fone
- The Ultimate Tutorial: Who's Been Bookmarking Your IG Posts?
- Top 15 Editores De Vídeo Mais Confiáveis E Inovadores Em 2024 - O Guia Ultimato
- Title: A Comprehensive Guide to Mastering iPogo for Pokémon GO On Apple iPhone XS | Dr.fone
- Author: Iris
- Created at : 2024-12-01 19:58:51
- Updated at : 2024-12-03 02:25:21
- Link: https://ios-pokemon-go.techidaily.com/a-comprehensive-guide-to-mastering-ipogo-for-pokemon-go-on-apple-iphone-xs-drfone-by-drfone-virtual-ios/
- License: This work is licensed under CC BY-NC-SA 4.0.