
Additional Tips About Sinnoh Stone For Apple iPhone 12 | Dr.fone
Additional Tips About Sinnoh Stone For Apple iPhone 12
Sinnoh Stones are similar to other evolutionary items found in Pokemon Go, like Metal Coat, Dragon Scale, and Sun Stones. Pokemon Go’s Sinnoh Stone is a rare evolution item enabling you to upgrade existing creatures into Gen 4 versions. It is extremely exciting to see your favorite Pokemon’s being upgraded, also making the best Pokemons of the game more powerful. The Pokemon Go Sinnoh Stone evolution list is also provided in the guide, which contains 18 Sinnoh Stone Evolutions.
Part 1: Understanding the idea of Pokemon Go Sinnoh Stone
The Sinnoh Stone is a new evolution item, and all eighteen-4th generation Pokémon’s require Sinnoh Stones for their evolution. It also allows Gen 1 and 2 Pokémon’s to evolve into Gen 4 evolution stages. The Sinnoh Stones items are used for all cross-generation evolutions. Below is the listing of Pokémon’s, which evolve using a Sinnoh Stone.

| Pokemon | Evolves |
|---|---|
| Misdreavus | Mismagius |
| Gligar | Gliscor |
| Yanma | Yanmega |
| Electabuzz | Electivire |
| Magmar | Magmortar |
| Porygon2 | Porygon-Z |
| Roselia | Roserade |
| Togetic | Togekiss |
| Tangela | Tangrowth |
| Sneasel | Weavile |
| Murkrow | Honchkrow |
| Dusclops | Dusknoir |
| Snorunt | Froslass |
| Rhydon | Rhyperior |
| Lickitung | Lickilicky |
| Aipom | Ambipom |
| Swinub | Mamoswine |
| Kirlia | Gallade |
Part 2: Obtaining Sinnoh Stones to Level Up
Sinnoh Stone can be obtained during the battle against the three leaders on Community Day, on the completion of the final day of your 7-day Research Task, and During PVP. You won’t be finding them at Poke Stops. Main places where you can find Sinnoh Stones are on the 7th Day of your Research Task and award for taking part in PVP. Another place that is not popular but odds to find Sinnoh Stone is present includes the introduction to PVP when you’re new to it. Players can obtain up to 10 Sinnoh Stones during the February Community Day and when the month is Pokemon Go Community Day. 5 Sinnoh Stones can be obtained by beating the three leaders in the battles and another 5 from winning PVP battles against friends. Defeating a Team Go Rocket Leader and Go Battle Reward is Sinnoh Stone.

You can use Dr. Fone’s Virtual Location to mock your location without any movement and obtain these Sinnoh Stones. Dr.Fone’s virtual location allows you to mock your location and lets the application on your phone think that you’re at a place selected in Dr.Fone’s application interface without resulting in any ban or detection from Pokemon Go developers. You can follow the steps listed below in order to catch Pokemon by one click to go anywhere without moving.
Step 1: Mocking Location Quirk:
Pokemon Go can be played by using the toolkit of Dr. Fone without shifting. Open the Virtual Location feature using a functioning lightning cable to mock the location and ensure that the iOS device is linked to the application.

You can press the Get Started” button to start the process upon phone detection.

Step 2: Imitating Movement between steps:
Open the first choice located in the top-right corner until you enter Dr.Fone’s GUI, which helps you to fake movement between the two locations. Select the location pin found in the search bar and press the “Move Here” button.

You want to make a motion, and navigate to the “March” button to start the simulation, enter the magnitude of times. By default, the movement is set to one, but the user can override it, and the application will move accordingly.

For the Pokemon Go application, the new position will appear as real and will presume that you are walking between the two selected locations you have selected on the Dr. Fone screen. The walking pace can also be changed at the bottom of the screen using the sliding menu. This way, without knowing it, you can use the fake movement of the desired position, and your application will not be prohibited.


Step 3: Movement Simulation between more than two spots:
The application by Dr.Fone also helps you to mock movement between more than two spots. The function is named after the multi-stop route that can be selected from the toolbox category gui found at the top-right corner, which lets you drop different unique stops located on the map, and your location will behave accordingly as handled by Dr.Fone’s virtual location application.
Click the ‘March’ button to allow the system to simulate motion by selecting the correct options. You’ll have to do the Pokémon Go walking trick at some point. The virtual motion simulation software for Dr. Fone makes your life easier and helps you to do the job without thinking about travel costs.

Part 3: Essential Requirement and Evolving Pokémon’s Using Sinnoh Stone
Only the trainers above the 10th Level have access to acquire Sinnoh Stone. The Sinnoh Stone can be obtained from Training Battles and Training with Team Leaders. You also need 100 candies for each of the Pokemon. Once you have got your hands on Sinnoh Stones and now you want to know where they should be used, there’s numerous 4th generation Pokémon who require Sinnoh Stone for their upgrade. Mamoswine is one of the best if you’re prioritizing attackers for a raid because it has a mix of extremely high CP with the strong ground and ice-type moves.
Conclusion
Sinnoh Stone, a rare evolution item, is one of the Perks of Pokemon Go letting you evolve your favorite Pokemon and keep them throughout your journey in the game. Dr.Fone’s virtual application lets you find them with ease without any real movement on your part and helps you enjoy the game to the fullest.
How does the stardust trade cost In pokemon go On Apple iPhone 12?
Pokemon go has been around for a while now and has arisen as one of the most talked-about games in the gaming community. The fact that it is a location-based game and needs you to move around while playing the game makes it further interesting. Trading in Pokemon go is one of the most talked-about features. Today, we will help you explore more about stardust trade costs and how can you easily perform trades! Hang on as we dwell deeper into Pokemon go and trade stardust costs.
Part 1: How does Pokemon trading work?
So as we’ve discussed earlier, Pokemon go trading is one of the most interesting features of the game. So how does this trading work? In Pokemon Go, you can trade pokemon possessed by you with those possessed by your friends if both you and your friend, decide to mutually trade the pokemon with each other! For trading in Pokemon go, there are certain criteria you need to satisfy to qualify for trading in Pokemon go! Given below are the requirements to qualify for trading in Pokemon go
- Be at least level 10
- Be friends with the person you’re trading on Pokemon go
- Be in a radius of 100 m while you’re trading
However, Pokemon go also has levels of friendship and you can trade pokemon of different levels with friends with whom you have different friendship levels. Higher is the friendship level, higher is the level of Pokemon which you can trade. every trade requires you and your partner to spend stardust points. So There are basically 4 levels of friendship in Pokemon go
- Friend
- Good friend
- Ultra friend
- Best friend
The levels of your friendship with a player on Pokemon go increase with the increase in the number of days you stay friends with them. Within a month of friendship, you can become best friends with a player on Pokemon go! You also need stardust points on Pokemon go. So what is stardust trade cost? Before you trade any pokemon you must spend stardust coins. Not having enough stardust trade coins will not allow the trade of pokemon to happen. Hence, you must have enough stardust trade costs.
Part 2: How much stardust do you need in pokemon trading costs?
Trading in Pokemon go is quite complex. This is because the needed Stardust points will be different in every case and will depend on several factors. Factors such as whether you already half got that Pokemon in your pokedesk or not, the friendship level of you and your friend who are interested in trading, or whether the Pokemon is rare or common. Given below are the Stardust trade costs for each Pokemon.
Standard trades
- Good friend:100
- Great friends:80
- Ultra Friends: 8
- Best friend: 4
Shiny or legendary (caught by you)
- Good Friend: 20,000
- Great Friend: 16,000
- Ultra Friend: 1,600
- Best Friend: 800
Shiny or Legendary (not caught by you)
- Good Friend: 1,000,000
- Great Friend: 800,000
- Ultra Friend: 80,000
- Best Friend: 40,000
However, this Stardust trade cost may vary according to the friendship levels! Before trading, you must think of the friendship level between you and your friend and also if the Pokemon which has been traded can be evolved through trading. Evolving Pokemon through trading is another beneficial tactic that could benefit you as a player of Pokemon go.
Part 3: Ways to increase stardust in pokemon go?
1. Use Dr.Fone – Virtual Location (iOS/Android)
Do you want to increase your Stardust trade cost in Pokemon go? There is no better way for doing so other than using Dr.Fone - Virtual location (iOS/Android) . Using this will easily help you to catch more Pokemon, as you can fake your location using this app. You can change your location to any given location on the map and catch Pokemons from different regions without having to move around. Doesn’t it sound fun? Catching the rarest Pokemon all by sitting at home!
Teleport to anywhere in the world
Step 1: Firstly, you need to install Dr.Fone- Virtual location (iOS/Android) on your computer(Win/Mac). Then, install and launch the program on your computer. Click on “Virtual Location” from the options on the main interface.
Step 2: Now, you need to connect your Apple iPhone 12 to the PC and click on “Get Started”.
Step 3: A new window would now pop up where you can see your current location. If you are unable to see your current location, then click on “center on” icon at the bottom. Doing so will lead you to show your location on the map.

Step 4: Now click on “Teleport mode” using the button on the top right corner of the window. Enter the place you want your location to be set to and then click on “Go”. Once done the click on “Move Here”. Well, that’s it! We’re done with changing our location to the desired location!

2. Exchange the gift with friends to level up a friendship
Pokemon go also allows you to send gifts to your game friends and receive gifts from your game friends. Well, this can help both of you grow and progress in the game and can be a helpful trick to increase Stardust!
3. Play the game as much as you can
Investing more and more time on the game will lead you to catching more pokemons which will, in turn, lead to getting more stardust! Hence play it regularly with continuity!
Conclusion
Well, the article did give us a lot of idea about stardust trade cost and how to increase Stardust trade points in Pokemon go. We dwelled more into major facts about the game and learned a lot about it. We also explored what is drfone-Virtual location (iOS) and how it can help you to teleport from one place to another! Using the app will help you a lot in improving the game and wouldn’t require you to do much! All you’ve to do is teleport from one place to another, catch more and more pokemons and get more stardust! As a player, it shall improve your stats by a huge margin!
4 solution to get rid of pokemon fail to detect location On Apple iPhone 12
Pokémon go failed to detect location is an error that is frequently faced by the players and there are several reasons for it. From device to server-based all the reasons amount to the error and therefore the right solution must be applied to get the work done with ease and perfection. The location-based attribute of the game is something that has been one of the best features. It is the sole reason for which the game is not only popular but also one of the most downloaded games of all time. It is therefore important to overcome fail to detect location error in this game.
Part 1: Why does Pokémon fail to detect location?
The two main and frequent errors that are related to the Pokémon are error 11 and error 12. These not only frustrate the users but also hamper the game experience. Failed to detect location Pokémon go is the result. This part of the article will make sure that you get all the information that is needed to overcome the issue. The GPS joystick failed to detect location error will also be overcome and you will also be able to guide others.
Causes of Error 11
- If the game failed to detect location Pokémon go fake GPS then the most common reason is the fact that the GPS has been disabled. The internet and GPS are the two important aspects of this game. If anyone is not available then it is a must that the game will not work at all.
- Once the game has been installed it requires certain permissions that should be granted for proper working. All the permissions must be accepted for the game to work fine. If the GPS access has not been granted then it should be so that the GPS joystick Pokémon go failed to detect location error is resolved and you can enjoy the game.
- To install some applications and to enhance the features of the phone it is at times rooted in the case of android or jailbroken in the case of iPhone. In both cases, you will get the Pokémon to go failed to detect location fake GPS error. It is therefore important that the issue is resolved by getting the Apple iPhone 12 device back to its original shape. It can be done by unrooting the Apple iPhone 12 devices so that the issue is resolved.
Causes of Error 12
- The Mock location on the Apple iPhone 12 device is enabled can lead to failed to detect location GPS joystick or error 12 on the Apple iPhone 12 device. It is therefore advised to make sure that the location in question is disabled to get the gaming experience back on track.
- The other and the most common reason for the error 12 is the fact that the GPS signals are not received by the Apple iPhone 12 device. It also leads to Pokémon failed to detect location error and will make sure that you get all the enjoyment for which the game has been downloaded.
Part 2: 3 solutions to fix Pokémon fails to detect the location
Solution 1: Turn on GPS
This is the most common method that can be applied to make sure that the game works perfectly.
i. Drag the notification panel down on your device.
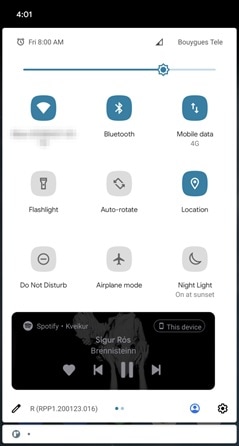
ii. Click on the location to turn it ON.

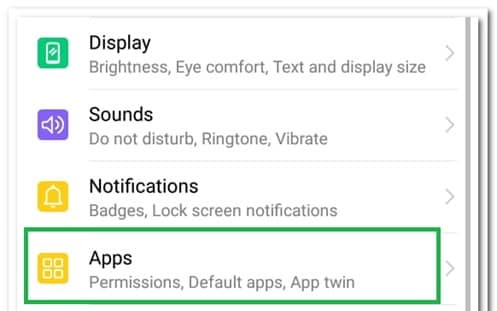
Solution 2: Setting Permissions for the application
If the right permissions are not given to the application then it can also lead to the fake GPS failed to detect location. To make sure that this is overcome you need to follow the steps as under.
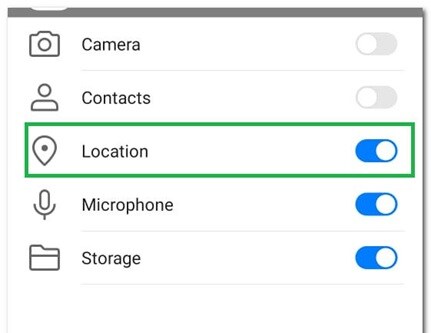
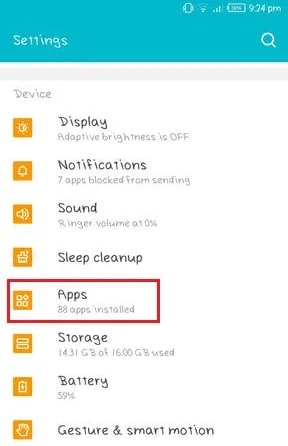
i. Go to Settings > Applications > Apps to access the permissions for the application.
ii. Go to Pokémon Go > Permissions > Turn on location to get the issue resolved.
Solution 3: Clear Cache
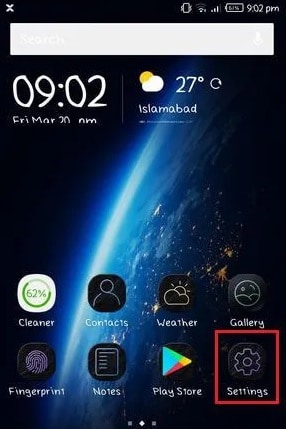
i. Go to the Settings of your device
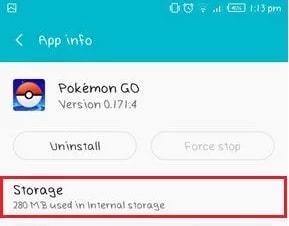
ii. Click on the app’s icon on the next screen
iii. Click on the storage option.
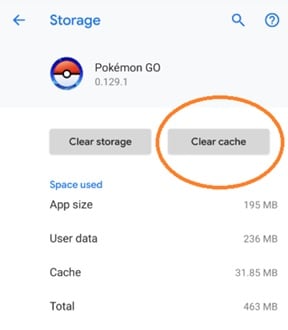
iv. Clear data and cache and restart the Apple iPhone 12 device to get the issue fixed.
Part 3: Dr.Fone Virtual location change your location in one click
To fix the fake GPS Pokémon go failed to detect location Dr. Fone’s virtual location is the best and the state of the art program that can be used. It is not only the best but also allows the users to overcome the issues that are presented by the other similar programs. With this program, it is easy to make sure that the overall game performance improves in terms of location detection. You can teleport with ease using this program. With an intuitive interface and a professional team backing the program, you get the ultimate results. Not only Pokémon but all the location-based and AR games this program is a boon.
How to use Dr. Fone Virtual Location
Step 1: Program Installation
First of all download and install the program to get started.
Step 2: Enable Virtual Location
Click the get started icon once the iPhone has been connected to the system and the virtual location has been enabled.
Step 3: Locate the Apple iPhone 12 device
Click the center on a button to make sure that your location is detected by the program.
Step 4: Change Location
The third icon on the upper right corner is to be pressed to teleport. In the bar type the name of the location you want to teleport to.

Step 5: Move to a teleported location
Click on move here to get to the location that has been selected.
Step 6: Validation
Your iPhone will show the same location as on the program and this finishes the process.

Conclusion
Dr. Fone’s virtual location is the best and the most advanced program that will make sure that you get the best results. It will not only enhance your gaming experience but will also remove the Pokémon go GPS joystick that failed to detect location error with perfection. It is the best program that is easy to use and there are guides online that further foster the process. With this program, it is easy to get a step ahead for all AR and location-based games and to enjoy to your fullest.
Also read:
- [Updated] 2024 Approved How to Do Screen Recording on iPad?
- [Updated] 2024 Approved Live Streaming & Video Editing with VLC
- [Updated] In 2024, Create Effective YouTube Advertisements on a Budget
- 1. ManyCam: Cutting-Edge Live Streaming and Virtual Camera App
- 15 Best Strongest Pokémon To Use in Pokémon GO PvP Leagues For Apple iPhone 6s | Dr.fone
- 2024 Approved FunnyFaces Forum Jokeye Imagez
- CatchEmAll Celebrate National Pokémon Day with Virtual Location On Nubia Z50S Pro | Dr.fone
- In 2024, 4 solution to get rid of pokemon fail to detect location On Apple iPhone 15 Pro | Dr.fone
- In 2024, Bypass iCloud Activation Lock with IMEI Code On your Apple iPhone 6 Plus
- In 2024, How and Where to Find a Shiny Stone Pokémon For Apple iPhone 13 Pro Max? | Dr.fone
- In 2024, How PGSharp Save You from Ban While Spoofing Pokemon Go On Apple iPhone 6 Plus? | Dr.fone
- In 2024, How to Come up With the Best Pokemon Team On Apple iPhone 12 Pro Max? | Dr.fone
- In 2024, Screen Saving Snapchat Memories on Phone
- In 2024, The Magnificent Art of Pokemon Go Streaming On Apple iPhone 13 Pro? | Dr.fone
- In 2024, Ultimate guide to get the meltan box pokemon go For Apple iPhone 6s | Dr.fone
- In 2024, Unova Stone Pokémon Go Evolution List and How Catch Them For Apple iPhone 6s Plus | Dr.fone
- Revenue Revolution Unlocking the Potential of Your YouTube Channel on Mobile for 2024
- Undelete lost photos from C210.
- Why does the pokemon go battle league not available On Apple iPhone 7 | Dr.fone
- Title: Additional Tips About Sinnoh Stone For Apple iPhone 12 | Dr.fone
- Author: Iris
- Created at : 2024-11-26 17:59:34
- Updated at : 2024-12-03 03:18:50
- Link: https://ios-pokemon-go.techidaily.com/additional-tips-about-sinnoh-stone-for-apple-iphone-12-drfone-by-drfone-virtual-ios/
- License: This work is licensed under CC BY-NC-SA 4.0.