
Can I use iTools gpx file to catch the rare Pokemon On Apple iPhone 14 Pro | Dr.fone
Can I use iTools gpx file to catch the rare Pokemon On Apple iPhone 14 Pro
Pokemon continues to be an after-sought mobile gaming app. The iTool gpx completes the game. This tool is dully smart, letting you catch Pokemon without much hassle. iTools is a replacement for iTunes which you can now use to manage your iDevice and computer. Its simplicity makes it a walk-in-the-park as you try to catch Pokemon. It will save your computer battery life and also save you from complex background operations.
It will inform you when a pokestop arrives without the need to even use your phone. More so, simply connect the Apple iPhone 14 Pro device to your phone via Bluetooth technology and move along as you enjoy your game. The device will vibrate or blink, an indication that you need to get ready to catch a Pokemon. So yes, you can use iTool gpx file to catch rare Pokemon.
Part 1:What can the gpx file do?
The gpx file is mainly used in software applications to transfer information about tracks and points from one application to another. These files are saved in ‘XML’ format, which makes it easy to import and read GPS data by several programs.
How to download gpx file on iOS and Android
On iOS
First, open the route that you are interested in, then select the ‘Export gpx’ option > ‘Export’ in the lower line. Next, choose whether to forward the gpx file via a provider or to copy and save it in your data.
On Android
Open the route you are interested in and hit the ‘More’ option. Next, select the ‘Export gps’ option and the file will be downloaded to your smartphone. You can forward the route to various providers by tapping the ‘Share’ button.
Why gpx Pokemon
Many games have thronged our screens but not many matches Pokemon. Once you download gpx to iTools mobile, you get real-life benefits from this hottest virtual game. As gpx files are a list of exact locations that form a route for cycling or walking, they direct the player. A player can, therefore, see their location regarding the route via GPS for surety.
Likewise, players are assured of being on the right trail when they use navigation apps with gpx files. And whey they get off track, they can redirect themselves to the path and continue gaming.
Part 2:Where to find the iTools gpx file
You have to import gpx file before opening it. The easiest way is to upload it to the web version of Google Maps. First, open and sign in to Google Maps then add a gpx file as a new map. Follow these steps.
- First, open the Google Maps menu and select ‘Your places’.
- Select ‘Maps’ > ‘Create map’.
- Select the ‘Import’ button after a new Google Maps window opens.
- Finally, upload your gpx file. You should see the map data in your file on Google Maps.
For you to use gpx file iTools, you first have to enable the virtual location on your device. It is from the virtual location where you can cycle and pin mode with teleport and joystick. More so, you can adjust the speed as desired. You just need to choose your favorite location and get to playing. Import, export, and save the iTools gpx to continue from your last stop point.
Follow these steps to save the iTools gpx file and get gpx files from friends
With ThinkSky, you can add gpx file to iTools and fake your gps location. This app comes with plenty of functionalities to make every fake location appear real to your friends.
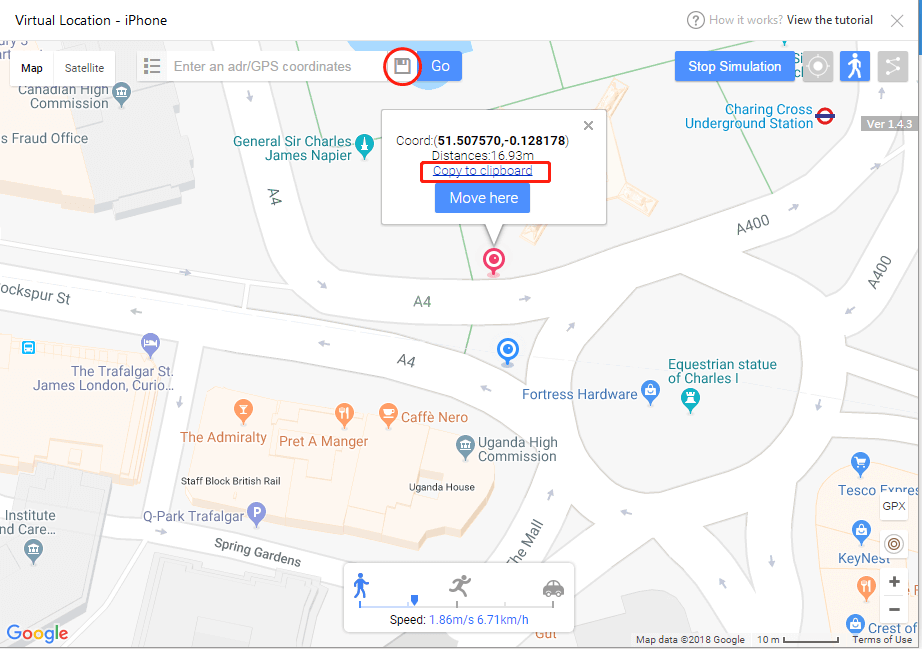
- First, determine and click on the point that you wish to fake.
- Next, copy the coordinates by clicking the ‘Copy to clipboard’ button.
- Then, confirm group name and click on the ‘Save’ icon. You’ll see it located besides the search bar.
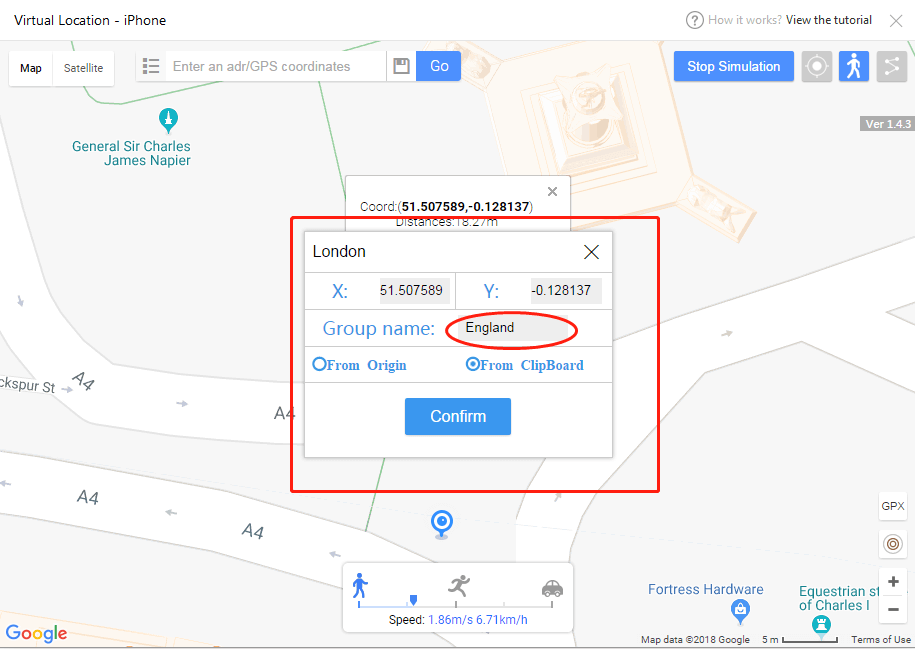
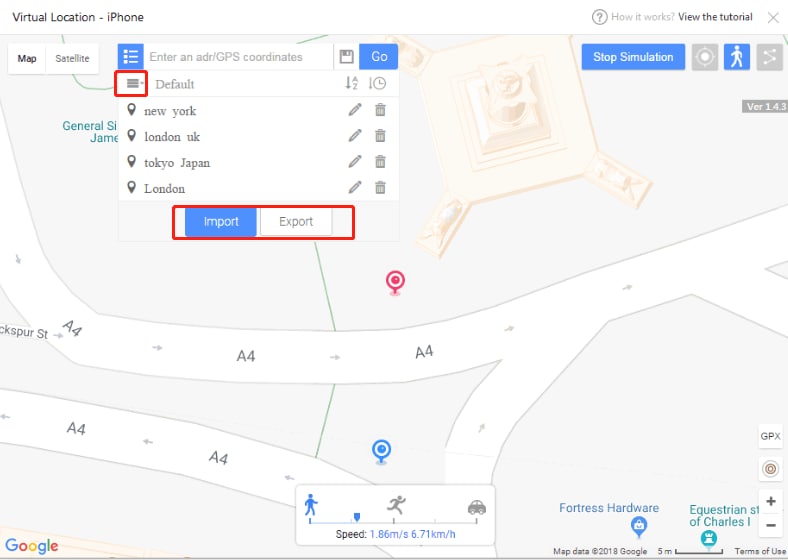
- Lastly, input the coordinates names and group name and then export your favorite location list.
Part 3:Is there any safer tool to spoof Pokemon with iTools file?
You can opt for other safer tools for route creator. Perhaps it is raining and you can’t step out. Or it is already late in the night. What do you do? Just fake it! Dr.Fone comes with advanced features to help you iSpoofer gpx routes and fake your locations in simple steps.
How to export and import gpx to save and share location with Dr.Fone
First, you need to download, install, and launch Dr. Fone – Virtual Location to your computer. Then click the ‘Virtual Location’ option and connect your Apple iPhone 14 Pro to the computer. Next, hit the ‘Get Started’ button. You’ll be redirected to a new window to find the actual location on your map. Please follow these steps to export and import gpx to save and share.

Step 1. Save the path as gpx.file
Dr. Fone virtual location supports saving customized routes. Click the ‘Export’ button once it pops-up.
Step 2. Import file
Next, import the shared gpx file into the app. You can download the gpx file from other websites or you can get it from friends. To import the file, go to the main screen of the app and check under the ‘Add-to-favorites’ icon then click the ‘Import’ button. Wait as the file is imported then click the ‘Save’ button after the process is completed.

You can also add your favorite iSpoofer gpx routes. To add any spot into your favorites, check for the five-star icon and click to add the route to favorites. You should see ‘Collection successfully’ after adding your favorites. This gpx route creator makes it easy to walk along your favorite routes. Click the ‘Move’ button and reach any place with a click of a button.

The Bottom Line
Being a first timer, you may find it very complicated to fake your gps location. But Pokemon map creator makes it easy. Dr. Fone virtual location works seamlessly with your iOS device to take you virtually to any place in the world, from the comfort of your living room.
Here’s Everything You Should Know About Pokemon Stops in Detail On Apple iPhone 14 Pro
If you are just starting with Pokemon Go, then you might see Pokemon stops all around you! Well, Pokemon Go stops are extremely essential in the game as they would help you collect items or even catch Pokemons. Therefore, in this post, I will let you know how to find Pokemon Go stops near me and would also discuss a solution to explore Pokemon stops in any other place.
Part 1: What are Pokemon Stops in Pokemon Go?
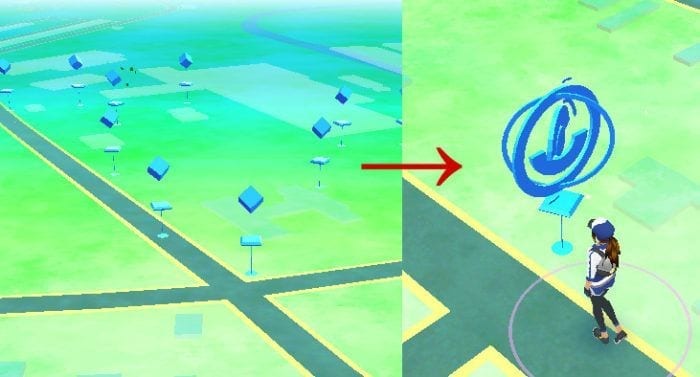
In nutshell, Pokemon Go stops are dedicated places in the Pokemon Go map that can be visited to collect valuable items. For instance, you can obtain eggs, Poke balls, potions, and other game-related items from a Pokemon Go stop near you. At times, even a Pokemon can be found roaming nearby a Pokemon Go stop.
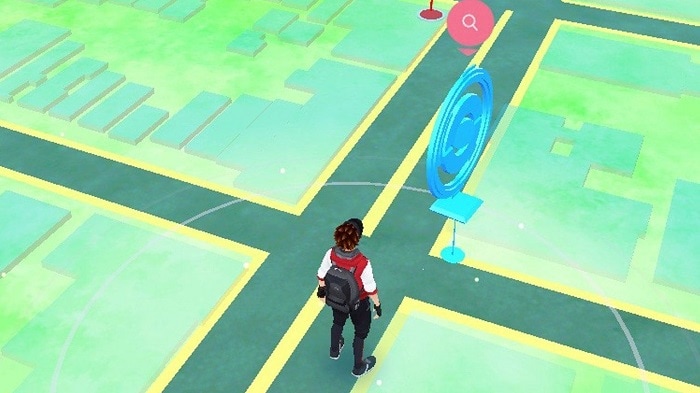
Mostly, Pokemon stops are located at important buildings, monuments, art installations, and other vital areas. On your map, you can see Pokemon stops near me depicted by a blue triangle icon. As you would approach the Pokemon stop, it will change to a disc icon and you can obtain various features by tapping on it in the game.
Part 2: How to use Lure Modules on Poke Stops in Pokemon Go?
Lure Module is a beneficial in-game item in Pokemon Go that can lure the nearby Pokemons to a Poke stop. Ideally, you can place a Lure Module at any Poke stop in Pokemon Go and it will be helpful to other players as well. As of now, the effect of a single Lure Module will last for 30 minutes, but you can install another module to prolong its effect.
These days, a lot of brands and businesses also place Lure Modules to create Pokemon Go sponsored stops that would attract players to a designated location. Here’s how I installed a Lure Module at Pokemon Go stops near me.
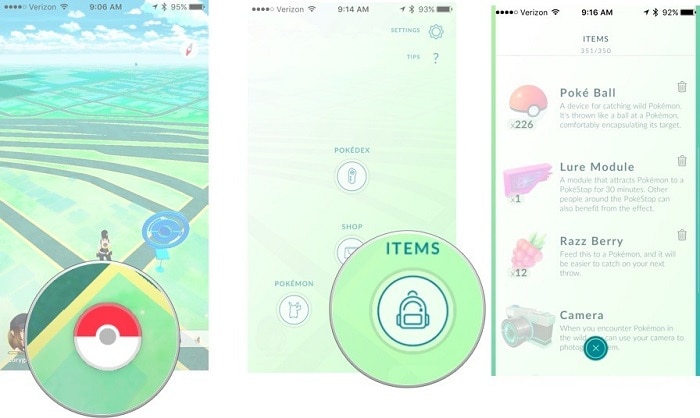
Step 1: Buy Lure Modules from the Pokemon Go Store
Before you install a Lure Module to a Pokemon stop, you need to purchase it on your account. For this, just launch Pokemon Go, tap on the Pokeball icon, and visit the “Items” store. From here, you can look for Lure Module and purchase any number of modules.
Step 2: Set up Lure Modules at Pokestops in Pokemon Go
Great! Once you have purchased Lure Modules, just step out and find Pokemon stops near me. After finding the Pokemon stop of your choice, tap on the disc icon to get more options. Now, tap on the Lure Module slot icon (white bar) at the top and go to the Pokemon Module feature.
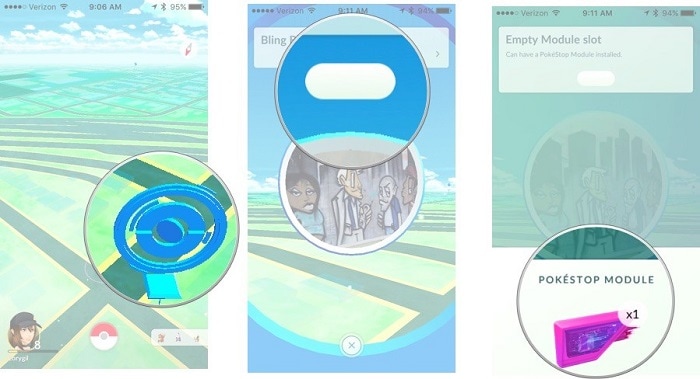
That’s it! You can now select Lure Module from the Pokemon Module options and simply place it at the designated Pokemon stop. The Pokemon Go stop’s icon would change with rose petals to attract the nearby Pokemons.
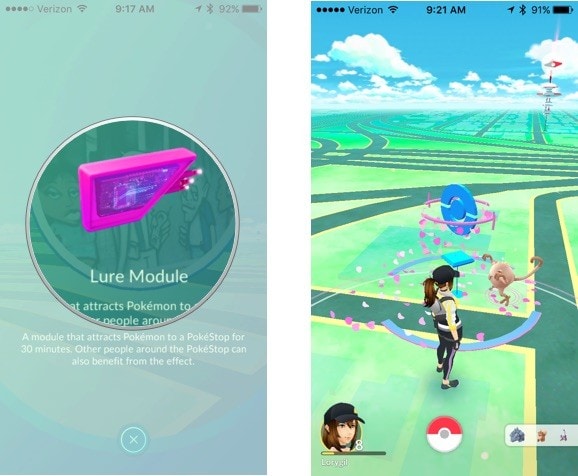
For the next 30 minutes, the nearby Pokemons will automatically come to the designated Pokemon Go stop. This will benefit you and any other trainer who would visit the Pokemon Go stop until the allocated time.
Part 3: How Can You Make Pokestops into Farming Spots in the Game?
With the help of Lure Modules and other techniques, players can make Pokemon Go stops into farming spots to catch more Pokemons. Ideally, you can also apply these suggestions that I followed to enhance Pokemon Go stops near me.
Explore Multiple Pokemon Go Stops nearby
You might already know that trainers with Level 38 or above can nominate places to become Pokemon Go stops. Therefore, you and your friends can also help create multiple Poke stops in Pokemon Go nearby.
In this way, you can simply explore multiple Pokemon Go stops by walking. In a single walk, this would let you replenish items in Pokemon Go and you might end up catching more Pokemons as well.
Use Lure Modules with Friends
Instead of solely using Lure Modules, you can go with your friends to catch Pokemons. For instance, you and your friends can install Lure Modules at the nearby Pokemon Go stops. This will automatically create a farming spot for that place, attracting all kinds of nearby Pokemons. Not only would this benefit you/your friends, but let other trainers to catch tons of new Pokemons easily.
Part 4: How to Explore Pokemon Go Stops Remotely (without Walking)?
While Pokemon Go is all about exploring and going out to find Pokemon and Pokestops, not everyone can step out or walk so much. In this case, you can use a dedicated tool like Dr.Fone – Virtual Location (iOS) that can spoof your Apple iPhone 14 Pro’s location to anywhere you want. You can simply change your location to any other spot where a Pokemon stop is located or even simulate your movement in the following way:
Step 1: Connect your Apple iPhone 14 Pro and Launch the Application
At first, just install the application, launch the Dr.Fone toolkit on your PC, and click on the “Virtual Location” module from its home.

Subsequently, also connect your Apple iPhone 14 Pro to the system using a working cable and trust the system. On the interface of Dr.Fone – Virtual Location (iOS), just agree to its terms, and click on the “Get Started” button.
Step 2: Enter the Details of the Target Location
Once your Apple iPhone 14 Pro is detected by the interface, its present location would be displayed with other details. To spoof the location of your Apple iPhone 14 Pro on Pokemon Go, you can click on the Teleport Mode icon from the top.

Now, you can go to the search options on the top-left side and enter the address or exact coordinates of the Pokestop. You can find the location of a Pokestop from several freely available online sources.

Step 3: Spoof your Apple iPhone 14 Pro Location to a Pokemon stop
As you would enter the location, the interface will automatically change to the designated spot. You can now move the pin around on the map and even zoom in/out to drop it at the exact spot. In the end, just click on the “Move Here” button to spoof your Apple iPhone 14 Pro’s location and visit the Pokemon stop virtually.

Besides that, you can also use the one-stop or multi-stop modes of the application to simulate your movement and visit the nearby Pokemon Go stops.
I’m sure that after reading this post, you would be able to know about Poke stops in Pokemon Go. I have included several tips that I implement to find Pokemon stops near me in this guide. Though, if you want to catch more Pokemons via Pokemon Go stops, then you can simply use Lure Modules. Apart from that, you can also use a dedicated location spoofer like Dr.Fone – Virtual Location (iOS) to visit Pokemon stops anywhere in the world and replenish unlimited items without any trouble.
Why is iPogo not working On Apple iPhone 14 Pro? Fixed
The popular iPogo app is one of the best free apps you can use to spoof on your device while playing Pokémon Go. It is equipped with an abundance of features that allows players to get way ahead in the game by spotting spawns early, catching gym raids, discovering nests and quest events, and so on. If you spot a Pokémon which is way too far from your location, you can use iPogo to fake your virtual coordinates and trick Pokémon Go to think you are nearby that area. Sounds like an amazing app to use right? But, there is a downside to it too as users of the app have repeatedly reported of iPogo not working. The app seems to overload and malfunction after a few hours of repeated usage. This issue is preventing users from harnessing the full potential of their gaming experience.
Why Users download iPogo?
iPogo is a free to use Pokémon Go++ mod which can be downloaded as an APK file for your iOS devices. It features tools that can be used by players to play the game virtually anywhere in the world while also enhancing the gameplay experience. Few of these exclusive features have been mentioned in the list below;
- The Spin and Auto-cash feature can be used to capture Pokémon and throw a spinning ball without requiring a physical device.
- With just one click you can manage your collection of stored items. It removes the cumbersome ordeal of the game to manually select and delete items when you can erase all un-required items with just one tap.
- If you are on the hunt for special shiny Pokémon, you can do so without having to go through dozens of non-shiny one’s. On activating the Auto-Runaway feature on your iPogo, you can skip through the time consuming animations of all non-shiny Pokémon.
- You can augment the game to let your avatar walk continuously at a desired pace. The speed of your avatar’s movement can be adjusted using iPogo.
- If there are unnecessary elements crowding up your screen, you can hide them temporarily.
- You keep track of Pokémon spawns, quests and raids using the feed on your iPogo.
With all these amazing benefits at hand, it seems almost unfair to not be able to make the best of it if iPogo keeps crashing or stops working. Let’s look into the probable reasons why your iPogo is not working and explore methods to solve this dilemma.
Part 1: Common problem that iPogo is not working
Pokémon Go players have made several reports of how iPogo is not functioning normally on their devices. For instance, while using the Plus mod on Pokémon Go, the Apple iPhone 14 Pro device screen goes completely black and unresponsive making the game inaccessible. Also, devices that run Pokémon Go with iPogo seems to be running slower than those which do not use any helper or spoofing support.
Even if your device is able to withstand the load of using iPogo, it may still be possible to face other app related performance issues like ipogo enhanced-throw not working, ipogo joystick not working and ipogo feeds not working either. All these symptoms sums up the fact that the iPogo app is faltering on your device.
Read on to understand the reasons why your device is unable to run the iPogo mod smoothly;
- One of the root causes which explains why iPogo is crashing could be because you are utilizing too much of your phone’s system resource capacity. This means you have too many tabs or other applications opened on your device that is making the resource distribution falter leading to an automatic shutdown.
- Another plausible reason could be that your iPogo application has not been properly installed. It is widely agreed upon that iPogo is a difficult app to install as it involves going through complex steps making it easier for mistakes to be made, eventually leading to a complete breakdown of the software.
- Since installing iPogo is a cumbersome process, players would often resort to using downloading hacks to get the job done faster. However, not all such hacks can be relied upon as they may end up jail breaking your device or make your version of the app even more unstable.
Some Easy Solutions for fixing the “iPogo not working” issue
It is often said that short cuts can cut you short or in this case, hacked! Disrupting the framework of your device is not price you should pay for enjoying the game at its best. Although, there are other safer and more reliable solutions to making the iPogo app run better on your iOS device. Let’s take a brief peak at some of them.
- Limiting the usage of System Resources: Let’s keep in mind that it is unwise to keep too much on your plate and rightfully so. In this case, the more applications you keep active on your shortcut bar, the lesser resources your CPU has left to allocate to the iPogo app. Therefore, close off all other unnecessary applications before launching iPogo as it is already a heavy enough application to run on its own.
- Too many Items opened: Keep a tight check on your list of inventory while playing Pokémon Go using iPogo. Remember to delete all un-required collected items as it may be taking up too much space and wasting precious system resources.
- Keep you Device Clean: Not essentially in the literal sense but yes, it is indeed important to clean up your device often. Use a cleaner app that deletes and clears all those extra cache files that becomes the primary reason of system lag on your iOS device.
- Install the Official Version: It may be tempting for anyone to install the app using shortcut hacks, but that’s all they are – just hacks! Installing iPogo seem like the long way but it is the right way on all accounts. There are three methods you can use to integrate the official iPogo app, all of which has been made more simplified.
Method 1: Use the three-step app installation method which is direct and free to use.
Method 2: If you are opting for a matrix installation, in which case you will need a PC installed with either Windows, LINUX or MacOS.
Method 3: The Signulous method is a premium mod that gives the player access to additional features.
Note: All of these installation methods have specific varied requirements which must be checked appropriately.
Part 2: A better alternative for iPogo - virtual location
If using the iPogo mod to enhance your gaming experience on Pokémon Go seem less appealing with all the added hassle then there is a better alternative for you to use. You can employ a much simpler and easier to install GPS mocking application like Wondershare’s Dr.Fone Virtual Location . It offers amazing user-friendly features like speed modulation, joystick control and map routing with none of the drawbacks that you had to previously overcome. It is a highly efficient virtual location tool that can be used to conveniently spoof your location without running the risk of detection on a GPS based game like Pokémon Go.
Primary Features of Dr. Fone
- Adjust the speed of travel with three speed modes, like walking, cycling or even driving.
- Manually move your GPS on the map freely using a virtual joystick in a 360 degree direction.
- Simulate your avatar’s movements to travel on a determined route of your choice.
Step by Step Tutorial
You can follow these easy steps to teleport to anywhere in the world with the help of drfone Virtual Location.
Step 1: Run the Program
Begin with downloading Dr.Fone – Virtual Location (iOS) on your PC. Then, install and launch it. To proceed, make sure to choose “Virtual Location” tab given on the main screen.
Step 2: Plug iPhone
Now, grab your Apple iPhone 14 Pro and get it connected with the PC using the lightening cable. Once done, hit on “Get Started” to begin spoofing.
Step 3: Check Location
You will notice a map on the screen now. As it comes, you got to click on ‘Centre On’ to accurately pin point the GPS to your location.
Step 4: Enable Teleport Mode
Now, you are required to turn on the ‘teleport mode’. To do this, simply click on the first icon on the upper right hand corner. After that, enter the location you want on the upper right field and then hit ‘Go’.
Step 5: Start Teleporting
Once you enter the location, a pop-up will appear. Here, you can see the distance of the location you have chosen. Click on ‘Move here’ in the pop up box and you are good to go.
Now, the location is changed. You can now open any location based app on your Apple iPhone 14 Pro and check the location. It will show the location you have selected.
Conclusion
Pokémon Go Plus mods like iPogo involves a certain degree of care in order to have a healthy game experience. Be sure to take pre-emptive measures suggested in this article and you would notice your device running smoothly in no time.
Also read:
- [New] Culinary Crescendo High-Impact Food Network Monikers
- [New] In 2024, Unlocking Access to High-Definition Facebook Videos
- [New] The Significance of GoPro's Burst Sequencing Feature
- [Updated] Navigating TikTok to Twitter
- [Updated] Streamlining Content Across Platforms YouTube & IGTV
- Acer Predator Triton 300 SE Explored: Where Performance and Portability Collide
- Expert Advice on Diagnosing and Resolving Issues with the Realtek RTL87#3B Driver Software
- How Microsoft Attracts Elite Developer Expertise at a Price | Discover the Strategy on ZDNet
- How to Fix Pokemon Go Route Not Working On Apple iPhone XS? | Dr.fone
- How to use Pokemon Go Joystick on Apple iPhone 7? | Dr.fone
- In 2024, How I Transferred Messages from Samsung Galaxy F04 to iPhone 12/XS (Max) in Seconds | Dr.fone
- In 2024, How to use Pokemon Go Joystick on Apple iPhone 6s Plus? | Dr.fone
- In 2024, Latest way to get Shiny Meltan Box in Pokémon Go Mystery Box On Apple iPhone X | Dr.fone
- In 2024, Planning to Use a Pokemon Go Joystick on Apple iPhone 11? | Dr.fone
- In 2024, Top 15 Augmented Reality Games Like Pokémon GO To Play On Apple iPhone 13 | Dr.fone
- In 2024, Which Pokémon can Evolve with a Moon Stone For Apple iPhone 6? | Dr.fone
- Pokemon Go No GPS Signal? Heres Every Possible Solution On Apple iPhone 6 | Dr.fone
- Video File Repair - How to Fix Corrupted video files of Samsung Galaxy A15 5G?
- Which Pokémon can Evolve with a Moon Stone For Apple iPhone 13 Pro Max? | Dr.fone
- Title: Can I use iTools gpx file to catch the rare Pokemon On Apple iPhone 14 Pro | Dr.fone
- Author: Iris
- Created at : 2024-11-19 08:17:17
- Updated at : 2024-11-23 19:10:39
- Link: https://ios-pokemon-go.techidaily.com/can-i-use-itools-gpx-file-to-catch-the-rare-pokemon-on-apple-iphone-14-pro-drfone-by-drfone-virtual-ios/
- License: This work is licensed under CC BY-NC-SA 4.0.