
In 2024, 4 solution to get rid of pokemon fail to detect location On Apple iPhone SE | Dr.fone
4 solution to get rid of pokemon fail to detect location On Apple iPhone SE
Pokémon go failed to detect location is an error that is frequently faced by the players and there are several reasons for it. From device to server-based all the reasons amount to the error and therefore the right solution must be applied to get the work done with ease and perfection. The location-based attribute of the game is something that has been one of the best features. It is the sole reason for which the game is not only popular but also one of the most downloaded games of all time. It is therefore important to overcome fail to detect location error in this game.
Part 1: Why does Pokémon fail to detect location?
The two main and frequent errors that are related to the Pokémon are error 11 and error 12. These not only frustrate the users but also hamper the game experience. Failed to detect location Pokémon go is the result. This part of the article will make sure that you get all the information that is needed to overcome the issue. The GPS joystick failed to detect location error will also be overcome and you will also be able to guide others.
Causes of Error 11
- If the game failed to detect location Pokémon go fake GPS then the most common reason is the fact that the GPS has been disabled. The internet and GPS are the two important aspects of this game. If anyone is not available then it is a must that the game will not work at all.
- Once the game has been installed it requires certain permissions that should be granted for proper working. All the permissions must be accepted for the game to work fine. If the GPS access has not been granted then it should be so that the GPS joystick Pokémon go failed to detect location error is resolved and you can enjoy the game.
- To install some applications and to enhance the features of the phone it is at times rooted in the case of android or jailbroken in the case of iPhone. In both cases, you will get the Pokémon to go failed to detect location fake GPS error. It is therefore important that the issue is resolved by getting the Apple iPhone SE device back to its original shape. It can be done by unrooting the Apple iPhone SE devices so that the issue is resolved.
Causes of Error 12
- The Mock location on the Apple iPhone SE device is enabled can lead to failed to detect location GPS joystick or error 12 on the Apple iPhone SE device. It is therefore advised to make sure that the location in question is disabled to get the gaming experience back on track.
- The other and the most common reason for the error 12 is the fact that the GPS signals are not received by the Apple iPhone SE device. It also leads to Pokémon failed to detect location error and will make sure that you get all the enjoyment for which the game has been downloaded.
Part 2: 3 solutions to fix Pokémon fails to detect the location
Solution 1: Turn on GPS
This is the most common method that can be applied to make sure that the game works perfectly.
i. Drag the notification panel down on your device.

ii. Click on the location to turn it ON.

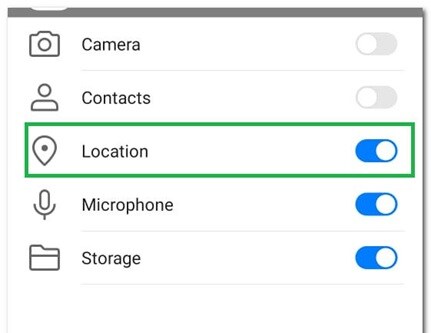
Solution 2: Setting Permissions for the application
If the right permissions are not given to the application then it can also lead to the fake GPS failed to detect location. To make sure that this is overcome you need to follow the steps as under.
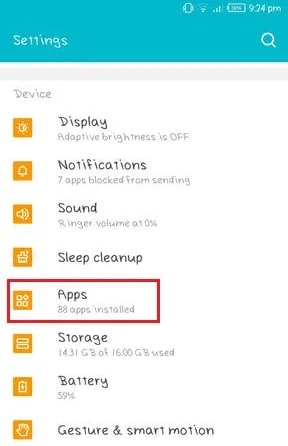
i. Go to Settings > Applications > Apps to access the permissions for the application.
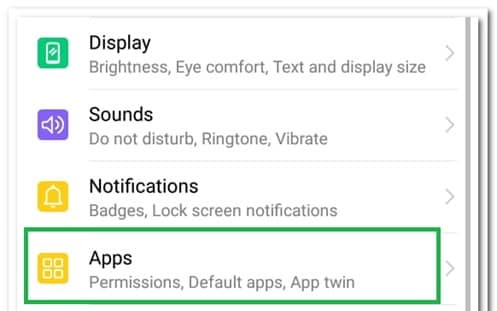
ii. Go to Pokémon Go > Permissions > Turn on location to get the issue resolved.
Solution 3: Clear Cache
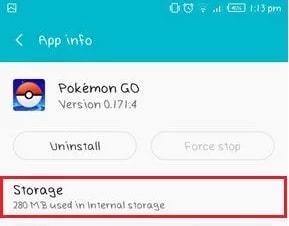
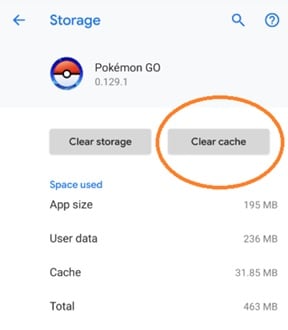
i. Go to the Settings of your device
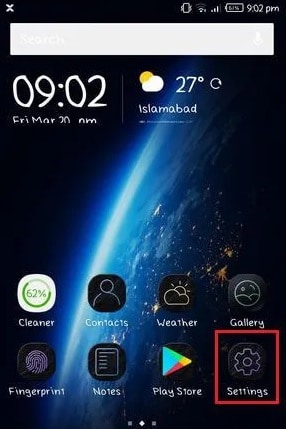
ii. Click on the app’s icon on the next screen
iii. Click on the storage option.
iv. Clear data and cache and restart the Apple iPhone SE device to get the issue fixed.
Part 3: Dr.Fone Virtual location change your location in one click
To fix the fake GPS Pokémon go failed to detect location Dr. Fone’s virtual location is the best and the state of the art program that can be used. It is not only the best but also allows the users to overcome the issues that are presented by the other similar programs. With this program, it is easy to make sure that the overall game performance improves in terms of location detection. You can teleport with ease using this program. With an intuitive interface and a professional team backing the program, you get the ultimate results. Not only Pokémon but all the location-based and AR games this program is a boon.
How to use Dr. Fone Virtual Location
Step 1: Program Installation
First of all download and install the program to get started.

Step 2: Enable Virtual Location
Click the get started icon once the iPhone has been connected to the system and the virtual location has been enabled.

Step 3: Locate the Apple iPhone SE device
Click the center on a button to make sure that your location is detected by the program.

Step 4: Change Location
The third icon on the upper right corner is to be pressed to teleport. In the bar type the name of the location you want to teleport to.

Step 5: Move to a teleported location
Click on move here to get to the location that has been selected.

Step 6: Validation
Your iPhone will show the same location as on the program and this finishes the process.

Conclusion
Dr. Fone’s virtual location is the best and the most advanced program that will make sure that you get the best results. It will not only enhance your gaming experience but will also remove the Pokémon go GPS joystick that failed to detect location error with perfection. It is the best program that is easy to use and there are guides online that further foster the process. With this program, it is easy to get a step ahead for all AR and location-based games and to enjoy to your fullest.
How can I get more stardust in pokemon go On Apple iPhone SE?
Pokemon Go is one of the most popular games worldwide, with over 80 million active players. The game will present tasks you should complete to collect items and Pokemons, thus improving your skill levels and making you better in the game.
One of the essential items you can get is Stardust, which will help you become the best trainer in the Pokemon Go industry. If you’re new to the game and are wondering what the importance of Stardust is in Pokemon Go, read ahead. We’ll teach you all about it and present methods to collect this item faster.
Part 1. What Is Stardust in Pokemon Go?
Stardust is a consumable item that allows you to strengthen your Pokemon. This item will help you reach the maximum of your Pokemon, making them more resilient and ready for potential fights. Moreover, Stardust is essential for trading – you must have a specific Stardust level to trade your valuables with another trainer.
Part 2. How Is Stardust Used in Pokemon Go?
Stardust can come in handy in several different scenarios in the Pokemon Go game. We’ll present all the use cases below to help you navigate your journey and learn the importance of collecting Stardust.
- Power up– the most crucial feature of Stardust is that it can power up your Pokemon to its maximum CP. It’s ideal for PVP games, and you’ll get the most out of your experience with this consumable.
- Trading– Stardust is essential for trading, and the amount of the item you need will depend on the Pokemon and the friendship level with the trader.
- Second Charged Attack– you can unlock the second charged attack if you have a couple of them up your sleeve.
- Purification – this consumable is used to purify the Shadow Pokemon left by Team Go Rocket.
- Changing the form– you can use Stardust to change the form of your Pokemon character.
As you can see, Stardust is crucial for numerous gameplay experiences, so you should check out the guide below to learn how to collect these consumables.

Part 3. Best Ways to Get Stardust in Pokemon Go
Since having Stardust is crucial for your Pokemon Go experience, you may be looking for the best ways to accumulate as many consumables as possible. We’ll present a couple of ways to reach your goals below.
Through Pvp Rewards
One of the best ways to earn Stardust is through Player versus Player features. When you’re playing with other users, you can earn Stardust based on the number of your previous wins, your game level, and the PVP outcome.
For instance, if you’re a Rank 2, you can earn around 2,000 Stardust points by winning a battle, and if you’re Rank 24, the number increases to about 200,000. You can also use a Star Piece to multiply your winnings by 1.5.
Another method is to play with your friends, and the Stardust points can vary from 300 to 1000, depending on your opponent’s rank.

By Opening Gifts
Opening gifts is one of the main components of the Pokemon Go experience. You’ll get daily gifts you can open for free, earn valuable items, and support your gameplay. Each gift can carry a certain amount of Stardust particles, so you don’t have to do anything to accumulate these items.
The maximum Stardust you can get in one gift is 300, which may not seem like a lot. However, if you open your gifts regularly, you’ll have the desired Stardust amount in no time. You should also combine this method with others mentioned in this article for the best experience.

By Hatching Pokemon
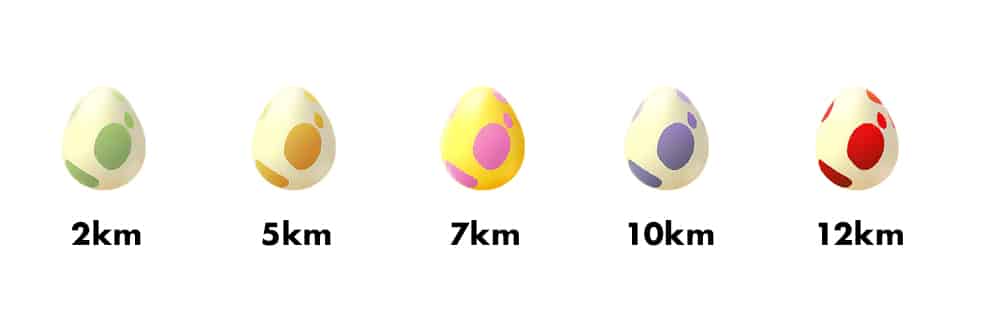
Hatching a Pokemon is also one of the essential parts of your Pokemon experience. Every time you hatch an egg, you’ll get Stardust points you can spend on numerous instances. The Stardust amount will depend on the egg itself; the higher the rank, the better the prices.
You can check out the list below to determine how much Stardust you’ll collect through your egg hatching:
- 400–800 Stardust for hatching a 2km egg;
- 600–1,600 Stardust for hatching a 5km egg;
- 800–1,600 Stardust for hatching a 7km egg;
- 1600–3200 Stardust for hatching a 10km egg;
- 3200–6400 Stardust for hatching a 12km egg.
You can also use the Star Piece item to multiply the Stardust amount by 1.5.
By Catching Pokemon
Catching Pokemon is one of the most efficient ways of earning Stardust points. Each Pokemon has a base rate of 100 Stardust points, but you can earn more points depending on the Pokemon’s evolution stage. For instance, if the Pokemon is in the second stage, you’ll earn an additional 500 Stardust points.
Another thing you should look out for is specific Pokemon characters – some may carry more than 100 Stardust points as their base. For instance, you can get a whopping 2,100 Stardust points if you catch Audino, 950 for Garbodor, 1,000 for Chimecho, etc.
If you stay consistent and catch at least one Pokemon daily, you can get up to 9,000 Stardust points on the seventh day. Moreover, the first catch of the day will bring you an additional 1,800 points.

By Claiming Raid Rewards
When the Boss enters your Gym, you may think it’s a stressful scenario. However, you should consider the bright side and fight to earn valuable rewards, such as Stardust points.
Once you and your team defeat the Boss, you can collect the prizes. You’ll win 1,000 Stardust points each time a Boss enters, even if it leaves the Gym without a fight.
If you defeat the boss, you’ll also get a chance to catch the Pokemon, which can bring you even more Stardust points!
By Getting Rocket Rewards
Rocket rewards are sets of items you get after fighting the Team Go Rocket. Each time you beat this criminal group, you’ll be rewarded with either 500 or 1,000 Stardust points, depending on whether you were fighting Grunt or Team Go Leader.
Additionally, if you ever face Giovanni, you’ll get 5,000 points for fighting and beating him.

By Earning Research Rewards Through Completed Tasks
Each player will get their daily to-do list depending on their skill and game level. Once you enter the app, you can complete these daily tasks for Stardust points.
The amount of points you will win depends on the task’s difficulty and duration. However, you should complete all the daily tasks to accumulate as many consumables as possible.
For instance, if you’re on level 45, you can head to the Go Battle League 45 times to earn 4,500 Stardust points.

By Visiting the Gym
While on your daily walk in the Pokemon world, you should check out whether you can find some Gyms around you. If you do, stop by to hang around with some of the most precious Pokemon characters and give them a berry while you’re there.
You’ll earn 20 Stardust points for each berry you give a Pokemon. It may be the easiest way to earn and use these points for your experience. Plus, you’ll meet new characters and fully experience what the Pokemon world offers.

Claim Stardust Quickly in Pokemon Go by Using Location Spoofing
If you live in a rural area and don’t get too many chances to walk around and catch Pokemon characters, you can use a classic trick of location spoofing. It will allow you to change your virtual location and wander the streets of another city to discover more Pokemon opportunities.
However, you’ll need a reliable tool to realize your Pokemon goals. One of the best options is Wondershare Dr. Fone, which provides a Virtual Location feature suitable for this quest. Aside from the obvious, you can use this application to manage your smartphone, recover data, and improve your overall smartphone experience.
Virtual Location will allow you to head to any city in the world, collect the rarest Pokemon characters, and earn the most Stardust points possible. Thus, download Dr. Fone Virtual Location from an official source, connect your phone, and follow the steps below to learn how to enable Virtual Location:
- Open Dr. Fone Virtual Location and select the mode in the top right corner (One-Stop, Multistop, or Joystick Route).

- Set the desired parameters.

- Click the Start Movingor Move Here
- You can also click on the Joystick feature to control your movements.
Once you turn the virtual location on, you’ll become an unbeatable Pokemon Go player.
Pokemon Go may be one of the most engaging games in the world. It requires you to move, complete tasks, catch Pokemon figures, and face numerous challenges daily, which is why it’s so popular in the gaming industry.
One of the features that contributes the most to your growth is Stardust, a consumable able to make your Pokemon dreams come to life.
If you’re searching for ways to collect these items as quickly as possible and gain incredible power, check out the guide below. We’ve discussed all the options you can try to obtain Stardust points, including changing your virtual location to get the most out of your journey.
Which Pokémon can Evolve with a Moon Stone For Apple iPhone SE?
Evolution items play a significant role in evolving certain species in the Pokémon game. Moon Stone is one of these peculiar items that are worth adding to your Pokedex. However, getting Moon Stone Pokémon is a tough assignment and you have to pull your best bells and whistles. However, there are several hacks and tricks that can reduce your hunting pain. In this article, we shall take you through a complete guide on Moon Stone Pokémon and evolutions.
Part 1. Moon Stone Pokémon
What is Moon Stone Pokémon?
Moon Stone is an evolution stone introduced in generation I. This peculiar stone is used to evolve certain species of Pokémon. In terms of appearance, Moon Stone Pokémon is elliptical and black as the night sky.

The simplest way to get a Moon Stone in Pokémon Sword and Shield is to go to Lake of Outrage in the Wild area. You will see a body of water on your left and a watt trader standing near it. To cross this water body, you will have to unlock the Rotom Bike from Route 9. When you manage this, check under the eight stones and you might be lucky that one of them might yield a Moon Stone. Also, you can navigate to the Dusty Bowl in the Wild Area. Here, you will find barren stones between a grassy rock and wheat field.
Pokémon that Evolve with a Moon Stone
Moon Stone makes certain species of Pokémon evolve. To evolve a Pokémon using Moon Stone in Pokémon Sword and Shield, simply open the bag and go to the “Other Items” section. Finally, use Moon Stone in any of the following Pokémon.
1. Nidorina
Nidorina is a poison type Pokémon that was introduced in Generation I. it looks like a rabbit with blue skin and dark spots around the body. Its natural abilities are poison point, rivalry, and hustle. As of level 16, Nidorona evolved from Nidoran. With the use of Moon Stone, Nidorina can evolve into Nidoqueen.
2. Nidorino
Nidorino is a male counterpart of Nidorina. This poison-type Pokémon debuted in Generation I and looks like a rabbit. It has a red-purple color with some dark spots spread across the body. Sharp teeth protrude with large upper jaws and spikes. This Pokémon is quick to anger. Nidorino evolved from Nidoran as of level 16 and can evolve to Nidoking using the Moon Stone.
3. Clefairy
This is a fairy-type Pokémon that was introduced in Generation I. It is a small, round, and star-shaped Pokémon whose abilities include magic guard and cute charm. It is timid and rarely feature near humans. Clefairy evolves from Cleffa when it gets leveled up with high friendship. With the help of Moon Stone, Clefairy evolves into Clefable.
4. Jigglypuff
This is a normal/fairy type of Pokémon that was also introduced in Generation I. Before Generation VI, this Pokémon was entirely a normal-type Pokémon. Jigglypuff itself is an evolution of Igglybuff and can evolve into Wigglytuff with the help of Moon Stone.
5. Skitty
This is a normal type Pokémon that was introduced in Generation II. This Pokémon is pink and looks like a cat with a cute charm ability. Skitty can evolve to Delcatty using the Moon Stone.
6. Munna
Munna is a psychic-type Pokémon that was introduced in Generation V. It is a small Pokémon with a pink round body having purple flower painting on its back. With the use of Moon Stone, Munna evolves into a Musharna.
Part 2. Tricks and Hacks to Get Moon Stone Pokémon
As you have seen above, getting a Moon Stone is not an easy ride. It involves lots of trials and there is no guarantee to get it. But what tricks and hacks can you incorporate to make your hunt seamless? The following are some of the plausible tricks that you can use to easily grab a Moon Stone and add it to your Pokedex.
1. Use Dr. Fone Virtual iOS Location
It goes without question that Dr. Fone Virtual Location is the best location spoofer tool. Remember Pokémon game is location-based and if you can play around with your location then you are at an upper hand of grabbing a rare Pokémon or an evolution item like Moon Stone. Dr. Fone Virtual Location makes it seamless to teleport to any location across the globe while you are seated comfortably at home. Besides, you can simulate movements between two or more points and make GPS control more flexible with the help of a joystick.
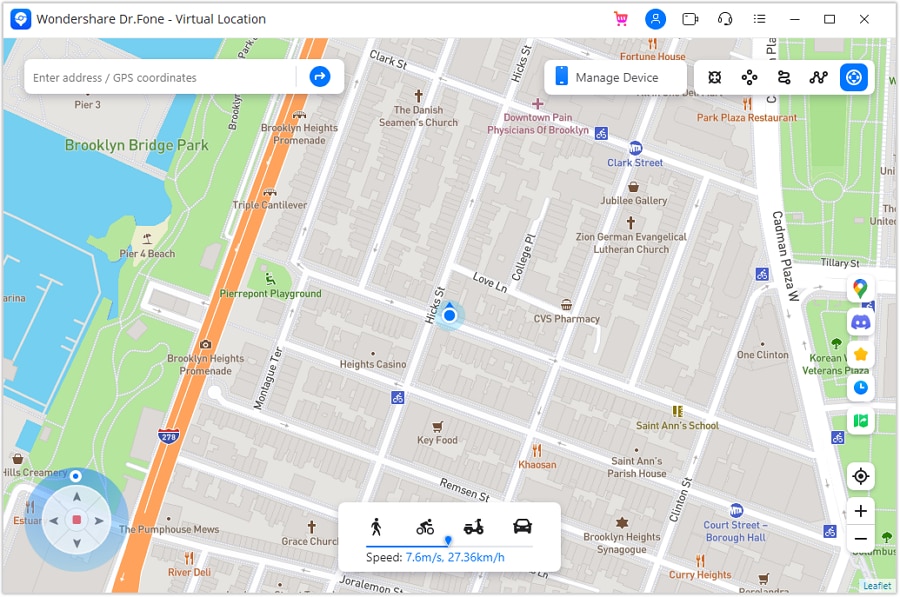
How to Teleport with Dr. Fone Virtual Location
Step 1. After installing Dr. Fone Virtual Location, launch it, and select “Virtual Location.” Now connect your Apple iPhone SE to the computer.
Step 2. Click the “Get Started” on the subsequent page to access the teleport options.
Step 3. The program will display a new page with three icons at the top-right. Click the third icon to take you to the teleport mode. Again enter the place you want to teleport to in the text field at the top-left of this same window and then hit “Go.”
Step 4. Click “Move Here” from the pop-up that follows to teleport to the location you provided.
2. Use Android Spoofing Tool- Pgsharp
Pgsharp is a fake GPS location tool for Android devices and is suitable for playing Pokémon from a fake location with no root. It allows users to teleport in real-time while they are just sited at home. It has a downloadable free version. It has a user-friendly interface, and once you have set the fake GPS location on your Android device, you can catch rare Pokémon and evolution items with ease.
3. Use Go-tcha Evolve
Go-tcha Evolve is an application that allows you to set animations and vibration to alert you in the case of Pokémon or pokestops. You can use its “auto-catch” feature to allow it automatically grab the Pokémon or pokestops without having to respond to alerts.
Also read:
- [Updated] Unveiling the Path to Your YouTube Comments on Devices
- Deleting Windows ~BT Directory: Purpose & Process
- How to Come up With the Best Pokemon Team On Apple iPhone 11 Pro Max? | Dr.fone
- How to recover deleted photos from Android Gallery without backup on Honor X50i+
- In 2024, Can I use iTools gpx file to catch the rare Pokemon On Apple iPhone XS | Dr.fone
- In 2024, Here are Different Ways to Find Pokemon Go Trainer Codes to Add to Your Account On Apple iPhone 14 Pro | Dr.fone
- Latest way to get Shiny Meltan Box in Pokémon Go Mystery Box On Apple iPhone 8 Plus | Dr.fone
- Methodology Creating Life-Changing Video Guides
- Técnicas Eficaces Para Configurar Windows [Input]: What Is the Measure of Arc AC in Circle P if M∠ABC = 160° and Point C Lies on a Tangent to Circle P at Point A?
- Title: In 2024, 4 solution to get rid of pokemon fail to detect location On Apple iPhone SE | Dr.fone
- Author: Iris
- Created at : 2024-11-07 19:44:46
- Updated at : 2024-11-13 21:34:02
- Link: https://ios-pokemon-go.techidaily.com/in-2024-4-solution-to-get-rid-of-pokemon-fail-to-detect-location-on-apple-iphone-se-drfone-by-drfone-virtual-ios/
- License: This work is licensed under CC BY-NC-SA 4.0.