
In 2024, All You Need To Know About Mega Greninja For Apple iPhone 14 Plus | Dr.fone
All You Need To Know About Mega Greninja For Apple iPhone 14 Plus
Are you a fan of Pokemon Go? Then, you will find this article not only useful but also quite interesting. In case you have never played this game before, then you should know that Pokemon Go is a fantastic augmented reality game.
It requires the use of GPS (Global Positioning System) to track your location. Basically, Pokemon Go is a mobile application which you can easily download from Google Play Store or App Store, and it’s absolutely free. In simple words, you can say that Pokemon Go makes use of mapping technology so as to plot your actual location as you roam around in the streets to catch your favourite Pokemon.
When you play the game, your main goal would be to catch as many Pokemon or fictional characters as you can. Your main task will be to battle your opponents to catch the Pokemon and then train them.
It’s worth mentioning here that this AR-game is absolutely convenient to play. Now, one of the most amazing features that have been added to this game is Mega Evolution. But, unfortunately if you were of the opinion that greninja can mega evolve, then you are completely wrong, in fact you should note that no Kalos pokemon can mega evolve.
Through this article, we will discuss all you need to know about Greninja. So, without any further delay, let’s get started.
Part 1: Who is Mega greninja?

Also, called the Ninja Pokemon, Greninja is Dark/ Water-type pokemon. Some people love to call it a frog-like master. One of the most amazing features of Greninja pokemon is that with its swift movements, you will notice that this pokemon succeeds in confusing its opponents.
It makes use of very sharp throwing stars to slice its enemies. It features Torrent ability.
There are various weaknesses of this pokemon which include “Fighting”, “Grass”, “Electric”, “Bug”, and “Fairy”.Its worth mentioning here that Greninja pokemon is the final evolution of Froakie.
Part 2: What are the Strengths of Greninja in Pokemon?

Greninja is resistant to “Water”, “Fire”, “Ice”, “Dark”, “Steel” and finally “Ghost”. Also, this pokemon is immune to “Psychic”. This pokemon’s presence can be very intimidating for its opponents, it would not be wrong if we say that Greninja is quite unpredictable. There is no doubt that the counter attacks of Greniaja prove to be very dangerous for its enemies.
Part 3: How to Catch Greninja?

In order to catch Greninja, you will be required to fulfill specific requirements in the Pokemon Sun and Moon Exclusive demo.
First of all, after launching the Pokemon Sun and Moon Demo, go to the Pokemon Center.
Then, you’ll meet Professor Kukui and when he starts talking to you and asks what you wish to do , choose the option of “bring to full version.After that, you will be required to choose Ash-Greninja. Then, open the full game, finally you have to enter the nearest Pokémon Center.
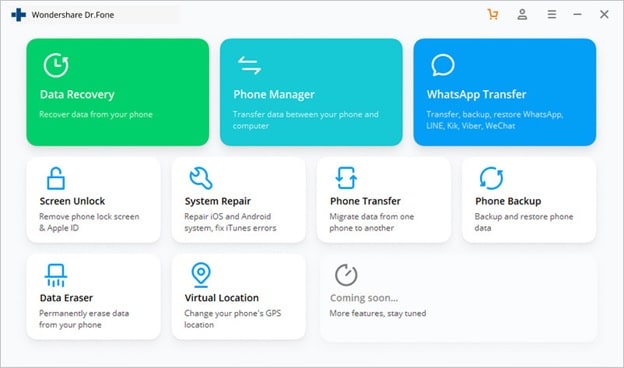
Catching your favourite Pokemon or to mega evolve a specific pokemon will require you to go to different places or explore different locations, but it’s not always possible to step out of your house, it might be raining, or its night time, in the case, we recommend using software called Dr.Fone(Virtual Location).
With the help of this amazing software, you can teleport to any location or place in the whole without even requiring you to step out of your house.
In order to get started with Dr.Fone, you need to download Dr.Fone(Virtual Location) iOS. Then, you have to install Dr.fone on your smartphone. Finally, you have to launch Dr.Fone (Virtual Location) on your device.
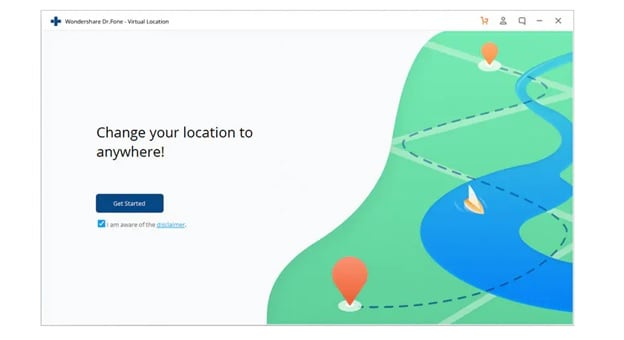
Step 1: You have to tap on “Virtual Location” among the various options that you will notice therein. It’s important to ensure that when you are setting up Dr.Fone on your device, always ensure that your Apple iPhone 14 Plus is connected to the PC. Then, click on “Get Started”.

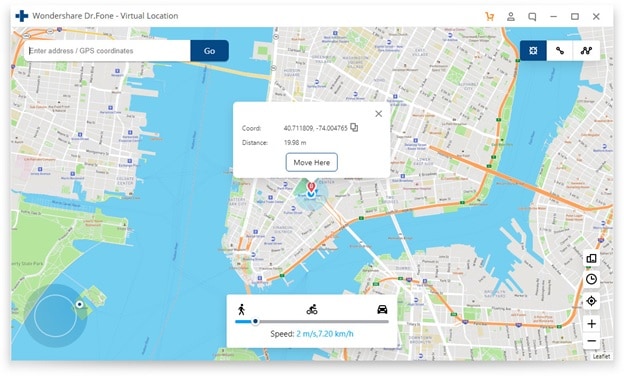
Step 2: If you have executed the prior steps or directions successfully, then you will see a new window that shows your actual location on a map will get displayed on your screen. Now, make sure that your displayed location on moa is accurate, if not, then click on “Center On,” with the help of this, you’ll be able to make your location correct.
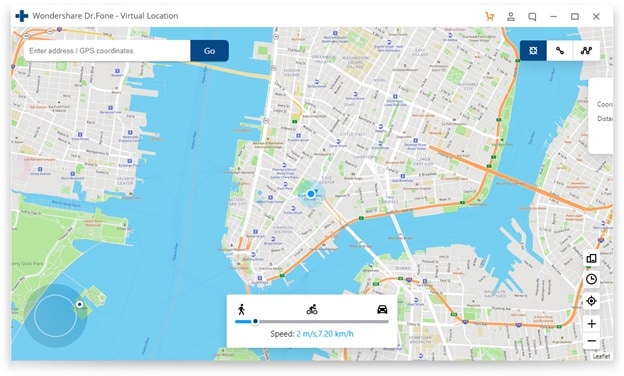
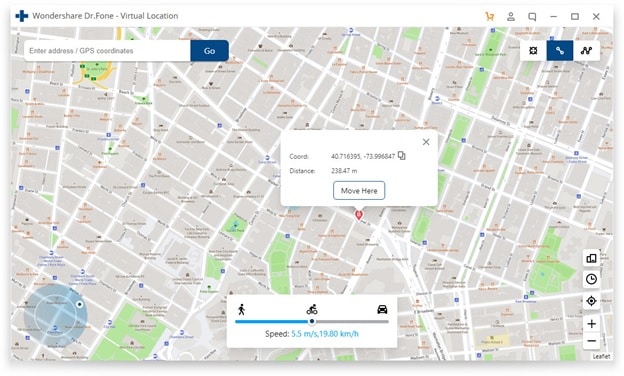
Step 3: After all the previous steps, the next step is to click on the “teleport mode” icon, which will be located in the upper-right part. This will activate the teleport mode. After that, you have to enter the name of the location or place where you wish to teleport to in the upper left field. Finally, tap on “Go”. As an example, we are going to enter “Italy”, Rome in the left field.
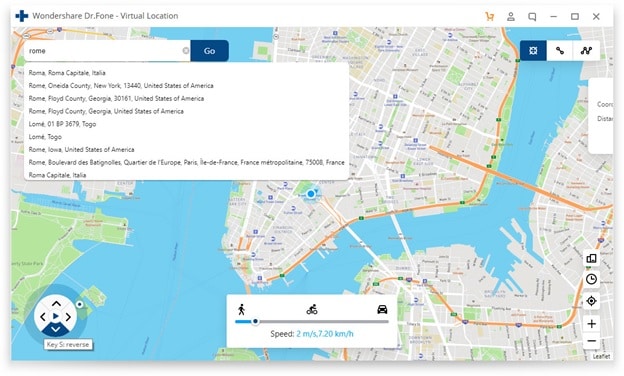
Step 4: In this manner, your location will now be understood or set by the system to “Italy”. You’ll see a pop-up box; you have to just click on “Move On”.
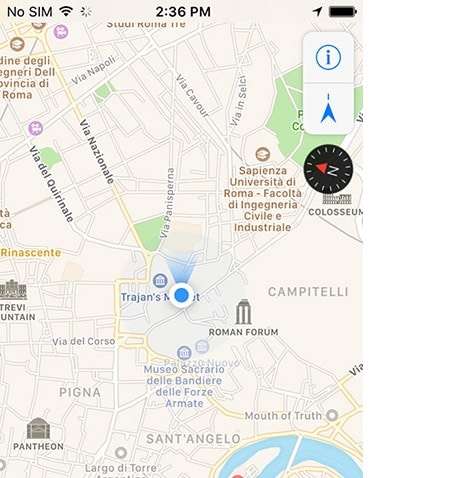
Step 5: If you have followed the directions accurately, your actual location on the map will now be set to “Italy”. You can confirm your location from the Pokemon Go’s map. Finally, below we have provided a screenshot of how the location will be shown.
Step 6: Also, you’ll see that the location on your Apple iPhone 14 Plus would have also changed now to “Italy” or any other place that you have entered earlier.
Conclusion
So, we have reached the end of this article. We hope that you found the article quite useful as well as insightful. We also hope that with the help of the setup guide for Dr.Fone you can now easily catch your favourite pokemon by teleporting to different locations across the world. If you have any doubts or suggestions related to this article, then feel free to write it down in the comment section. So, this was all from our side for now. Stay Tuned
Catch or Beat Sleeping Snorlax on Pokemon Go For Apple iPhone 14 Plus
Embracing new challenges and seeking out rare creatures to add to their Pokédex consistently excites Pokémon GO players. The coveted reward for players globally, Snorlax, a legendary Pokémon, is widely recognized as the iconic Sleeping Snorlax. Despite being one of the original 151 Pokémon in Pokémon GO, capturing Snorlax remains exceptionally challenging. It falls under Z’s category of Pokémons, which also includes Komala and Abra.
This makes it a unique challenge for trainers seeking to add this heavyweight Pokémon to their collection. In this guide, we will go through the latest strategies and updates in the Pokémon GO universe. The aim is to reveal the secrets to catching a Pokémon Sleeping Snorlax in 2024. Read the article as we explore the techniques, locations, and special events that will increase your chances of capturing this Pokémon.

Part 1: What Is a Sleeping Snorlax in Pokémon GO
Part of the original 151 creatures in Pokémon GO, Snorlax is a Pokémon from the Pokémon franchise. It stands out as a normal type with notable Combat Power (CP) and endurance. Its substantial Hit Points (HP) and powerful moves make it a formidable defender in gyms, earning it a reputation as a resilient fighter.

Being one of the Z’s category Pokémon, known for their sleepy and relaxed nature, is reflected in its appearance. Snorlax Pokémon sleeping is a large, bear-like Pokémon with a big belly and is often found blocking paths in mainline Pokémon games.
In Pokémon GO, Snorlax can be encountered in the wild, but it is more commonly obtained through special events or raids. Like other Pokémon, Snorlax can be powered up and used in battles against other trainers or in raids. Below is a detailed table explaining everything about Snorlax:
| Specs | Snorlax |
|---|---|
| Pokédex No | 143 |
| Generation | 1st |
| Region | Kanto |
| Height | 6’11” or 2.1 m |
| Weight | 1014.1 lbs. or 460.0 kg |
| Stamina | 143 |
| Pokédex No | 330 |
| Attack | 190 |
| Defense | 169 |
| Max HP | 285 |
| Max CP | 3384 |
| Abilities | Thick Fat & Immunity |
| Best Moves | Lick & Hyper Beam |
| Evolves From | Evolves From |
Part 2: Is It Possible To Capture a Sleeping Snorlax in Pokémon GO?
When it comes to whether it is possible to capture a Snorlax sleeping Pokémon, the answer is a resounding yes. Being rare, the chances to encounter and capture have steadily risen compared to past years. With its formidable stats, Snorlax reaches an impressive maximum Combat Power (CP) of 3884.
At Pokémon Z’s Event 2023, participants had the chance to capture not only Snorlax but also its rare shiny variant. Moreover, after completing the special research task, users were able to encounter a Snorlax with a nightcap. To get Snorlax more easily, users are recommended to use Pokémon Go Plus +.
Utilizing advanced Bluetooth and low-energy technology, the Pokémon GO Plus + device establishes connections with both the Pokémon Sleep and Pokémon GO mobile applications. Its functionality extends to monitoring sleep, a feature it shares with Pokémon Sleep. All you need to do is hold the central button, put it near you, and go to sleep. It includes a Pikachu to sing you lullabies and work as a morning alarm.
Moreover, the Pokémon GO Plus + accessory facilitates the spinning of PokéStops. It enables the automatic throwing of different Poké Balls, Great Balls, and Ultra Balls. Thus eliminating the need to press any buttons. Below is a detailed table about the specifications of Pokémon GO Plus + to capture Snorlax sleeping Pokémon:
| Specs | Pokémon GO Plus + |
|---|---|
| On Sale | America: July 14, 2023 / Europe: July 21, 2023 |
| Package Contents | Pokémon GO Plus + strap with clip, Pokémon GO Plus + device, operations manual, USB charging cable |
| Device Size | |
| Diameter: 64.5mm |
Thickness: 18.3mm
|
| Device Weight | 50g |
| Internal Battery |
Lithium-ion battery
Charges via USB Type-C
|
| Battery Charging Time | 3.5 Hours |
| Functions | Vibration and sounds |
| Platform/OS |
Android 7 and up
iOS 14 and up
|
Part 3: How To Catch a Sleeping Snorlax With the Help of Pokémon GO Plus+
With the release of Pokémon GO Plus + in July 2023, Nianticreleased a week-long “Catching Some Z’s” event. The main part of the event was to increase the spawned rate for Snorlax and a special encounter with a Snorlax with a nightcap. While the event has long finished, Pokémon GO Plus + remains.
Many users have reported increased sightings of Snorlax even after the event when using Pokémon GO Plus +. As discussed earlier, Pokémon GO Plus + uses Bluetooth to remain connected with the Pokémon GO app. Here are the steps you need to follow to pair Pokémon GO with the Pokémon GO Plus + for help in catching Pokémon Snorlax sleeping:
- Step 1. Begin by enabling Bluetooth, opening the Pokémon GO app on your device, and tapping the central Pokéball button. Now tap “Settings” from the top right corner and select “Connected Devices and Devices.”

- Step 2. On the following screen, press “Accessory Devices” to access the pairing menu. Now, move to Pokémon GO Plus + and press the main button. Once it appears in the “Available Devices” section of the Pokémon GO app, begin the pairing process following the on-screen instructions.

Part 4: Enhance Your Gaming Experience With One-Click Location Spoofer of 2024
Are you having issues with capturing Pokemon Snorlax sleeping despite employing Pokémon GO Plus +? Given the rarity and low spawning rate, capturing Snorlax can be hard. This becomes especially difficult if you are unable to travel long distances. To come to your rescue, there’s another useful tool at your disposal named Wondershare Dr.Fone - Virtual Location. Enabling you to simulate your location anywhere globally, it also incorporates lifelike movement.
With just one click, modify your GPS location effortlessly using this tool that smoothly integrates with both iOS and Android devices. This means you can easily explore diverse in-game terrains. It increases your chances of encountering Snorlax Sleeping Pokemon in various locations. Wondershare Dr.Fone gives you precise control over your virtual location, ensuring that you can navigate the Pokémon GO map with accuracy.
Standout Features of Dr.Fone - Virtual Location
- Effortlessly import/export GPX files containing diverse paths, enabling you to save and view your preferred routes with a simple click.
- When spoofing your GPS location on an iOS device, you don’t need to jailbreak it when using Dr.Fone - Virtual Location.
- It offers you the flexibility to traverse at various simulated speeds, such as walking, cycling, driving, etc., ranging from 3.6 km/h to 108 km/h.
Steps To Enhance Your Gaming Experience With One-Click Location Spoofer of 2024
Save time and energy by using Wondershare Dr.Fone - Virtual Location feature. There is no need to physically travel to different places by simply adjusting your virtual location.
When coupled with powerful Pokémon GO Plus +, it can increase your chances of encountering Sleeping Snorlax significantly. Here is how to enhance your gaming experience and get help in capturing Pokémon sleeping Snorlax via Dr.Fone - Virtual Location:
- Step 1. Activate Teleport Mode in Dr.Fone - Virtual Location
Open Wondershare Dr.Fone - Virtual Location, connect your smartphone with an original USB cable, and choose the “Teleport Mode” option located in the top-right section. The specific icon for Teleport Mode is the first one from the left in that section. Once Teleport Mode is activated, click on the search bar at the top-left to input the desired location. After entering the location, press “Enter” to continue.

- Step 2. Teleport to the Chosen Location
As you enter the desired location, the map will confirm your selection. If you wish to teleport to this designated location, click on “Move Here.” The smartphone’s location will promptly switch to the chosen destination and reflect on the map. You can then verify that the Apple iPhone 14 Plus device’s current location matches the updated location by opening the maps app on the Apple iPhone 14 Plus device.

- Step 3. Simulate Movement with One-Stop Route
To simulate movement, navigate to the top-right section and click “One-Stop Route.” It is the third icon from the left. After moving to the desired location, tap anywhere on the map to designate your destination. Specify the number of round trips and opt for either a Round or Loop trip. Adjust the walking speed by sliding the speed option. Finally, tap “Move Here” for the movement simulation.

- Step 4. Enable the Multi-Stop Route Feature
If you want to visit more than one stop, enable the Multi-Stop Route mode. You can do it by accessing the top-right section adjacent to the One-Stop Route mode. Once activated, designate multiple locations on the map by selecting your desired points. Specify the number of trips and speed settings. Initiate the process by clicking on “Start Moving.” During the simulation, you can “Pause” the sequence at any point.

Conclusion
In conclusion, the pursuit of capturing a Snorlax Pokémon sleeping in Pokémon GO is an ever-evolving adventure. To enhance your gaming experience and increase your chances of success, consider incorporating Wondershare Dr.Fone - Virtual Location. With its one-click location spoofer, Dr.Fone adds versatility and efficiency to your exploration. It allows you to enjoy the thrill of the hunt without physical constraints.
Why can’t I install the ipogo On Apple iPhone 14 Plus
For tweaking the official Pokemon Go app right there in AppStore, iPogo is a choice to have. But sometimes iPogo can’t install, and users face a lot of difficulties. At that moment, some users feel furious and look forward to the solutions to get rid of it. If you also hit in the same category, you are on the right page. Let’s discuss it more and look forward to the solution that will help you to install it again.
Part 1: Reasons that you can’t install the ipogo
There are multiple reasons that contribute to the difficulty when you can’t install the iPogo. Some of them are as follows:
- iPhone version:
The current iPhone version you are choosing may be responsible for the problem for iPogo can’t install. It is important to have iOS version 13. It works on all the known jailbreak devices having the same iOS. In case you have upgraded the iOS 13 to iOS 14, the chances are quite less to use it.
- iPogo version:
iPogo version is also an important factor of consideration. Time to time regular updates keep coming, and if you are stuck on the previous version, you will not be able to use it. Sometimes the iPogo is down whenever there is an update, and when you try to update it, the problem arises. At that moment, you need to be patient and try re-installation.
- Direct download method:
If a user is considering direct downloading method, they might also face this trouble because Apple now targets certificate. Now you need to create your certificate with the help of a computer or a paid service like Signulous and others.
Bonus: Simple steps to install iPogo
To install iPogo, we suggest you avoid the direct download method and instead follow the steps to follow with “Matrix installer.”
Steps to follow:
Step 1: Upgrade the iTunes version of your computer to latest version.
Step 2: Now remove the original app from your iDevice.
Step 3: Get IPA from the website download and save it.
Step 4: Launch the “Matrix Installer”.
Step 5: With the help of USB cable connect your Apple iPhone 14 Plus to the PC.
Step 6: Let the installer to detect the iDevice.
Step 7: Now click on “Device” then “Install Package” option.
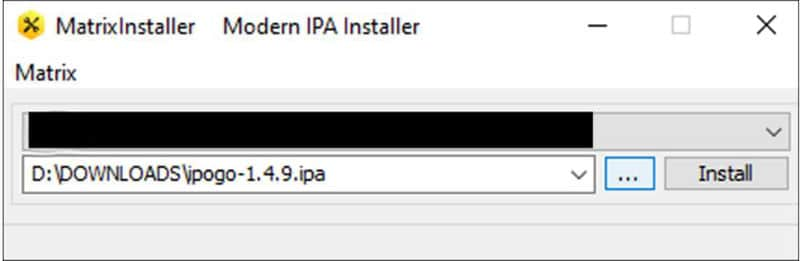
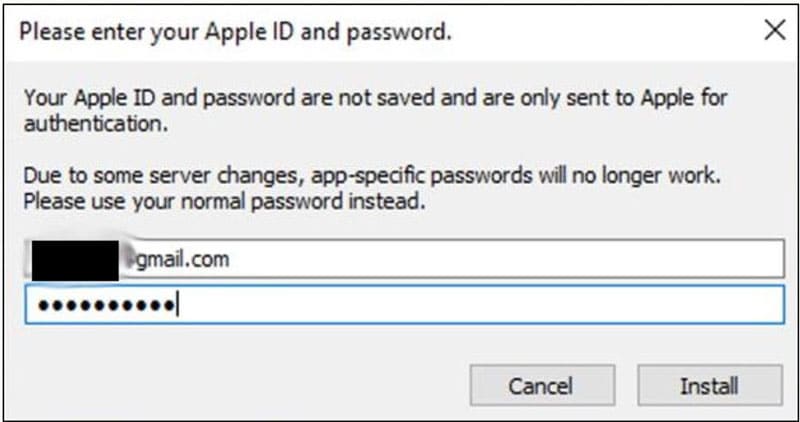
Step 8: Now the installer asks for the Apple ID username, and Password mentions the same. Make sure these are the ones used to fetch the developer certificate from the Apple Server. (We suggest you create a new Apple ID)
Step 9: Be patient for a while and let the impact or to perform all the work.
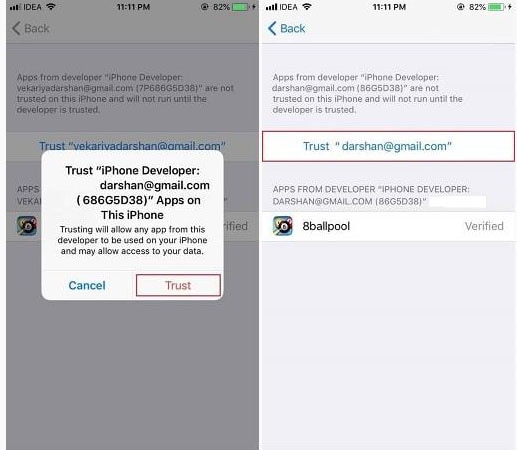
Step 10: “Complete” message will appear and unlock your Apple iPhone 14 Plus Screen and move to “settings->General-> device management.”
Step 11: Now hit on the developer Apple ID and trust it.
Part 2: Risk of installing ipogo and running
You can come across a certain risks also when you are installing and running iPogo. These are as follows:
Jailbreaking is required:
For using iPogo, jailbreaking is required, and it refers to the privilege to Apple devices through which they can remove all the software restrictions. If there is any loss to the data, a user will be responsible for it.
Chances to get banned:
iPogo is an application that can be used after jailbreaking only. After doing the jailbreaking, the chances are there that your device might get banned. You are at a high risk where certain problems may arise.
Can lose access to content:
There might be a chance you have will lose access to content as well. Therefore we suggest you avoid. If you still want to jailbreak your device and want to install iPogo, it is entirely your choice.
Part 3: is there a software like iPogo without jailbreak?
If you are wondering about the same question, then the answer is “Yes”. Dr.Fone Virtual Location is an iOS location changer helping you to enjoy the same features without any hassle. This application will help you to simulate GPS movement along real road or paths you draw. A user can also integrate joystick to make the movement of GPS effortless. It helps you to teleport iPhone GPS to anywhere in the world. The best part is it supports up to five device location management at a time.
Let us understand how this tool can help you spoofing your location.
We are mentioning the steps which will help you to teleport to anywhere in the world. The steps for it are as follows:
Step 1: Get the tool on PC
Start with downloading Dr.Fone Virtual Location on your PC using the official website. And then install it. Once done, launch the program. Now hit on “Virtual Location” from all the options and connect your Apple iPhone 14 Plus to the computer.

Step 2: Get the Apple iPhone 14 Plus device Connected
You now need to get your iPgone plugged with PC via a USB cord. Once you do this, simply click on “Get Started.”

Step 3: Check Location Accuracy
A new window will appear indicating the actual location on the map. If the location does not appear to be accurate hit on “Centre on” icon at the lower right part to get an accurate location.
Step 4: Turn on Teleport Mode
By clicking on the Corresponding icon in the upper right activates “Teleport Mode”. Now mention the place you want to teleport in the upper left field. Click “Go” (consider a Rome in Italy as an example)

Step 5: Start Spoof
After selecting it, the system will understand the desired place in Rome and hit on “Move here” in the popup box.
Finally, the location has been changed to Rome now. Whatever you do whether you click on “centre on” icon or try to relocate yourself on iPhone ROM is the fixed location that will appear, and in all the location app as well Rome is the fixed place.
Conclusion
Here, we have agreed to do to the conclusion that if iPogo won’t install there is nothing for you to worry about because certain other solutions are there that help you to switch the locations without any hassle.
Also read:
- [New] 2024 Approved Streamline Your Way to a Thriving Biz YouTube Channel
- [New] Walk of Shadows The Ultimate List of Greatest Zombie Games
- Amplify Your Video Reach with These Key SEO Insights (1-11) for 2024
- Here are Different Ways to Find Pokemon Go Trainer Codes to Add to Your Account On Apple iPhone XS Max | Dr.fone
- How can I get more stardust in pokemon go On Apple iPhone 11? | Dr.fone
- How to Recover Apple iPhone 15 Pro Data From iOS iCloud? | Dr.fone
- In 2024, Here Are Some Reliable Ways to Get Pokemon Go Friend Codes For Apple iPhone XR | Dr.fone
- In 2024, How Can I Create My Pokemon Overworld Maps On Apple iPhone 12 Pro Max? | Dr.fone
- In 2024, Pokemon Go Error 12 Failed to Detect Location On Apple iPhone 7? | Dr.fone
- Pokémon Go Cooldown Chart On Apple iPhone 15 | Dr.fone
- The Ultimate Guide for Streamlining iPhone Video Content
- Transforma Tus Archivos CAF Directamente a OGG Gratuitos Con El Potente Software De Movavi Online
- Unlock iPhone 8 Plus With Forgotten Passcode Different Methods You Can Try | Dr.fone
- Title: In 2024, All You Need To Know About Mega Greninja For Apple iPhone 14 Plus | Dr.fone
- Author: Iris
- Created at : 2024-11-01 18:13:22
- Updated at : 2024-11-04 19:02:51
- Link: https://ios-pokemon-go.techidaily.com/in-2024-all-you-need-to-know-about-mega-greninja-for-apple-iphone-14-plus-drfone-by-drfone-virtual-ios/
- License: This work is licensed under CC BY-NC-SA 4.0.