
In 2024, All You Need To Know About Mega Greninja For Apple iPhone 7 | Dr.fone
All You Need To Know About Mega Greninja For Apple iPhone 7
Are you a fan of Pokemon Go? Then, you will find this article not only useful but also quite interesting. In case you have never played this game before, then you should know that Pokemon Go is a fantastic augmented reality game.
It requires the use of GPS (Global Positioning System) to track your location. Basically, Pokemon Go is a mobile application which you can easily download from Google Play Store or App Store, and it’s absolutely free. In simple words, you can say that Pokemon Go makes use of mapping technology so as to plot your actual location as you roam around in the streets to catch your favourite Pokemon.
When you play the game, your main goal would be to catch as many Pokemon or fictional characters as you can. Your main task will be to battle your opponents to catch the Pokemon and then train them.
It’s worth mentioning here that this AR-game is absolutely convenient to play. Now, one of the most amazing features that have been added to this game is Mega Evolution. But, unfortunately if you were of the opinion that greninja can mega evolve, then you are completely wrong, in fact you should note that no Kalos pokemon can mega evolve.
Through this article, we will discuss all you need to know about Greninja. So, without any further delay, let’s get started.
Part 1: Who is Mega greninja?

Also, called the Ninja Pokemon, Greninja is Dark/ Water-type pokemon. Some people love to call it a frog-like master. One of the most amazing features of Greninja pokemon is that with its swift movements, you will notice that this pokemon succeeds in confusing its opponents.
It makes use of very sharp throwing stars to slice its enemies. It features Torrent ability.
There are various weaknesses of this pokemon which include “Fighting”, “Grass”, “Electric”, “Bug”, and “Fairy”.Its worth mentioning here that Greninja pokemon is the final evolution of Froakie.

Part 2: What are the Strengths of Greninja in Pokemon?

Greninja is resistant to “Water”, “Fire”, “Ice”, “Dark”, “Steel” and finally “Ghost”. Also, this pokemon is immune to “Psychic”. This pokemon’s presence can be very intimidating for its opponents, it would not be wrong if we say that Greninja is quite unpredictable. There is no doubt that the counter attacks of Greniaja prove to be very dangerous for its enemies.
Part 3: How to Catch Greninja?

In order to catch Greninja, you will be required to fulfill specific requirements in the Pokemon Sun and Moon Exclusive demo.
First of all, after launching the Pokemon Sun and Moon Demo, go to the Pokemon Center.
Then, you’ll meet Professor Kukui and when he starts talking to you and asks what you wish to do , choose the option of “bring to full version.After that, you will be required to choose Ash-Greninja. Then, open the full game, finally you have to enter the nearest Pokémon Center.
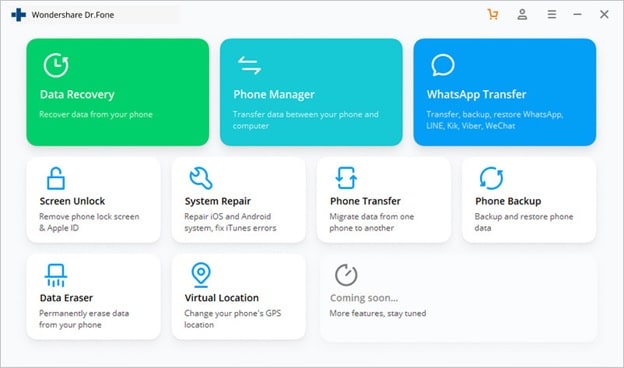
Catching your favourite Pokemon or to mega evolve a specific pokemon will require you to go to different places or explore different locations, but it’s not always possible to step out of your house, it might be raining, or its night time, in the case, we recommend using software called Dr.Fone(Virtual Location).
With the help of this amazing software, you can teleport to any location or place in the whole without even requiring you to step out of your house.
In order to get started with Dr.Fone, you need to download Dr.Fone(Virtual Location) iOS. Then, you have to install Dr.fone on your smartphone. Finally, you have to launch Dr.Fone (Virtual Location) on your device.
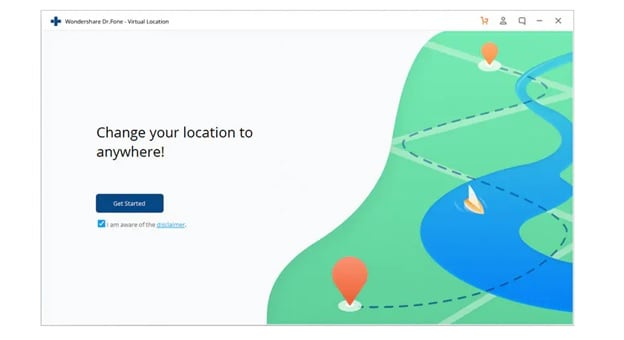
Step 1: You have to tap on “Virtual Location” among the various options that you will notice therein. It’s important to ensure that when you are setting up Dr.Fone on your device, always ensure that your Apple iPhone 7 is connected to the PC. Then, click on “Get Started”.
Step 2: If you have executed the prior steps or directions successfully, then you will see a new window that shows your actual location on a map will get displayed on your screen. Now, make sure that your displayed location on moa is accurate, if not, then click on “Center On,” with the help of this, you’ll be able to make your location correct.
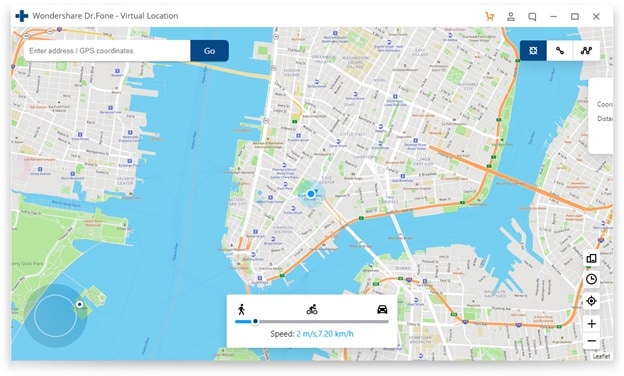
Step 3: After all the previous steps, the next step is to click on the “teleport mode” icon, which will be located in the upper-right part. This will activate the teleport mode. After that, you have to enter the name of the location or place where you wish to teleport to in the upper left field. Finally, tap on “Go”. As an example, we are going to enter “Italy”, Rome in the left field.
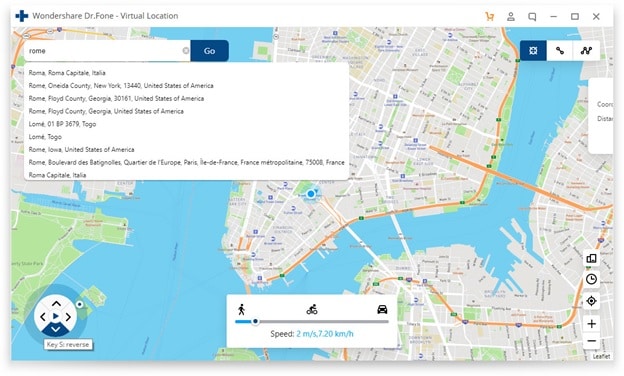
Step 4: In this manner, your location will now be understood or set by the system to “Italy”. You’ll see a pop-up box; you have to just click on “Move On”.
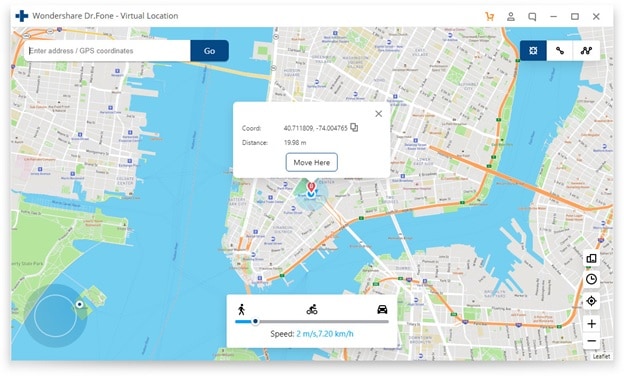
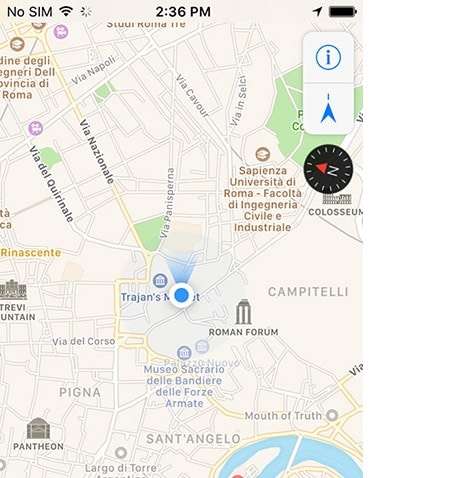
Step 5: If you have followed the directions accurately, your actual location on the map will now be set to “Italy”. You can confirm your location from the Pokemon Go’s map. Finally, below we have provided a screenshot of how the location will be shown.
Step 6: Also, you’ll see that the location on your Apple iPhone 7 would have also changed now to “Italy” or any other place that you have entered earlier.
Conclusion
So, we have reached the end of this article. We hope that you found the article quite useful as well as insightful. We also hope that with the help of the setup guide for Dr.Fone you can now easily catch your favourite pokemon by teleporting to different locations across the world. If you have any doubts or suggestions related to this article, then feel free to write it down in the comment section. So, this was all from our side for now. Stay Tuned
Why can’t I install the ipogo On Apple iPhone 7
For tweaking the official Pokemon Go app right there in AppStore, iPogo is a choice to have. But sometimes iPogo can’t install, and users face a lot of difficulties. At that moment, some users feel furious and look forward to the solutions to get rid of it. If you also hit in the same category, you are on the right page. Let’s discuss it more and look forward to the solution that will help you to install it again.
Part 1: Reasons that you can’t install the ipogo
There are multiple reasons that contribute to the difficulty when you can’t install the iPogo. Some of them are as follows:
- iPhone version:
The current iPhone version you are choosing may be responsible for the problem for iPogo can’t install. It is important to have iOS version 13. It works on all the known jailbreak devices having the same iOS. In case you have upgraded the iOS 13 to iOS 14, the chances are quite less to use it.
- iPogo version:
iPogo version is also an important factor of consideration. Time to time regular updates keep coming, and if you are stuck on the previous version, you will not be able to use it. Sometimes the iPogo is down whenever there is an update, and when you try to update it, the problem arises. At that moment, you need to be patient and try re-installation.
- Direct download method:
If a user is considering direct downloading method, they might also face this trouble because Apple now targets certificate. Now you need to create your certificate with the help of a computer or a paid service like Signulous and others.
Bonus: Simple steps to install iPogo
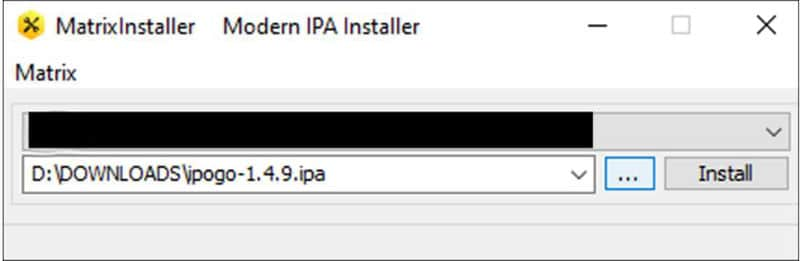
To install iPogo, we suggest you avoid the direct download method and instead follow the steps to follow with “Matrix installer.”
Steps to follow:
Step 1: Upgrade the iTunes version of your computer to latest version.
Step 2: Now remove the original app from your iDevice.
Step 3: Get IPA from the website download and save it.
Step 4: Launch the “Matrix Installer”.
Step 5: With the help of USB cable connect your Apple iPhone 7 to the PC.
Step 6: Let the installer to detect the iDevice.
Step 7: Now click on “Device” then “Install Package” option.
Step 8: Now the installer asks for the Apple ID username, and Password mentions the same. Make sure these are the ones used to fetch the developer certificate from the Apple Server. (We suggest you create a new Apple ID)
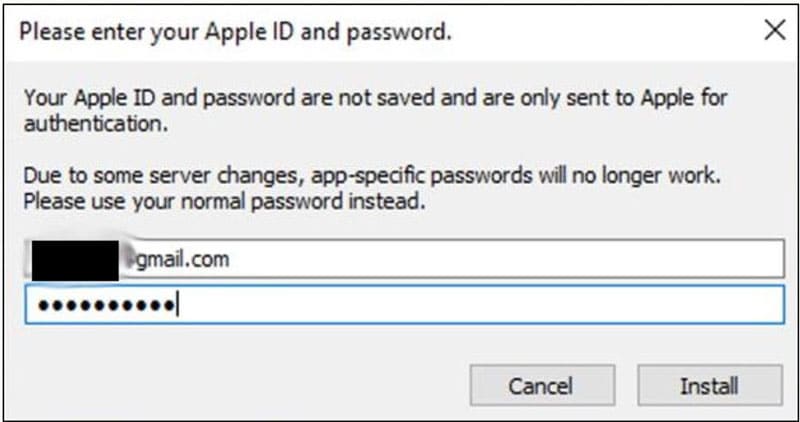
Step 9: Be patient for a while and let the impact or to perform all the work.
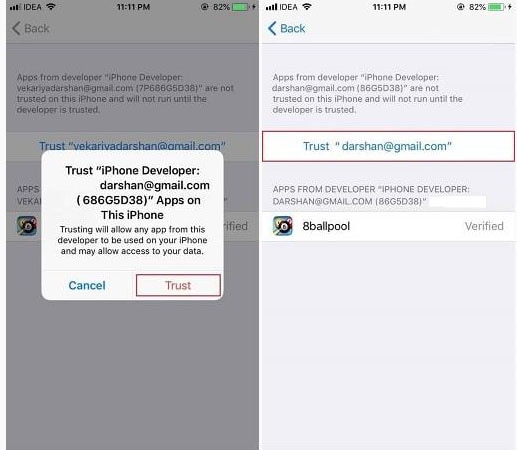
Step 10: “Complete” message will appear and unlock your Apple iPhone 7 Screen and move to “settings->General-> device management.”
Step 11: Now hit on the developer Apple ID and trust it.
Part 2: Risk of installing ipogo and running
You can come across a certain risks also when you are installing and running iPogo. These are as follows:
Jailbreaking is required:
For using iPogo, jailbreaking is required, and it refers to the privilege to Apple devices through which they can remove all the software restrictions. If there is any loss to the data, a user will be responsible for it.
Chances to get banned:
iPogo is an application that can be used after jailbreaking only. After doing the jailbreaking, the chances are there that your device might get banned. You are at a high risk where certain problems may arise.
Can lose access to content:
There might be a chance you have will lose access to content as well. Therefore we suggest you avoid. If you still want to jailbreak your device and want to install iPogo, it is entirely your choice.
Part 3: is there a software like iPogo without jailbreak?
If you are wondering about the same question, then the answer is “Yes”. Dr.Fone Virtual Location is an iOS location changer helping you to enjoy the same features without any hassle. This application will help you to simulate GPS movement along real road or paths you draw. A user can also integrate joystick to make the movement of GPS effortless. It helps you to teleport iPhone GPS to anywhere in the world. The best part is it supports up to five device location management at a time.
Let us understand how this tool can help you spoofing your location.
We are mentioning the steps which will help you to teleport to anywhere in the world. The steps for it are as follows:
Step 1: Get the tool on PC
Start with downloading Dr.Fone Virtual Location on your PC using the official website. And then install it. Once done, launch the program. Now hit on “Virtual Location” from all the options and connect your Apple iPhone 7 to the computer.

Step 2: Get the Apple iPhone 7 device Connected
You now need to get your iPgone plugged with PC via a USB cord. Once you do this, simply click on “Get Started.”

Step 3: Check Location Accuracy
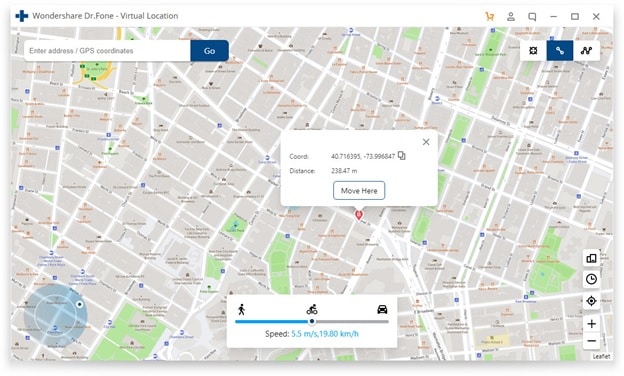
A new window will appear indicating the actual location on the map. If the location does not appear to be accurate hit on “Centre on” icon at the lower right part to get an accurate location.
Step 4: Turn on Teleport Mode
By clicking on the Corresponding icon in the upper right activates “Teleport Mode”. Now mention the place you want to teleport in the upper left field. Click “Go” (consider a Rome in Italy as an example)

Step 5: Start Spoof
After selecting it, the system will understand the desired place in Rome and hit on “Move here” in the popup box.

Finally, the location has been changed to Rome now. Whatever you do whether you click on “centre on” icon or try to relocate yourself on iPhone ROM is the fixed location that will appear, and in all the location app as well Rome is the fixed place.
Conclusion
Here, we have agreed to do to the conclusion that if iPogo won’t install there is nothing for you to worry about because certain other solutions are there that help you to switch the locations without any hassle.
Here’s Everything You Should Know About Pokemon Stops in Detail On Apple iPhone 7
If you are just starting with Pokemon Go, then you might see Pokemon stops all around you! Well, Pokemon Go stops are extremely essential in the game as they would help you collect items or even catch Pokemons. Therefore, in this post, I will let you know how to find Pokemon Go stops near me and would also discuss a solution to explore Pokemon stops in any other place.
Part 1: What are Pokemon Stops in Pokemon Go?
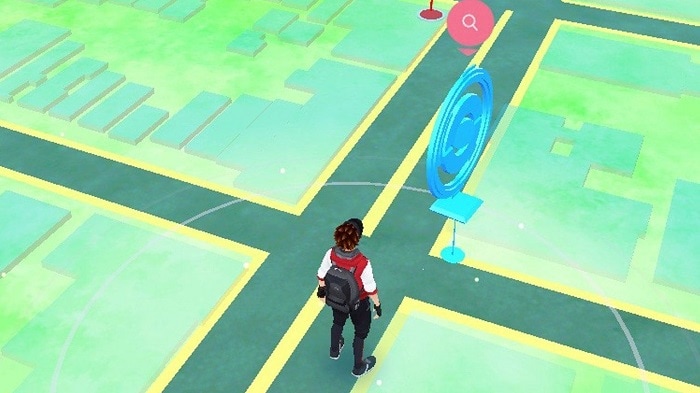
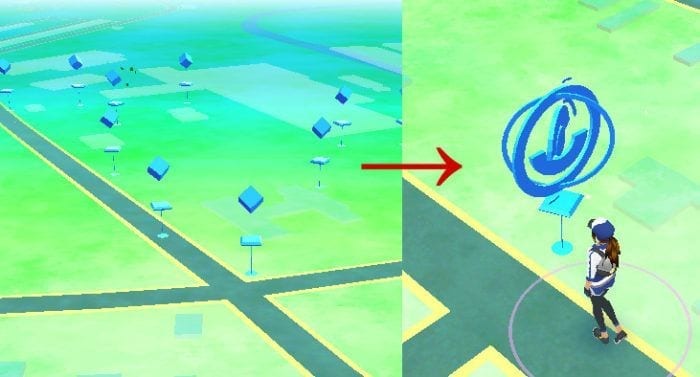
In nutshell, Pokemon Go stops are dedicated places in the Pokemon Go map that can be visited to collect valuable items. For instance, you can obtain eggs, Poke balls, potions, and other game-related items from a Pokemon Go stop near you. At times, even a Pokemon can be found roaming nearby a Pokemon Go stop.
Mostly, Pokemon stops are located at important buildings, monuments, art installations, and other vital areas. On your map, you can see Pokemon stops near me depicted by a blue triangle icon. As you would approach the Pokemon stop, it will change to a disc icon and you can obtain various features by tapping on it in the game.
Part 2: How to use Lure Modules on Poke Stops in Pokemon Go?
Lure Module is a beneficial in-game item in Pokemon Go that can lure the nearby Pokemons to a Poke stop. Ideally, you can place a Lure Module at any Poke stop in Pokemon Go and it will be helpful to other players as well. As of now, the effect of a single Lure Module will last for 30 minutes, but you can install another module to prolong its effect.
These days, a lot of brands and businesses also place Lure Modules to create Pokemon Go sponsored stops that would attract players to a designated location. Here’s how I installed a Lure Module at Pokemon Go stops near me.
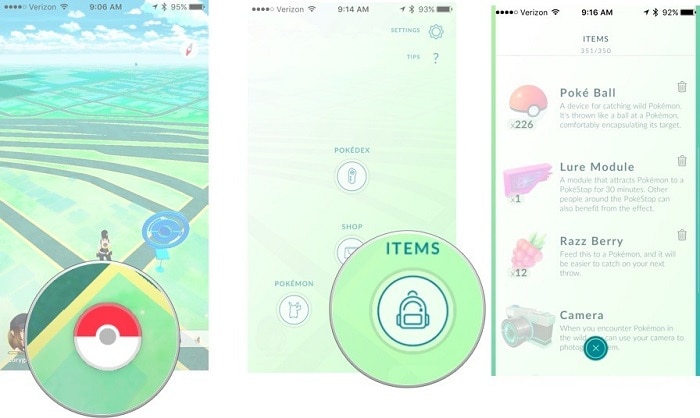
Step 1: Buy Lure Modules from the Pokemon Go Store
Before you install a Lure Module to a Pokemon stop, you need to purchase it on your account. For this, just launch Pokemon Go, tap on the Pokeball icon, and visit the “Items” store. From here, you can look for Lure Module and purchase any number of modules.
Step 2: Set up Lure Modules at Pokestops in Pokemon Go
Great! Once you have purchased Lure Modules, just step out and find Pokemon stops near me. After finding the Pokemon stop of your choice, tap on the disc icon to get more options. Now, tap on the Lure Module slot icon (white bar) at the top and go to the Pokemon Module feature.
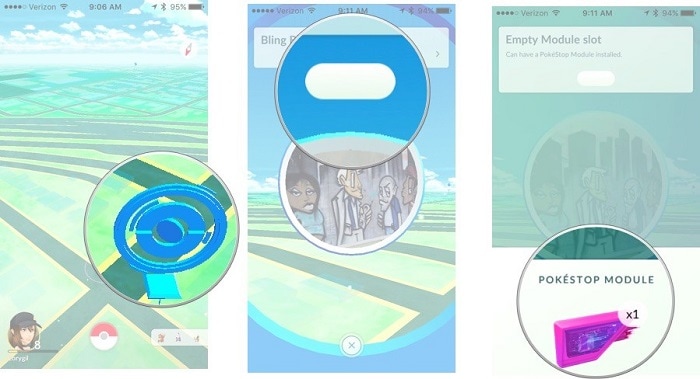
That’s it! You can now select Lure Module from the Pokemon Module options and simply place it at the designated Pokemon stop. The Pokemon Go stop’s icon would change with rose petals to attract the nearby Pokemons.
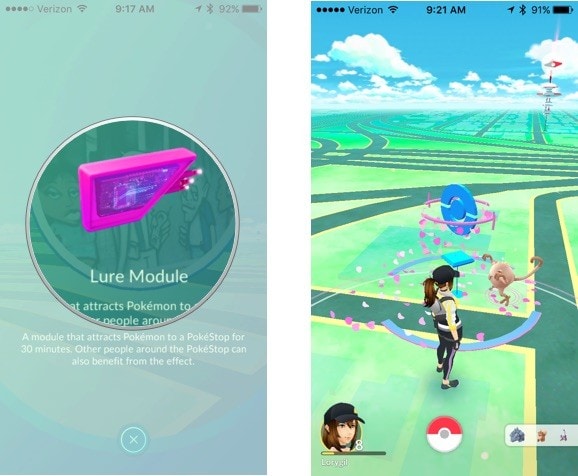
For the next 30 minutes, the nearby Pokemons will automatically come to the designated Pokemon Go stop. This will benefit you and any other trainer who would visit the Pokemon Go stop until the allocated time.
Part 3: How Can You Make Pokestops into Farming Spots in the Game?
With the help of Lure Modules and other techniques, players can make Pokemon Go stops into farming spots to catch more Pokemons. Ideally, you can also apply these suggestions that I followed to enhance Pokemon Go stops near me.
Explore Multiple Pokemon Go Stops nearby
You might already know that trainers with Level 38 or above can nominate places to become Pokemon Go stops. Therefore, you and your friends can also help create multiple Poke stops in Pokemon Go nearby.
In this way, you can simply explore multiple Pokemon Go stops by walking. In a single walk, this would let you replenish items in Pokemon Go and you might end up catching more Pokemons as well.
Use Lure Modules with Friends
Instead of solely using Lure Modules, you can go with your friends to catch Pokemons. For instance, you and your friends can install Lure Modules at the nearby Pokemon Go stops. This will automatically create a farming spot for that place, attracting all kinds of nearby Pokemons. Not only would this benefit you/your friends, but let other trainers to catch tons of new Pokemons easily.
Part 4: How to Explore Pokemon Go Stops Remotely (without Walking)?
While Pokemon Go is all about exploring and going out to find Pokemon and Pokestops, not everyone can step out or walk so much. In this case, you can use a dedicated tool like Dr.Fone – Virtual Location (iOS) that can spoof your Apple iPhone 7’s location to anywhere you want. You can simply change your location to any other spot where a Pokemon stop is located or even simulate your movement in the following way:
Step 1: Connect your Apple iPhone 7 and Launch the Application
At first, just install the application, launch the Dr.Fone toolkit on your PC, and click on the “Virtual Location” module from its home.
Subsequently, also connect your Apple iPhone 7 to the system using a working cable and trust the system. On the interface of Dr.Fone – Virtual Location (iOS), just agree to its terms, and click on the “Get Started” button.
Step 2: Enter the Details of the Target Location
Once your Apple iPhone 7 is detected by the interface, its present location would be displayed with other details. To spoof the location of your Apple iPhone 7 on Pokemon Go, you can click on the Teleport Mode icon from the top.

Now, you can go to the search options on the top-left side and enter the address or exact coordinates of the Pokestop. You can find the location of a Pokestop from several freely available online sources.
Step 3: Spoof your Apple iPhone 7 Location to a Pokemon stop
As you would enter the location, the interface will automatically change to the designated spot. You can now move the pin around on the map and even zoom in/out to drop it at the exact spot. In the end, just click on the “Move Here” button to spoof your Apple iPhone 7’s location and visit the Pokemon stop virtually.
Besides that, you can also use the one-stop or multi-stop modes of the application to simulate your movement and visit the nearby Pokemon Go stops.
I’m sure that after reading this post, you would be able to know about Poke stops in Pokemon Go. I have included several tips that I implement to find Pokemon stops near me in this guide. Though, if you want to catch more Pokemons via Pokemon Go stops, then you can simply use Lure Modules. Apart from that, you can also use a dedicated location spoofer like Dr.Fone – Virtual Location (iOS) to visit Pokemon stops anywhere in the world and replenish unlimited items without any trouble.
Also read:
- [Updated] Transformative Tips to Take Your LunaPic Skills Up
- 11 Best Pokemon Go Spoofers for GPS Spoofing on Apple iPhone 15 Plus | Dr.fone
- 15 Best Strongest Pokémon To Use in Pokémon GO PvP Leagues For Apple iPhone 14 Pro | Dr.fone
- 2024 Approved PS5/Xbox Series X The Elite TVs for Gamers
- Cómo Crear Tu Propia Imagen De Disco en Windows Gratis - Técnicas Sencillas
- Heres Everything You Should Know About Pokemon Stops in Detail On Apple iPhone 14 Plus | Dr.fone
- How to get the dragon scale and evolution-enabled pokemon On Apple iPhone XR? | Dr.fone
- In 2024, 15 Best Strongest Pokémon To Use in Pokémon GO PvP Leagues For Apple iPhone 12 Pro Max | Dr.fone
- In 2024, 9 Mind-Blowing Tricks to Hatch Eggs in Pokemon Go Without Walking On Apple iPhone 12 mini | Dr.fone
- In 2024, Optimal Downloaders Your Guide to Superior 4K Content
- In 2024, Pokemon Go No GPS Signal? Heres Every Possible Solution On Apple iPhone 7 Plus | Dr.fone
- In 2024, Top 5 from Nokia C12 Plus to iPhone Contacts Transfer Apps and Software | Dr.fone
- In 2024, Top 7 Phone Number Locators To Track Honor 90 Location | Dr.fone
- In 2024, What is the best Pokemon for pokemon pvp ranking On Apple iPhone 12 mini? | Dr.fone
- Is pgsharp legal when you are playing pokemon On Vivo Y78+ (T1) Edition? | Dr.fone
- Latest Intel Iris+ Graphics Amics 655 Windows Drivers for 10 & 11 Operating Systems
- Visual Perfection with OBS Studio and Its Comprehensive LUT Support
- Title: In 2024, All You Need To Know About Mega Greninja For Apple iPhone 7 | Dr.fone
- Author: Iris
- Created at : 2024-11-01 19:14:31
- Updated at : 2024-11-04 18:38:18
- Link: https://ios-pokemon-go.techidaily.com/in-2024-all-you-need-to-know-about-mega-greninja-for-apple-iphone-7-drfone-by-drfone-virtual-ios/
- License: This work is licensed under CC BY-NC-SA 4.0.