
In 2024, Heres Everything You Should Know About Pokemon Stops in Detail On Apple iPhone 7 Plus | Dr.fone
Here’s Everything You Should Know About Pokemon Stops in Detail On Apple iPhone 7 Plus
If you are just starting with Pokemon Go, then you might see Pokemon stops all around you! Well, Pokemon Go stops are extremely essential in the game as they would help you collect items or even catch Pokemons. Therefore, in this post, I will let you know how to find Pokemon Go stops near me and would also discuss a solution to explore Pokemon stops in any other place.
Part 1: What are Pokemon Stops in Pokemon Go?
In nutshell, Pokemon Go stops are dedicated places in the Pokemon Go map that can be visited to collect valuable items. For instance, you can obtain eggs, Poke balls, potions, and other game-related items from a Pokemon Go stop near you. At times, even a Pokemon can be found roaming nearby a Pokemon Go stop.
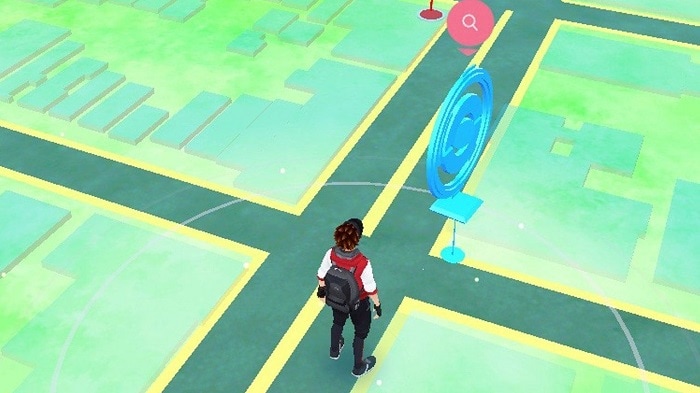
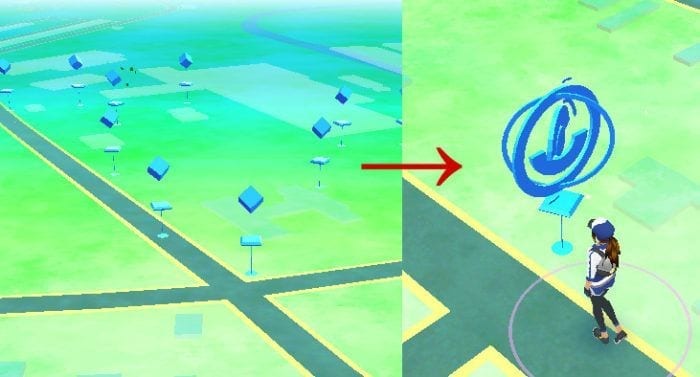
Mostly, Pokemon stops are located at important buildings, monuments, art installations, and other vital areas. On your map, you can see Pokemon stops near me depicted by a blue triangle icon. As you would approach the Pokemon stop, it will change to a disc icon and you can obtain various features by tapping on it in the game.
Part 2: How to use Lure Modules on Poke Stops in Pokemon Go?
Lure Module is a beneficial in-game item in Pokemon Go that can lure the nearby Pokemons to a Poke stop. Ideally, you can place a Lure Module at any Poke stop in Pokemon Go and it will be helpful to other players as well. As of now, the effect of a single Lure Module will last for 30 minutes, but you can install another module to prolong its effect.
These days, a lot of brands and businesses also place Lure Modules to create Pokemon Go sponsored stops that would attract players to a designated location. Here’s how I installed a Lure Module at Pokemon Go stops near me.
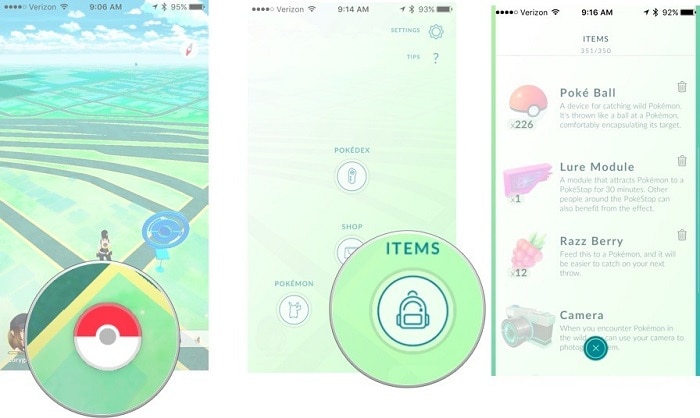
Step 1: Buy Lure Modules from the Pokemon Go Store
Before you install a Lure Module to a Pokemon stop, you need to purchase it on your account. For this, just launch Pokemon Go, tap on the Pokeball icon, and visit the “Items” store. From here, you can look for Lure Module and purchase any number of modules.
Step 2: Set up Lure Modules at Pokestops in Pokemon Go
Great! Once you have purchased Lure Modules, just step out and find Pokemon stops near me. After finding the Pokemon stop of your choice, tap on the disc icon to get more options. Now, tap on the Lure Module slot icon (white bar) at the top and go to the Pokemon Module feature.
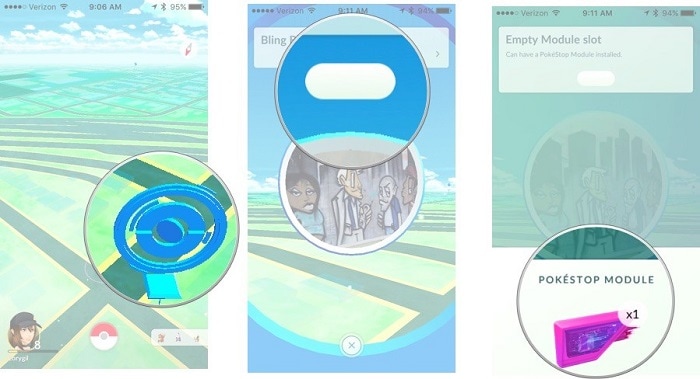
That’s it! You can now select Lure Module from the Pokemon Module options and simply place it at the designated Pokemon stop. The Pokemon Go stop’s icon would change with rose petals to attract the nearby Pokemons.
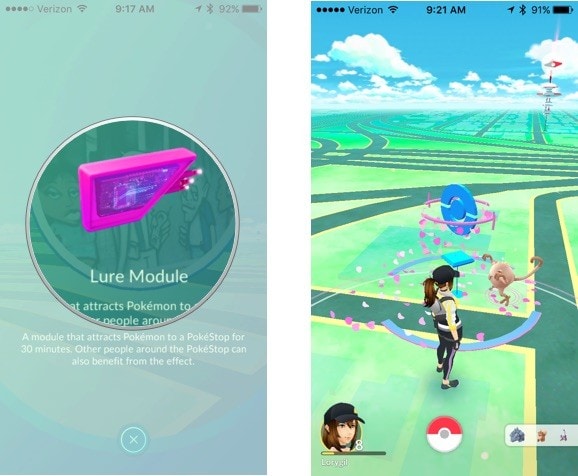
For the next 30 minutes, the nearby Pokemons will automatically come to the designated Pokemon Go stop. This will benefit you and any other trainer who would visit the Pokemon Go stop until the allocated time.
Part 3: How Can You Make Pokestops into Farming Spots in the Game?
With the help of Lure Modules and other techniques, players can make Pokemon Go stops into farming spots to catch more Pokemons. Ideally, you can also apply these suggestions that I followed to enhance Pokemon Go stops near me.
Explore Multiple Pokemon Go Stops nearby
You might already know that trainers with Level 38 or above can nominate places to become Pokemon Go stops. Therefore, you and your friends can also help create multiple Poke stops in Pokemon Go nearby.
In this way, you can simply explore multiple Pokemon Go stops by walking. In a single walk, this would let you replenish items in Pokemon Go and you might end up catching more Pokemons as well.
Use Lure Modules with Friends
Instead of solely using Lure Modules, you can go with your friends to catch Pokemons. For instance, you and your friends can install Lure Modules at the nearby Pokemon Go stops. This will automatically create a farming spot for that place, attracting all kinds of nearby Pokemons. Not only would this benefit you/your friends, but let other trainers to catch tons of new Pokemons easily.

Part 4: How to Explore Pokemon Go Stops Remotely (without Walking)?
While Pokemon Go is all about exploring and going out to find Pokemon and Pokestops, not everyone can step out or walk so much. In this case, you can use a dedicated tool like Dr.Fone – Virtual Location (iOS) that can spoof your Apple iPhone 7 Plus’s location to anywhere you want. You can simply change your location to any other spot where a Pokemon stop is located or even simulate your movement in the following way:
Step 1: Connect your Apple iPhone 7 Plus and Launch the Application
At first, just install the application, launch the Dr.Fone toolkit on your PC, and click on the “Virtual Location” module from its home.

Subsequently, also connect your Apple iPhone 7 Plus to the system using a working cable and trust the system. On the interface of Dr.Fone – Virtual Location (iOS), just agree to its terms, and click on the “Get Started” button.

Step 2: Enter the Details of the Target Location
Once your Apple iPhone 7 Plus is detected by the interface, its present location would be displayed with other details. To spoof the location of your Apple iPhone 7 Plus on Pokemon Go, you can click on the Teleport Mode icon from the top.

Now, you can go to the search options on the top-left side and enter the address or exact coordinates of the Pokestop. You can find the location of a Pokestop from several freely available online sources.

Step 3: Spoof your Apple iPhone 7 Plus Location to a Pokemon stop
As you would enter the location, the interface will automatically change to the designated spot. You can now move the pin around on the map and even zoom in/out to drop it at the exact spot. In the end, just click on the “Move Here” button to spoof your Apple iPhone 7 Plus’s location and visit the Pokemon stop virtually.

Besides that, you can also use the one-stop or multi-stop modes of the application to simulate your movement and visit the nearby Pokemon Go stops.
I’m sure that after reading this post, you would be able to know about Poke stops in Pokemon Go. I have included several tips that I implement to find Pokemon stops near me in this guide. Though, if you want to catch more Pokemons via Pokemon Go stops, then you can simply use Lure Modules. Apart from that, you can also use a dedicated location spoofer like Dr.Fone – Virtual Location (iOS) to visit Pokemon stops anywhere in the world and replenish unlimited items without any trouble.
Where Is the Best Place to Catch Dratini On Apple iPhone 7 Plus
Dratini is a rare Pokemon that can be found in the wild. It is a Dragon-type Pokemon that evolves into Dragonair and then into Dragonite. Dratini is a popular Pokemon among players due to its rarity and powerful evolution. If you are looking to catch Dratini on your Apple iPhone 7 Plus, you may be wondering where the best place to find them is.
Dratini is one of the Pokémon creatures that resemble a snake. It has an elongated blue body with a blue white underside. It carries three-pronged fins on each side of its head which are white in color. Dratini also has a white bump on the forehead.
Dratini has an energy level that is constantly increasing, which makes it grow and can reach a length of more than 6 feet. It sheds its skin every time it has to grow, and usually hide behind a waterfall when shedding. The colony of Dratini lives underwater, living at the bottom feeding on food that falls from the upper levels. Outrage is the signature move for this Pokémon creature.
Part 1: What’s the evolution of Dratini?
Dratini undergoes two different evolutions
The first un-evolved version is the serpentine Dratini that looks like a snake and continues shedding its skin as it grows. When you get to level 30, Dratini evolves into Dragonair, and at level 55 it becomes Dragonite
Dragonair
This is an evolution of Dratini, which has a long scaly serpent-like body. It still retails the blue body with a white underside. The white bump on the forehead now becomes a white horn. The budding wings on the side of the head have now grown into full wings. It also carries three crystal orbs, with one on the neck and the other two on the tail.
Dragonair has the ability to stretch its wings so it can fly. It has a huge amount of energy in the body and can discharge the energy through the crystals. The energy that it releases has the ability to change the weather wherever it is. Dragonair can be found in seas and lakes.
Dragonite
This is a Pokémon character that truly resembles a dragon and is the second evolution of Dratini. It has a yellow thick body, and a couple of antennae that come out of its forehead. It has a striated underbelly. The body is quite large when compared to the small wings.
Dragonite can fly at very high speeds despite its bulky appearance. It is a kindhearted Pokémon, which is as intelligent as a human being. It has been found to have tendencies to save humans from disasters, such as saving those who have come from a capsized ship on the high seas. It lives near the sea and is extremely rare in the Pokémon world.
Part 2: Where can I find the Dratini nest?
Dratini is a Pokémon that lives in the water. Since it loves lakes and seas, you can find it when you visit areas that are near water. For example, in the United States, the most famous nests for Dratini are found in North Eastern San Francisco, Pier 39 and Pier 15. You will always find Dratini at these sites and they are famous for people who want to farm Dratini.
You may also g West to Squirtle Nest where you can get a lot of Dratini.
Dratini has a 5% spawning chance every day, so if you have the time, you can spend it on these sites as you enjoy the watery view and wait for it to appear.
Dratini nests can also be found in other parts of the world, such as Tokyo, Japan; Sydney and New South Wales, Australia; Paris, France and others.
Part 3: Are the Dratini nest and spawn spot in the same place?
This is quite a common question for those who are new to the Pokémon universe. Basically, Dratini nests and spawn points are the same for a period of two weeks. The nests then migrate leaving the spawn points to spawn different types of Pokémon.
If the Dratini nest migrates, it can still come back in the future. You should always keep an eye at the spawn point where you first encountered your first Dratini Nest; it may come back once more and you can continue farming Dratini.
Dratini nests will migrate on alternate Thursdays at midnight. The nest migrations are random, so make sure that you visit and hit them many times over the two weeks in order to get the most Dratini that you can.
Part 4: How to increase the possibility of earning Pokémon Go Dratini?
As mentioned earlier, Dratini can be found in certain places around the world. If you live outside these regions, you cannot be able to get Dratini. The best way to go about getting Dratini in such cases is to virtually relocate your device. This means that you can take your device to Tokyo nest sites even if you live in Africa.
The best app to use for teleportation is Dr.Fone - Virtual Location (iOS)
Features of Dr.Fone - Virtual Location (iOS)
- Instantly teleport to an area where a Dratini nest has been found and remotely collect as many as you can.
- Use the joystick feature to move around the map until you come across Dratini.
- The app allows you to seem to be walking, riding a bike, or in a vehicle, on the map. This simulates real-time travel data, which is important when playing Pokémon Go.
- Any app that relies on geo-location data can safely use Dr.Fone - Virtual Location for teleportation.
A step-by-step guide to spoof your location using Dr.Fone Virtual Location (iOS)
On the official Dr.Fone page, download and install Dr.Fone on your computer or you can click the Download button below to download it directly. Launch it and then go to the Home screen and click on “Virtual Location”.
After entering the virtual location module, connect your iOS device to your computer using an original USB cable.
Next, click on “Get Started”; you will now be able to start the spoofing process.
Looking at the map, you can now see the actual location of your device. If the coordinates are not the correct ones, go to the bottom of your computer screen and click on the “Current Virtual location” icon. This will instantly point to the current virtual location of your device.
Now go to the top side of your computer screen and click on the third icon on the bar. This instantly puts you in “teleport” mode. Now enter the coordinates of the Dratini nest that you have located. Hit the “Go” button and your device will instantly be teleported to the coordinates you entered.
The image below shows an example of coordinates entered for Rome, Italy.
Once you have successfully teleported your device, you will be able to navigate to the area where the Dratini nest has been found. You can use the joystick feature for this. You should also click on “Move here” so your location is permanently moved to that place.
You may now camp and keep hitting the Dratini nest so you can farm as many as possible within the two weeks before the nest migrates to another location.
Camping and looking for other Pokémon in the area will help you cool down and therefore avoid being banned from the game for spoofing your iOS device.
This is how your location will be viewed on the map.

This is how your location will be viewed on another iPhone device.

In conclusion
Dratini is one of the most friendly but rare Pokémon to get. It can evolve from a small serpentine worm, into a might, good-hearted dragon. This is one of the Pokémon that people love to farm for trading and taking part in raids and such events.
When you need to, you can teleport your device to an area where Dratini is popular using Dr.Fone - Virtual Location (iOS). Use the Dratini nest maps to find Dratini, and then visit the area or teleport there.
Detailed guide of ispoofer for pogo installation On Apple iPhone 7 Plus
Pokemon Go is Niantic’s most successful game that has taken the world by storm. Players get to be a part of the various regions of the Pokemon has now become one with our world. The game requires you to travel to different locations to complete researches, catch Pokemon, defend gyms, and most importantly, complete the Pokedex given by Professor Willow. Niantic’s games are designed to be played with others outdoors. This feature ends up giving players in some parts of the world advantage over others. This is specially to catch regional Pokemon and during ticketed events and sponsored events. Spoofers can avoid the barriers of distance and play anywhere in the world by iSpoofer for pogo installation and other such apps. Niantic, however, does not allow this and considers it the same as hacking. Players who were looking to play and access all the features of the game available all across the world.
Part 1: Will the iSpoofer back on 2020?
iSpoofer has been shut down. All its applications, websites, and other related services have been terminated. iSpoofer for pogo installation does not exist. If any website claims to give access to the application or iSpoofer direct download, it is fake. Also, the new Pokemon Go application version which is 0.195.0 has been updated to detect applications like iSpoofer, so on being detected, it may lead to a warning, or a permanent ban as well. And we don’t see the certainty to get it back soon.
Part 2: Detailed guide of iSpoofer for pogo installation
This detailed guide for iSpoofer installation is for those who still possess the older version of the app that works in an older iOS version.
Step 1 – Install the setup for iSpoofer on your computer if you had got it using. This requires the latest version of iTunes, so make sure that you have it installed.
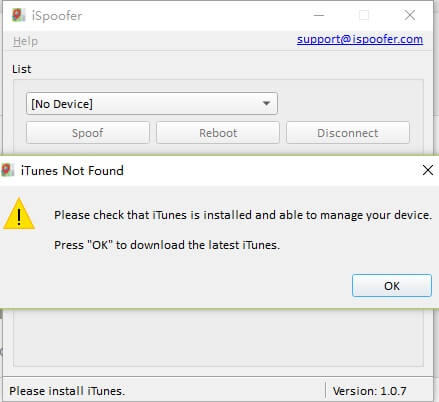
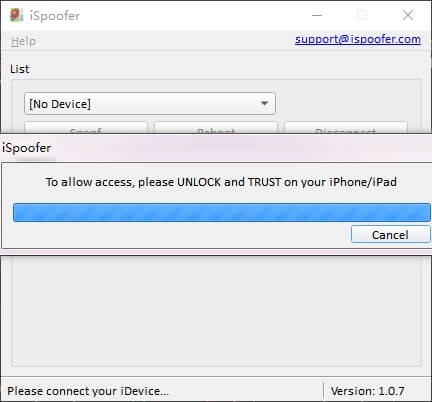
Step 2 – Once the setup is done, connect your phone to the computer and unlock it. You will have to select the “TRUST” option for the software to do its work. On selecting this option, iSpoofer will download a developer file that will spoof the location.
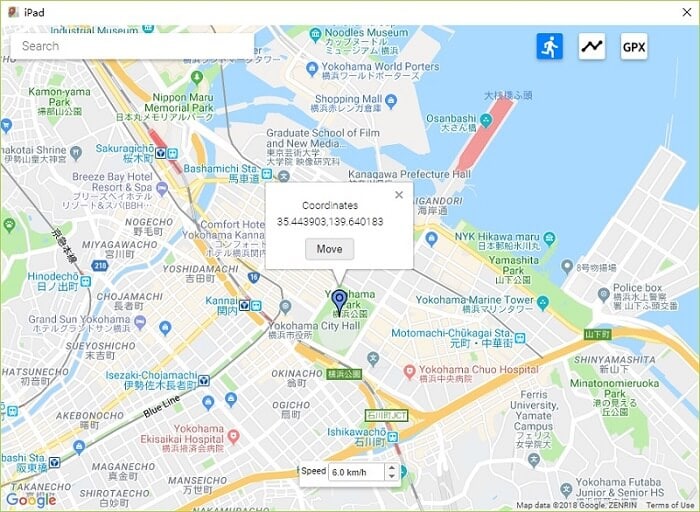
Step 3 – A map will load on your computer screen, which allows you to enter or point the location. Enter the location of your choice and click on “MOVE”. And that is it! Three simple steps and you have spoofed!
Part 3: How to use the iSpoofer when you play pokemon
Follow the tutorial above for ispoofer for pogo installation. A mock location has now been added to your device that makes iOS believe that you are at the entered spot.

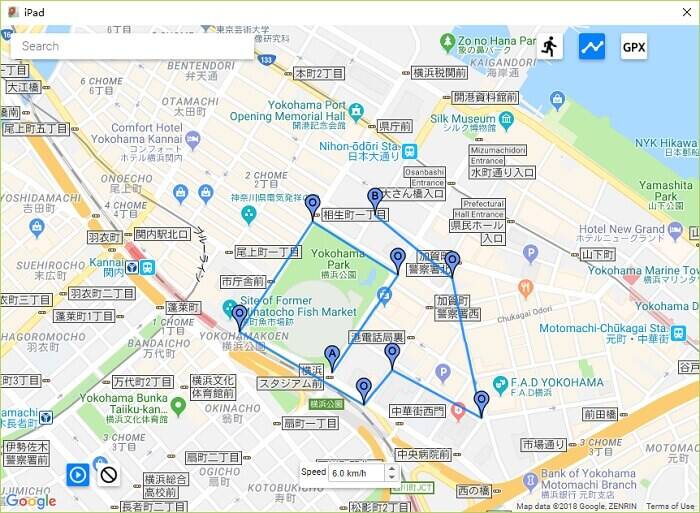
Following these steps, disconnect your phone and launch Pokemon Go. From here you can either use the joystick to move around or use a “.gpx” file to add a preset route for you to move around. That would look like this -
iSpoofer for pogo installation has the following disadvantages -
- The application cannot work without iTunes and is very dependent on it.
- Niantic can easily detect spoofing through this app and may lead to a ban.
- Movement simulations are hard and unnatural, making it more susceptible to a ban.
- Configurations and settings require some technical knowledge in to troubleshoot any errors.
- The app is prone to crashing a lot. The interface sometimes cannot handle the constant change of locations.
All these issues are overcome with great detail by Dr. Fone Virtual Location (iOS) by Wondershare.
Part 4: Safer tool to spoof pokemon- drfone virtual location
Pokemon Go Spoofers using iOS need not depend on iSpoofer for jumping locations. Dr. Fone Virtual Location by Wondershare is the new, safer app to spoof in Pokemon Go. The app uses mock location services to help you teleport to anywhere across the world. This also allows you to be safe from the detection software in Pokemon Go.
What are the benefits of using Dr. Fone Virtual Location?
- It provides a mock location and location changer – With just a single click, the application can change your location to where you want to. All apps on your phone will start recognizing this location.
- It enables you to move at different speeds - It has 3 different speeds, namely walking, cycling, and driving that helps you travel faster or log in kilometers too.
- The joystick allows movement – You can use the joystick to move your character around the map to navigate to Pokestops or rare wild spawns easily.
- The map view gives a 360o view – By scrolling around the screen, you can get to see all the routes around you and plan accordingly.
- Auto-walk feature - The game has an auto-walk feature in case you do not want to use the joystick to move around manually.
- Keyboard movement commands – The player can also use the A, S, W and D keys on the keyboard to move around
Step by Step Guide to Install and use Dr. Fone Virtual Location -
Step 1 - Download the Dr. Fone Virtual Location by official Wondershare website. Connect your phone to the computer in to execute the changes. Click on the “Virtual Location” option.
Step 2 – Now, on the next screen, you will see “Get Started” option. Click on it to proceed.
Step 3 – The screen will now show a map with your current location on it. In case the location is incorrect, click on the “Center On” button at the bottom-right side of your screen.
Step 4 – Select the “teleport” option by clicking on the icon on the top right corner. Then, in the text box, enter the city or the location’s exact name or the coordinates in the “latitude, longitude” format.
Step 5 – After entering your location, select the “GO” option.
Step 6 – The app will show you an option that says “Move Here”. Click on it, and now you have successfully spoofed to your location of choice.
Your spoofed location is now the default location of your phone, and all the apps will recognize it. The maps app on your phone looks like this –
The teleportation is now complete. Enjoy playing the game with no lags or errors.
Alert
While spoofing between two distant locations give the required amount of time for the cooldown timer to reach zero. If you decide to spoof too quickly, you will automatically trigger a soft ban, and you will not be able to play most parts of the game like catching Pokemon or spinning Pokestops. If this occurs consistently over multiple occasions, it will trigger Niantic’s warning and may end up getting a permanent ban. It has a 3-strike policy. 3 warnings are given before the account is permanently deleted.
The notice looks like this -

The cool-down period between two locations is based on distance and you can refer to the table below to understand the time you need to wait before logging in again.
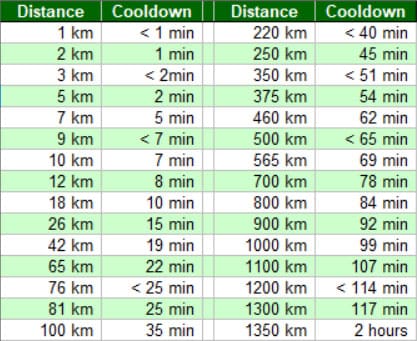
Most gamers wait for the standard 2 hours before logging in again. This gives them access to all the game’s features like before.
Conclusion
We hope that this article has been informative, about Dr Fone Virtual Location and ispoofer for pogo installation. You can now spoof locations with ease by using Dr.Fone - Virtual Location app. Vigilance is needed, and spoofing must be done by following all rules of cool down. This would prevent you from being caught by Niantic, and by Officer Jenny. We would like you to enjoy the game throughout without having to lose any of your levels and Pokemon.
Also read:
- [New] 2024 Approved IPhone Shot Success Adopt These 10 Key Photographic Rules
- [Updated] 2024 Approved Maximizing Engagement in Online Collaboration with Snap Camera
- 9 Best Free Android Monitoring Apps to Monitor Phone Remotely For your Vivo V30 Pro | Dr.fone
- A Detailed Pokemon Go PvP Tier List to Make you a Pro Trainer For Apple iPhone 11 Pro | Dr.fone
- A Detailed Pokemon Go PvP Tier List to Make you a Pro Trainer For Apple iPhone 13 Pro | Dr.fone
- Can I use iTools gpx file to catch the rare Pokemon On Apple iPhone XS Max | Dr.fone
- Easy Guide to Honor 80 Pro Straight Screen Edition FRP Bypass With Best Methods
- Elevate Your Search Capabilities Using Google Gemini Techniques
- How Does the Windows Registry Work? An Explanation Using RevoUninstaller Techniques
- How To Activate Your Dolby Digital Live Sound Drivers on a Windows 11 PC
- How to Fix Pokemon Go Route Not Working On Apple iPhone 12? | Dr.fone
- How to Upgrade iPhone 7 Plus without iTunes? | Dr.fone
- In 2024, A Detailed Pokemon Go PvP Tier List to Make you a Pro Trainer For Apple iPhone XS | Dr.fone
- In 2024, CatchEmAll Celebrate National Pokémon Day with Virtual Location On Apple iPhone 7 | Dr.fone
- In 2024, Heres Everything You Should Know About Pokemon Stops in Detail On Apple iPhone XS Max | Dr.fone
- In 2024, How and Where to Find a Shiny Stone Pokémon For Apple iPhone 11 Pro? | Dr.fone
- In 2024, The Best iSpoofer Alternative to Try On Apple iPhone 12 Pro Max | Dr.fone
- Overcoming Challenges: Ensuring Continuous Saving of ChatGPT Dialogues
- The Complete Manual of Sound Control Enhancing Your Live Stream with OBS Ducking for 2024
- Title: In 2024, Heres Everything You Should Know About Pokemon Stops in Detail On Apple iPhone 7 Plus | Dr.fone
- Author: Iris
- Created at : 2024-10-27 17:42:29
- Updated at : 2024-10-29 20:44:01
- Link: https://ios-pokemon-go.techidaily.com/in-2024-heres-everything-you-should-know-about-pokemon-stops-in-detail-on-apple-iphone-7-plus-drfone-by-drfone-virtual-ios/
- License: This work is licensed under CC BY-NC-SA 4.0.