
In 2024, How and Where to Find a Shiny Stone Pokémon For Apple iPhone 6? | Dr.fone
How and Where to Find a Shiny Stone Pokémon For Apple iPhone 6?
Shiny Stone Pokémon is an important evolution item in Pokémon Sword and Shield. If you are a Pokémon player, you understand how great it is to capture a Shiny Stone. However, the Shiny Stone is a rare item, and you will have to put more work to grab one. In this article, we will to explain to you everything you ought to know about Shiny Stone Pokémon, including how to get them with less effort. Let’s get started.
Part 1. Shiny Stone Pokémon
What is Shiny Stone Evolution?
A Shiny Stone is an item in Pokémon Go that is used to evolve certain Pokémon. Shiny Stone was introduced in Generation IV and is no different from other evolution stones such as dusk stones, dawn stone, and ice stone, to mention but a few. The major differences could be their location as well as the type of Pokémon they help to evolve. You can identify this peculiar stone by its dazzling, shining light.

How and where to find a Shiny Stone evolution
In Pokémon Sword and Shield, the easiest way to get any evolution stone, including Shiny Stone, is by completing poke jobs. When you earn a water badge and then the gym badge, you can access the third tier poke jobs. Everything further will depend on whether your Pokémon perform great in their assigned jobs. If it performs great, you will be rewarded with an evolution stone that could be a Shiny Stone. If you want your Pokémon to do a great job, make sure you meticulously read through the summary of every given poke job. This is vital because it provides you a clue of what Pokémon you should pick.

Shiny Stone Evolution
In Pokémon Go, Shiny Stone is used to evolve certain Pokémon species. The following are some of the Pokémon that evolve using Shiny Stone. Evolving them is pretty simple. Just launch the menu and navigate to the bag. Select the “Other items” tab and use it to evolve any of the Pokémon listed below.
1. Roselia
Roselia is small, light green in color grass and poison type Pokémon. It has stats of 50 hp, 60 attacks, 65 speed, and 45 defense. This Pokémon was introduced in Generation III and had three thorns on its head and black eyes with long eyelashes. It holds a rose on the one hand and a red one on the other hand. Its aroma draws serenity, but the thorns on its head contain poison. The healthier it is, the stronger its aroma is. This Pokémon evolves from Budew through friendship level up in the day. When it is subjected to a Shiny Stone, it evolves into Roserade.
2. Minccino
This is a normal type of Pokémon that was introduced in Generation 5. It is also referred to as Chinchilla Pokémon. Its abilities include cute charm, technician, and skill link. Its stats are hp-55, attack-50, defence-40, speed-75, and total combat points-75. A Minccino evolves into a Cincino using a Shiny Stone. In Pokémon Sword and Shield, Minccino is located in rolling fields, East Lake Axewell, Route 5, and Giant’s cap.
3. Togetic
Togetic is a fairy and flying type of Pokémon that has ten hatch cycles. Its abilities include hustle, serene grace, and super luck. Togetic itself evolves from Togepi with leveled up friendship through camp play and cooking curry. It can float in midair without having to flip it wings. It appears and showers happiness to kindhearted and caring people. It, however, becomes dispirited if it encounters people who aren’t kind. Togetic is located in Stony Wilderness and from an evolving Togepi. Togetic evolves to Togekiss with the help of a Shiny Stone.
Part 2. Tricks and Hacks to Find Shiny Stone Pokémon
Finding a Shiny Stone in Pokémon Sword and Shield is challenging because it is a rare item. Nevertheless, some hacks and tricks can reduce your curve of finding a Shiny Stone, as explained below.
1. Use the iOS spoofing tool-Dr. Fone Virtual Location
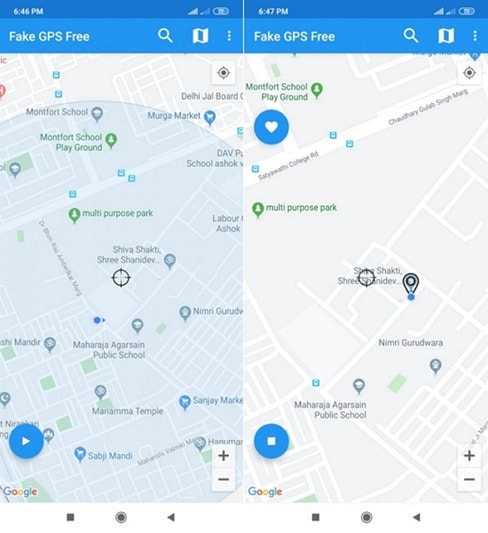
Since the game of Pokémon is location-based, you can fake your GPS location by simply teleporting to an appropriate Shiny Stone location while you are seated at your home. This is achievable with the help of Dr. Fone Virtual Location . The program is powerful, simple, and easy to use. You can teleport to whatever place you want, simulate movements along a route set by two or multiple points. To teleport to the location where it is easier to grab a Shiny Stone using Dr. Fone Virtual Location, follow the steps below.
Step 1. Download and install Dr. Fone Virtual Location on your computer. Now run it and click on the “Virtual Location” tab.

Step 2. After that, connect your iOS to the PC and click the “Get Started” button.

Step 3. On the next page, click the third icon on the top-right to provide the teleport mode. Choose the location you want to teleport to within the filed at the top and press “Go.”

Step 4. Click “Move Here” on the dialog box that pops up once the program finds the location.

2. Use Android spoofing tool- Pgsharp
Pgsharp i8s an Android application that enables users to be fake their GPS location and fools location-based apps like Pokémon Go to enter a territory that is easy to grab a Shiny Stone or Pokémon. It has a joystick feature for easy and smooth movement, coordinates to move to specific locations, auto walkthrough several pokestops, and saves your last location, among others.
3. Use a Drone
Some YouTube channels teach you how to use drones to cheat in Pokémon Go. A good example of a drone is DJI PantomDrone. When this drone is integrated with some smart software, you can easily control a phone that is attached to the drone. This way, you can sit at home while visiting gyms and pokestops.
Ultimate guide to get the meltan box pokemon go For Apple iPhone 6
If you are a huge Pokemon fan and loves to play pokemon go, you will definitely be aware of the latest addition to this family- meltan. It’s the only 8th generation pokemon. The first appearance of this pokemon was via Pokemon Go, as a mysterious silhouette. There are a huge hue and cry among the pokemon lovers about this mystery box pokemon. With its unannounced entry, it has sent the internet raving mad. It’s not an easy task to catch this pokemon, though. Let us take you through an ultimate guide regarding how you can get the meltan box pokemon go in 2020. Stay tuned and keep reading!

Part 1: What is the meltan box and how does it work?
Meltan, the mythical Pokemon is also described as a Hex Nut Pokemon. A major part of its body is built from liquid metal and its shape is fluid. It generates electricity using the metal that it absorbs from the outside sources. The pokemon uses its arms and legs to corrode metal and absorb it into its own body.

The meltan box is actually a mystery box that you cannot receive through the traditional method. It requires you to make an unconventional move to get this box and catch this different pokemon. The process involved to get the meltan box pokemon go include the following:
- The first and foremost thing you need to do is deport a Pokemon from Pokemon Go to Pokemon Let’s Go. You don’t have to transfer it to your own copy of Let’s Go. A friend’s copy would come in great help here.
- For making the transfer, you will get a mystery box in Pokemon Go. This box will allow the meltan to run into the wild for about 30 minutes. It gives you the chance to latch the pokemon.
- If you cannot catch meltan in 30 minutes, you will have to wait and repeat the above process again. As the mystery box will close after 30 minutes, and meltan will vanish from the wild.
Part 2: How to connect pokemon go to pokemon switch
The trainers with Pokemon let can send Pokemon from Pokemon Go to Nintendo switch. Like transferring the pokemon to Professor Willow, the trainers will earn candy to send their Pokemon to the switch. These pokemons will appear in the Go Park complex of your Pokemon Let’s Go.
Rewarding you for sending Pokemon to the switch, you will receive the meltan box pokemon go. This mystery box will allow you to catch the mythical pokemon.
The steps to connect Pokemon Go to Switch is clearly defined in the following points:
Step 1: The first step you need to take to connect the Pokemon Go to Switch is to launch the Pokemon Let’s Go from the Home Menu.
Step 2: During the game, press the “X” button to access the in-game menu, followed by the “Y” button to open the Options Menu.
Step 3: Choose the option “Open Pokemon GO Settings”.

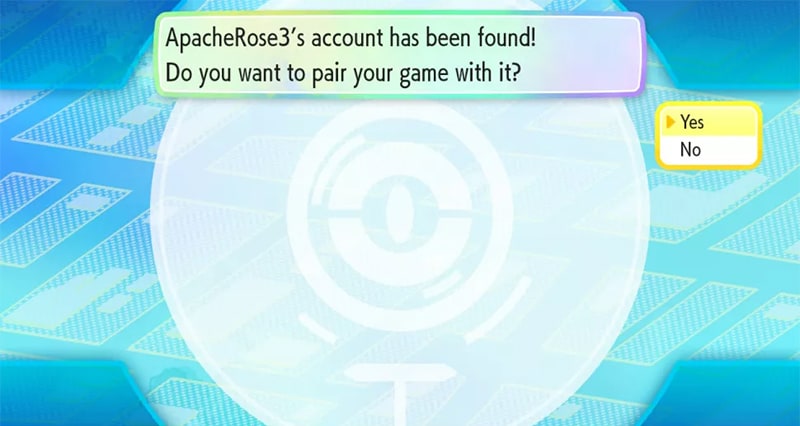
Step 4: When asked, select the option “YES”. This will allow the game to begin the search for a Pokemon Go account that you can pair with.
Step 5: The next step will require you to set up your Pokemon Go account to pair with the Nintendo Switch game.
Step 6: For pairing up, you will need to tap the Poke Ball icon on your screen and then select the “Settings” option.
Step 7: Scroll down to the option “Nintendo Switch” and select it.
Step 8: Then choose the “Connect to Nintendo Switch”.
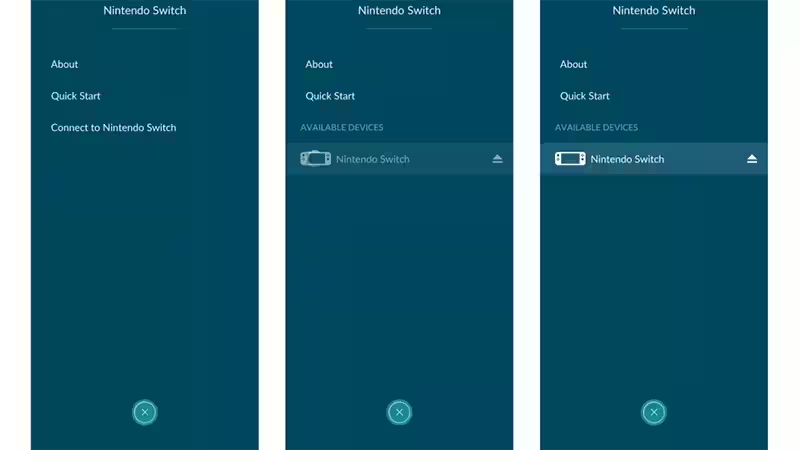
Step 9: This will allow Pokemon Go to search for a Nintendo Switch game to connect with.
Step 10: When you finally see that the Nintendo Switch console is locating the Pokemon Go account, select the “Yes” button on the console to establish the pairing.
Step 11: Once the pairing is done, you can now transfer the Pokemon from the Pokemon Go smoothly. Let’s get to know that too.
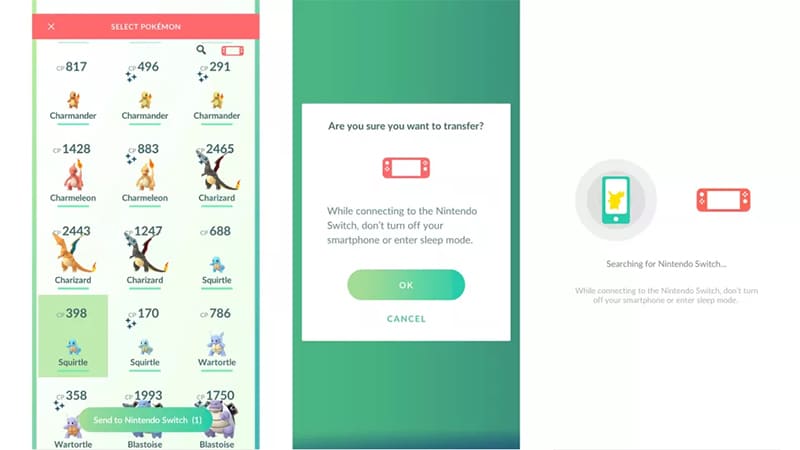
After the pairing is complete, you are now ready to send your Pokemon to the Go complex Park in Pokemon Let’s Go. This can be done by following the process:
Step 1: Open the Pokemon Let’s Go app.
Step 2: In Fuschia City, talk to the Go Park Complex Attendant and select the “Bring Pokemon” option.

Step 3: Open Pokemon Go.
Step 4: In the map view, tap on the button “Main menu”.
Step 5: Then, tap the “Pokemon” Button.
Step 6: At the top-right section of your screen, you will find the “Nintendo Switch”, tap on that.
Step 7: Now select the Pokemon you want to transfer. Please note that you can only send the Pokemon you have originally discovered in the Kanto Region.
Step 8: Now, click on the “Send to Nintendo Switch”, when you have finally decided which Pokemon you want to send.
Following the aforementioned steps will allow you to get the pokemon go mystery box.
Part 3: Tips to get more meltan boxes
There is a lot of confusion among the Pokemon trainers regarding how to get meltan in pokemon go. Here, we share a few tips for doing the same and reducing your confusion to zero.
Tip No.1: Transfer Pokemon to Win a Mystery Box
With the help of pairing and connecting your Pokemon Go to the Nintendo Switch, you can actually get the opportunity to transfer the Pokemon and win a mystery box for yourself.
Tip No.2: Transfer Pokemon to Friend’s Switch
If you cannot establish a pair with your Nintendo Switch, you can always look for your friends. In case you don’t have a Nintendo Switch with a copy of Let’s Go Pikachu, do not worry. You can still obtain a shiny meltan pokemon go mystery box. You can send Pokemon to your friend’s Nintendo switch and bang… you get the chance to catch the mythical pokemon.
Tip No.3: Use Dr. Fone Virtual Location Service
You can catch not just one but several Meltans through the mystery box. All you need to do is move around in your area and discover the meltan available near you. But not every time, you can get this lucky to obtain the opportunity to maximize your mystery box. If this is what you are thinking, then we are happy to say that you are wrong!
With the help of Dr.Fone- Virtual Location service that is developed and designed for iOS devices, you can change your GPS location with just one click.
It is well-known that Pokemon Go is a location-based game that offers several services only according to your location. You might find it difficult to maximize your pokemon go meltan box without moving or looking for services out of your region. Dr.Fone Virtual Location is here to help. With this service provider’s help, you can change your location and enjoy the unlimited fun that you had always desired. It will also be a great rescue for you if you cannot catch a meltan in your region. Try it and get the Hex Nut Pokemon.
Conclusion
Resolving your query about getting meltan box and offering you a detailed guide and assistance, we aim to help you continue your fun-experience with the game. Play, look for and find all the meltan! You can then evolve your meltan into a formidable Melmetal. You will need around 400 meltan candy to evolve into Melmetal, so be sure to catch as many as possible and enjoy!
Pokemon Go Error 12 Failed to Detect Location On Apple iPhone 6?
Pokemon Go is a popular game that has taken the world by storm. It is an augmented reality game that allows players to catch Pokemon in the real world using their smartphones. However, many players have reported encountering the “Failed to detect location (12)” error while playing the game. This error can be frustrating as it prevents players from playing the game properly. In this article, we will discuss what causes the “Failed to detect location (12)” error in Pokemon Go and how you can fix it on your Apple iPhone 6.
Pokémon Go has been on the nerves of its players and this is all because of the AR notion that it presents. The failed to detect location 12 is one of the most common errors that are faced by the players while playing this game. You might not believe but the GPS signals and the location settings on iPhone or Android are the two main reasons for this error. It can be resolved with ease and this article has been written to get the work done with ease. Applying the methods explained will ensure that you get the best results overall.
Part 1: Why is Location Important in Pokémon Go?
The best part of this game is that it has been compiled keeping in view the location mechanics. The location analytics of the game has made sure that it becomes the overnight sensation. Three main attributes are associated with the location framework of the game. These attributes also show how important the location is for the game. Understanding these attributes will also make sure that the user can overcome the errors such as failed to detect location 12 GPS joystick 2019.
i. Physical World Attribute
The best part of this attribute is that it is the center of the user experience of the game. The second part is the fact that this map has evolved and there are no shortcuts to its success. Ingress was the previous game that was developed by Niantic and the crowdsourcing of this map started with the evolution of this application. This was developed by the same team that is working on the core of Google Earth.
ii. Real World Gestures
The augmented reality is another important aspect that is related to Pokemon Go and this also means that the location services are relied on when it comes to this application. The android and the iOS location services are continuously used by the game to provide the pinpoint locations as well as the game features that are not found in other applications. The use of location through GPS satellites even becomes more important for such gestures. Especially when the player is outdoors it becomes too important to deal with using GPS location.
iii. Place Attribution
The system within the system that has been designed by the game developers makes sure that the location inaccuracies are accounted for. This also means that the 4-meter accuracy of the GPS is further enhanced to deal with the perfect location identification of each player.
Part 2: Ways to Fix Error 12 on Pokémon Go
Several ways can be used to make sure that the subject error is resolved with ease. This section of the article will deal with all such ways that can be used to get the work done with ease and perfection.
Method 1: Enable Mock Locations
As the name suggests it is to set the fake location using the build-in iPhone feature. It will also make sure that the feature of the game continues to work perfectly.
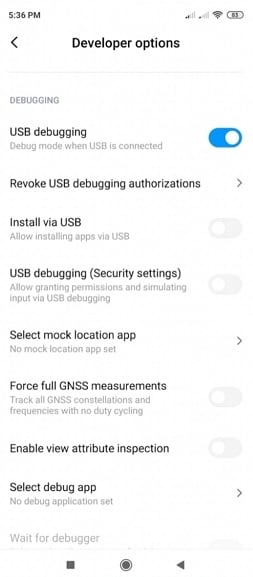
Step 1. Go to the developer options of your device. To get to the developer options simply head over to the settings > About Phone > Software Info > Build number and tap it 7 times to enable the mock locations.
Step 2. Install the Fake GPS that is a free application and can easily be found on the Play Store.
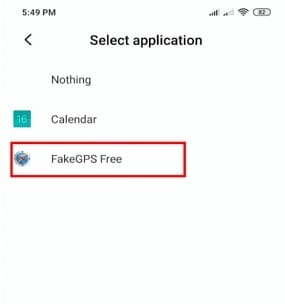
Step 3. Launch the application and you can easily enjoy Pokémon Go without any hassle and trouble and resolve the Pokémon go failed to detect location 12 fake GPS error.
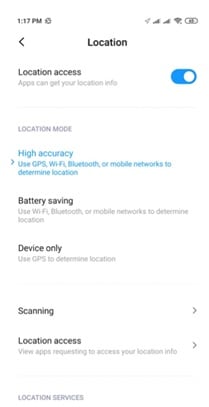
Method 2: Location Activation
This is another important and easy way to make sure that the Pokémon failed to detect location 12 error is resolved with ease and perfection. To execute the process the steps are mentioned as follows:
Step 1. Open the settings on your Phone to start with:
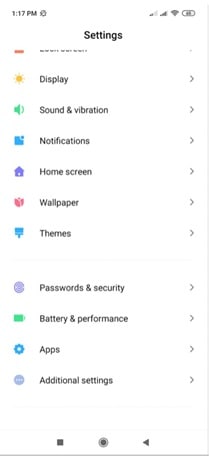
Step 2. Tap on the passwords and security to proceed with the process:
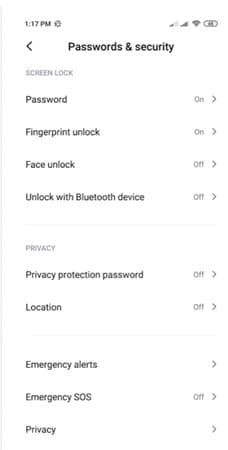
Step 3. Tap to turn on the location to finish the process and eliminate the failed to detect location 12 Pokémon Go errors.
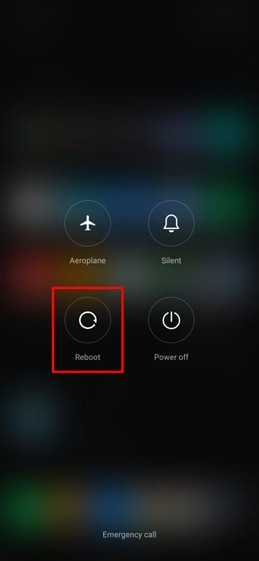
Method 3: Reboot the Apple iPhone 6 device
This might seems weird but this trick has been working to quiet some time now and has been proven to eliminate the failed location 12 Pokémon Go issue. There is a possibility that the server location is not synced with the Apple iPhone 6 device. Restarting the Apple iPhone 6 device will make sure that both the locations are sync and the problem is resolved with ease.
Just long-press the power button and choose the reboot option from the menu that appears to complete the process in full.
Part 3: Best Way to Overcome Location Error 12 on Pokémon Go for iOS Devices
Dr. Fone Virtual location is the best tool to overcome issues such as failure to detect location 12 Pokémon go on iPhone. The program has been designed to make sure that the GPS location is spoofed and you get the perfect outcome in resolving the error under discussion.
The Process
Step 1: Program Installation
To begin the process, download and install the program to get going with the process.
Step 2: Enable Virtual Location
Connect your Apple iPhone 6 and enable virtual location from the options of the program. Hit get started to begin the spoof.
Step 3: Locate yourself
The center on the button on the next screen is to be clicked to get the accurate location.

Step 4: Teleportation
On the upper right corner click the icon on the third to begin teleportation or spoofing to be precise. Enter the name of the place where you want to teleport to.
Step 5: Move to the teleported location
Click on move here and the system will move you to the location that has been entered.

Step 6: Validate and Completion
The location will be locked by the program and your Apple iPhone 6 will also show the same location as on Dr. Fone. This also completes the process in full:
Conclusion
Dr.Fone - Virtual Location is the best and the state-of-the-art program to overcome Pokémon go unable to detect location 12 on iOS devices. It has an intuitive interface and it also allows the users to overcome the issues that traditional spoofing programs present. It is being updated constantly which also means that you will be able to get the best results. There is no program on the internet that can resolve the error that failed to detect location 12 in Pokémon go as easily as this one does.
Also read:
- [New] FlashCapture Screen Tools
- [New] In 2024, Effortless Win 11 Screen Captures Here
- [Updated] 6 Easy, Free YouTube Closers for Your Videos (Top Picks) for 2024
- 2024 Approved Become an Instagram Star [9 Tips]
- In 2024, 11 Best Pokemon Go Spoofers for GPS Spoofing on Apple iPhone 11 Pro Max | Dr.fone
- In 2024, Hacks to do pokemon go trainer battles For Apple iPhone 13 Pro | Dr.fone
- In 2024, Pokémon Go Cooldown Chart On Apple iPhone 12 mini | Dr.fone
- In 2024, Which Pokémon can Evolve with a Moon Stone For Apple iPhone 11 Pro Max? | Dr.fone
- Most Effective High-Performance Routers for Extended Coverage in 2^24
- Title: In 2024, How and Where to Find a Shiny Stone Pokémon For Apple iPhone 6? | Dr.fone
- Author: Iris
- Created at : 2024-10-28 03:47:37
- Updated at : 2024-10-29 23:18:24
- Link: https://ios-pokemon-go.techidaily.com/in-2024-how-and-where-to-find-a-shiny-stone-pokemon-for-apple-iphone-6-drfone-by-drfone-virtual-ios/
- License: This work is licensed under CC BY-NC-SA 4.0.