
In 2024, Pokemon Go Error 12 Failed to Detect Location On Apple iPhone 7? | Dr.fone
Pokemon Go Error 12 Failed to Detect Location On Apple iPhone 7?
Pokemon Go is a popular game that has taken the world by storm. It is an augmented reality game that allows players to catch Pokemon in the real world using their smartphones. However, many players have reported encountering the “Failed to detect location (12)” error while playing the game. This error can be frustrating as it prevents players from playing the game properly. In this article, we will discuss what causes the “Failed to detect location (12)” error in Pokemon Go and how you can fix it on your Apple iPhone 7.
Pokémon Go has been on the nerves of its players and this is all because of the AR notion that it presents. The failed to detect location 12 is one of the most common errors that are faced by the players while playing this game. You might not believe but the GPS signals and the location settings on iPhone or Android are the two main reasons for this error. It can be resolved with ease and this article has been written to get the work done with ease. Applying the methods explained will ensure that you get the best results overall.
Part 1: Why is Location Important in Pokémon Go?
The best part of this game is that it has been compiled keeping in view the location mechanics. The location analytics of the game has made sure that it becomes the overnight sensation. Three main attributes are associated with the location framework of the game. These attributes also show how important the location is for the game. Understanding these attributes will also make sure that the user can overcome the errors such as failed to detect location 12 GPS joystick 2019.
i. Physical World Attribute
The best part of this attribute is that it is the center of the user experience of the game. The second part is the fact that this map has evolved and there are no shortcuts to its success. Ingress was the previous game that was developed by Niantic and the crowdsourcing of this map started with the evolution of this application. This was developed by the same team that is working on the core of Google Earth.
ii. Real World Gestures
The augmented reality is another important aspect that is related to Pokemon Go and this also means that the location services are relied on when it comes to this application. The android and the iOS location services are continuously used by the game to provide the pinpoint locations as well as the game features that are not found in other applications. The use of location through GPS satellites even becomes more important for such gestures. Especially when the player is outdoors it becomes too important to deal with using GPS location.
iii. Place Attribution
The system within the system that has been designed by the game developers makes sure that the location inaccuracies are accounted for. This also means that the 4-meter accuracy of the GPS is further enhanced to deal with the perfect location identification of each player.
Part 2: Ways to Fix Error 12 on Pokémon Go
Several ways can be used to make sure that the subject error is resolved with ease. This section of the article will deal with all such ways that can be used to get the work done with ease and perfection.
Method 1: Enable Mock Locations
As the name suggests it is to set the fake location using the build-in iPhone feature. It will also make sure that the feature of the game continues to work perfectly.
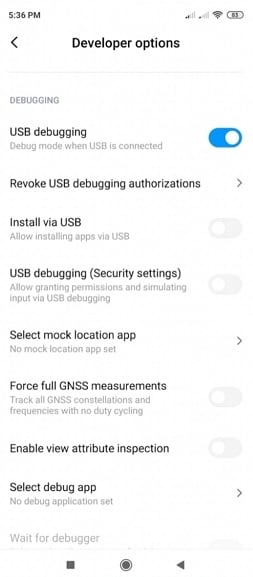
Step 1. Go to the developer options of your device. To get to the developer options simply head over to the settings > About Phone > Software Info > Build number and tap it 7 times to enable the mock locations.
Step 2. Install the Fake GPS that is a free application and can easily be found on the Play Store.
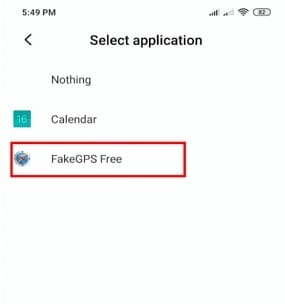

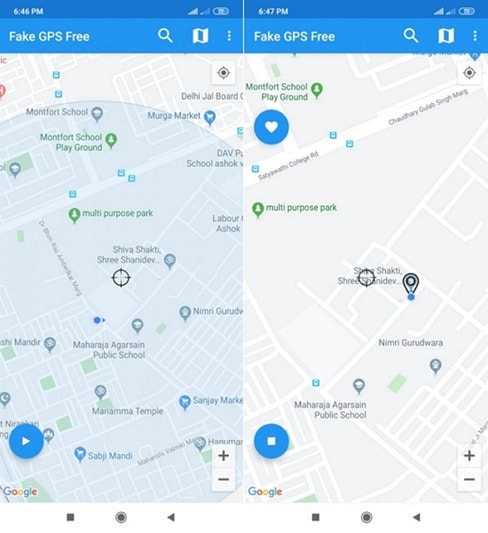
Step 3. Launch the application and you can easily enjoy Pokémon Go without any hassle and trouble and resolve the Pokémon go failed to detect location 12 fake GPS error.
Method 2: Location Activation
This is another important and easy way to make sure that the Pokémon failed to detect location 12 error is resolved with ease and perfection. To execute the process the steps are mentioned as follows:
Step 1. Open the settings on your Phone to start with:
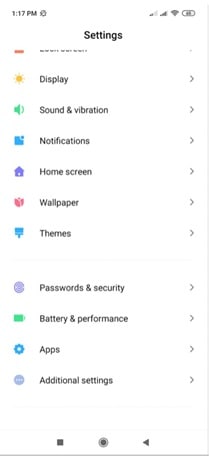
Step 2. Tap on the passwords and security to proceed with the process:
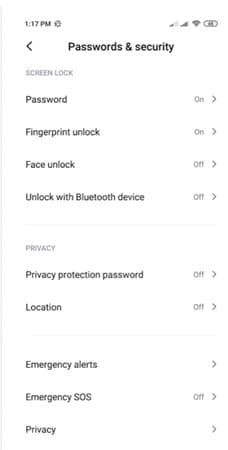
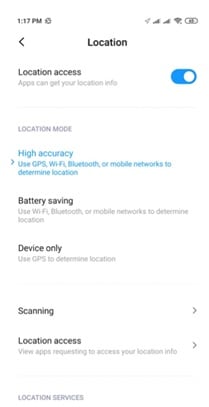
Step 3. Tap to turn on the location to finish the process and eliminate the failed to detect location 12 Pokémon Go errors.
Method 3: Reboot the Apple iPhone 7 device
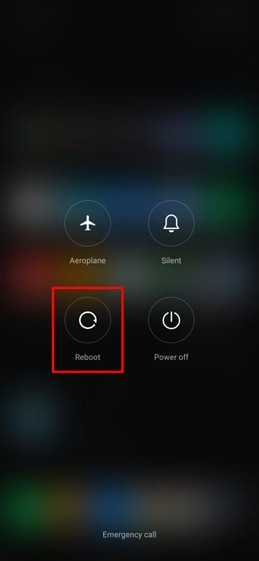
This might seems weird but this trick has been working to quiet some time now and has been proven to eliminate the failed location 12 Pokémon Go issue. There is a possibility that the server location is not synced with the Apple iPhone 7 device. Restarting the Apple iPhone 7 device will make sure that both the locations are sync and the problem is resolved with ease.
Just long-press the power button and choose the reboot option from the menu that appears to complete the process in full.
Part 3: Best Way to Overcome Location Error 12 on Pokémon Go for iOS Devices
Dr. Fone Virtual location is the best tool to overcome issues such as failure to detect location 12 Pokémon go on iPhone. The program has been designed to make sure that the GPS location is spoofed and you get the perfect outcome in resolving the error under discussion.
The Process
Step 1: Program Installation
To begin the process, download and install the program to get going with the process.

Step 2: Enable Virtual Location
Connect your Apple iPhone 7 and enable virtual location from the options of the program. Hit get started to begin the spoof.

Step 3: Locate yourself
The center on the button on the next screen is to be clicked to get the accurate location.

Step 4: Teleportation
On the upper right corner click the icon on the third to begin teleportation or spoofing to be precise. Enter the name of the place where you want to teleport to.

Step 5: Move to the teleported location
Click on move here and the system will move you to the location that has been entered.

Step 6: Validate and Completion
The location will be locked by the program and your Apple iPhone 7 will also show the same location as on Dr. Fone. This also completes the process in full:

Conclusion
Dr.Fone - Virtual Location is the best and the state-of-the-art program to overcome Pokémon go unable to detect location 12 on iOS devices. It has an intuitive interface and it also allows the users to overcome the issues that traditional spoofing programs present. It is being updated constantly which also means that you will be able to get the best results. There is no program on the internet that can resolve the error that failed to detect location 12 in Pokémon go as easily as this one does.
Can I use iTools gpx file to catch the rare Pokemon On Apple iPhone 7
Pokemon continues to be an after-sought mobile gaming app. The iTool gpx completes the game. This tool is dully smart, letting you catch Pokemon without much hassle. iTools is a replacement for iTunes which you can now use to manage your iDevice and computer. Its simplicity makes it a walk-in-the-park as you try to catch Pokemon. It will save your computer battery life and also save you from complex background operations.
It will inform you when a pokestop arrives without the need to even use your phone. More so, simply connect the Apple iPhone 7 device to your phone via Bluetooth technology and move along as you enjoy your game. The device will vibrate or blink, an indication that you need to get ready to catch a Pokemon. So yes, you can use iTool gpx file to catch rare Pokemon.
Part 1:What can the gpx file do?
The gpx file is mainly used in software applications to transfer information about tracks and points from one application to another. These files are saved in ‘XML’ format, which makes it easy to import and read GPS data by several programs.
How to download gpx file on iOS and Android
On iOS
First, open the route that you are interested in, then select the ‘Export gpx’ option > ‘Export’ in the lower line. Next, choose whether to forward the gpx file via a provider or to copy and save it in your data.
On Android
Open the route you are interested in and hit the ‘More’ option. Next, select the ‘Export gps’ option and the file will be downloaded to your smartphone. You can forward the route to various providers by tapping the ‘Share’ button.
Why gpx Pokemon
Many games have thronged our screens but not many matches Pokemon. Once you download gpx to iTools mobile, you get real-life benefits from this hottest virtual game. As gpx files are a list of exact locations that form a route for cycling or walking, they direct the player. A player can, therefore, see their location regarding the route via GPS for surety.
Likewise, players are assured of being on the right trail when they use navigation apps with gpx files. And whey they get off track, they can redirect themselves to the path and continue gaming.
Part 2:Where to find the iTools gpx file
You have to import gpx file before opening it. The easiest way is to upload it to the web version of Google Maps. First, open and sign in to Google Maps then add a gpx file as a new map. Follow these steps.
- First, open the Google Maps menu and select ‘Your places’.
- Select ‘Maps’ > ‘Create map’.
- Select the ‘Import’ button after a new Google Maps window opens.
- Finally, upload your gpx file. You should see the map data in your file on Google Maps.
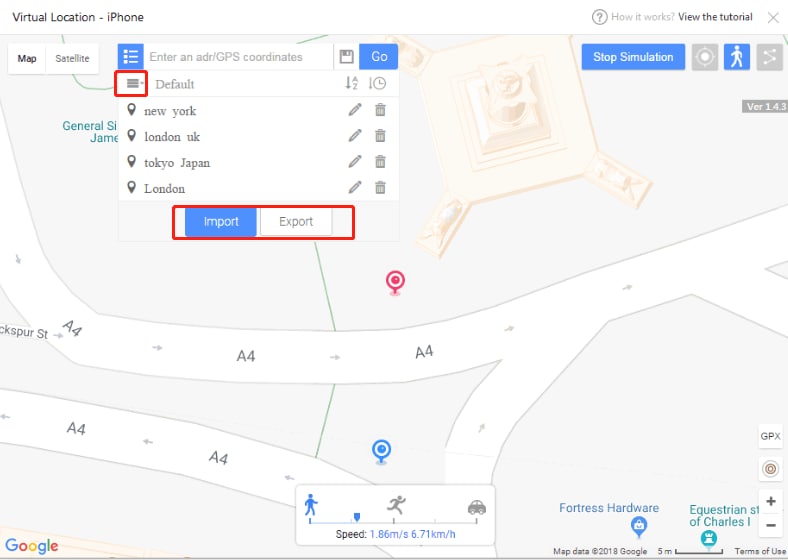
For you to use gpx file iTools, you first have to enable the virtual location on your device. It is from the virtual location where you can cycle and pin mode with teleport and joystick. More so, you can adjust the speed as desired. You just need to choose your favorite location and get to playing. Import, export, and save the iTools gpx to continue from your last stop point.
Follow these steps to save the iTools gpx file and get gpx files from friends
With ThinkSky, you can add gpx file to iTools and fake your gps location. This app comes with plenty of functionalities to make every fake location appear real to your friends.
- First, determine and click on the point that you wish to fake.
- Next, copy the coordinates by clicking the ‘Copy to clipboard’ button.
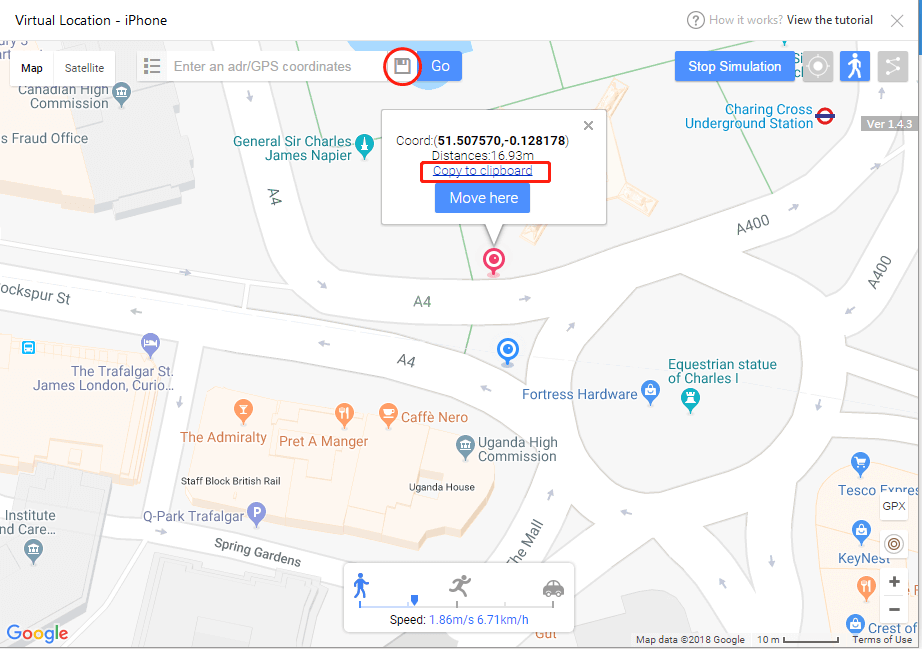
- Then, confirm group name and click on the ‘Save’ icon. You’ll see it located besides the search bar.
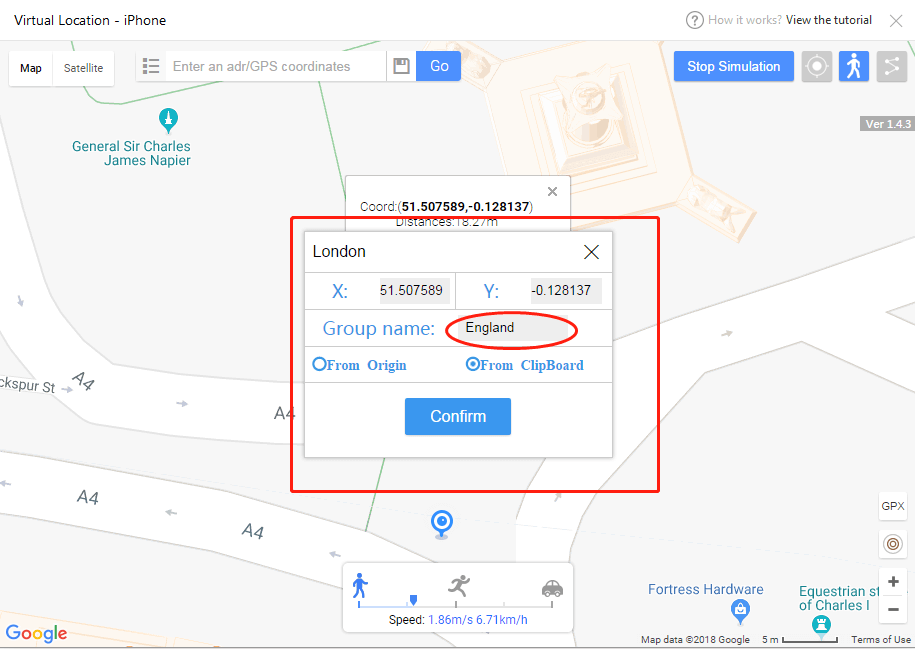
- Lastly, input the coordinates names and group name and then export your favorite location list.
Part 3:Is there any safer tool to spoof Pokemon with iTools file?
You can opt for other safer tools for route creator. Perhaps it is raining and you can’t step out. Or it is already late in the night. What do you do? Just fake it! Dr.Fone comes with advanced features to help you iSpoofer gpx routes and fake your locations in simple steps.
How to export and import gpx to save and share location with Dr.Fone
First, you need to download, install, and launch Dr. Fone – Virtual Location to your computer. Then click the ‘Virtual Location’ option and connect your Apple iPhone 7 to the computer. Next, hit the ‘Get Started’ button. You’ll be redirected to a new window to find the actual location on your map. Please follow these steps to export and import gpx to save and share.
Step 1. Save the path as gpx.file
Dr. Fone virtual location supports saving customized routes. Click the ‘Export’ button once it pops-up.
Step 2. Import file
Next, import the shared gpx file into the app. You can download the gpx file from other websites or you can get it from friends. To import the file, go to the main screen of the app and check under the ‘Add-to-favorites’ icon then click the ‘Import’ button. Wait as the file is imported then click the ‘Save’ button after the process is completed.

You can also add your favorite iSpoofer gpx routes. To add any spot into your favorites, check for the five-star icon and click to add the route to favorites. You should see ‘Collection successfully’ after adding your favorites. This gpx route creator makes it easy to walk along your favorite routes. Click the ‘Move’ button and reach any place with a click of a button.

The Bottom Line
Being a first timer, you may find it very complicated to fake your gps location. But Pokemon map creator makes it easy. Dr. Fone virtual location works seamlessly with your iOS device to take you virtually to any place in the world, from the comfort of your living room.
Catch or Beat Sleeping Snorlax on Pokemon Go For Apple iPhone 7
Embracing new challenges and seeking out rare creatures to add to their Pokédex consistently excites Pokémon GO players. The coveted reward for players globally, Snorlax, a legendary Pokémon, is widely recognized as the iconic Sleeping Snorlax. Despite being one of the original 151 Pokémon in Pokémon GO, capturing Snorlax remains exceptionally challenging. It falls under Z’s category of Pokémons, which also includes Komala and Abra.
This makes it a unique challenge for trainers seeking to add this heavyweight Pokémon to their collection. In this guide, we will go through the latest strategies and updates in the Pokémon GO universe. The aim is to reveal the secrets to catching a Pokémon Sleeping Snorlax in 2024. Read the article as we explore the techniques, locations, and special events that will increase your chances of capturing this Pokémon.

Part 1: What Is a Sleeping Snorlax in Pokémon GO
Part of the original 151 creatures in Pokémon GO, Snorlax is a Pokémon from the Pokémon franchise. It stands out as a normal type with notable Combat Power (CP) and endurance. Its substantial Hit Points (HP) and powerful moves make it a formidable defender in gyms, earning it a reputation as a resilient fighter.

Being one of the Z’s category Pokémon, known for their sleepy and relaxed nature, is reflected in its appearance. Snorlax Pokémon sleeping is a large, bear-like Pokémon with a big belly and is often found blocking paths in mainline Pokémon games.
In Pokémon GO, Snorlax can be encountered in the wild, but it is more commonly obtained through special events or raids. Like other Pokémon, Snorlax can be powered up and used in battles against other trainers or in raids. Below is a detailed table explaining everything about Snorlax:
| Specs | Snorlax |
|---|---|
| Pokédex No | 143 |
| Generation | 1st |
| Region | Kanto |
| Height | 6’11” or 2.1 m |
| Weight | 1014.1 lbs. or 460.0 kg |
| Stamina | 143 |
| Pokédex No | 330 |
| Attack | 190 |
| Defense | 169 |
| Max HP | 285 |
| Max CP | 3384 |
| Abilities | Thick Fat & Immunity |
| Best Moves | Lick & Hyper Beam |
| Evolves From | Evolves From |
Part 2: Is It Possible To Capture a Sleeping Snorlax in Pokémon GO?
When it comes to whether it is possible to capture a Snorlax sleeping Pokémon, the answer is a resounding yes. Being rare, the chances to encounter and capture have steadily risen compared to past years. With its formidable stats, Snorlax reaches an impressive maximum Combat Power (CP) of 3884.
At Pokémon Z’s Event 2023, participants had the chance to capture not only Snorlax but also its rare shiny variant. Moreover, after completing the special research task, users were able to encounter a Snorlax with a nightcap. To get Snorlax more easily, users are recommended to use Pokémon Go Plus +.
Utilizing advanced Bluetooth and low-energy technology, the Pokémon GO Plus + device establishes connections with both the Pokémon Sleep and Pokémon GO mobile applications. Its functionality extends to monitoring sleep, a feature it shares with Pokémon Sleep. All you need to do is hold the central button, put it near you, and go to sleep. It includes a Pikachu to sing you lullabies and work as a morning alarm.
Moreover, the Pokémon GO Plus + accessory facilitates the spinning of PokéStops. It enables the automatic throwing of different Poké Balls, Great Balls, and Ultra Balls. Thus eliminating the need to press any buttons. Below is a detailed table about the specifications of Pokémon GO Plus + to capture Snorlax sleeping Pokémon:
| Specs | Pokémon GO Plus + |
|---|---|
| On Sale | America: July 14, 2023 / Europe: July 21, 2023 |
| Package Contents | Pokémon GO Plus + strap with clip, Pokémon GO Plus + device, operations manual, USB charging cable |
| Device Size | |
| Diameter: 64.5mm |
Thickness: 18.3mm
|
| Device Weight | 50g |
| Internal Battery |
Lithium-ion battery
Charges via USB Type-C
|
| Battery Charging Time | 3.5 Hours |
| Functions | Vibration and sounds |
| Platform/OS |
Android 7 and up
iOS 14 and up
|
Part 3: How To Catch a Sleeping Snorlax With the Help of Pokémon GO Plus+
With the release of Pokémon GO Plus + in July 2023, Nianticreleased a week-long “Catching Some Z’s” event. The main part of the event was to increase the spawned rate for Snorlax and a special encounter with a Snorlax with a nightcap. While the event has long finished, Pokémon GO Plus + remains.
Many users have reported increased sightings of Snorlax even after the event when using Pokémon GO Plus +. As discussed earlier, Pokémon GO Plus + uses Bluetooth to remain connected with the Pokémon GO app. Here are the steps you need to follow to pair Pokémon GO with the Pokémon GO Plus + for help in catching Pokémon Snorlax sleeping:
- Step 1. Begin by enabling Bluetooth, opening the Pokémon GO app on your device, and tapping the central Pokéball button. Now tap “Settings” from the top right corner and select “Connected Devices and Devices.”

- Step 2. On the following screen, press “Accessory Devices” to access the pairing menu. Now, move to Pokémon GO Plus + and press the main button. Once it appears in the “Available Devices” section of the Pokémon GO app, begin the pairing process following the on-screen instructions.

Part 4: Enhance Your Gaming Experience With One-Click Location Spoofer of 2024
Are you having issues with capturing Pokemon Snorlax sleeping despite employing Pokémon GO Plus +? Given the rarity and low spawning rate, capturing Snorlax can be hard. This becomes especially difficult if you are unable to travel long distances. To come to your rescue, there’s another useful tool at your disposal named Wondershare Dr.Fone - Virtual Location. Enabling you to simulate your location anywhere globally, it also incorporates lifelike movement.
With just one click, modify your GPS location effortlessly using this tool that smoothly integrates with both iOS and Android devices. This means you can easily explore diverse in-game terrains. It increases your chances of encountering Snorlax Sleeping Pokemon in various locations. Wondershare Dr.Fone gives you precise control over your virtual location, ensuring that you can navigate the Pokémon GO map with accuracy.
Standout Features of Dr.Fone - Virtual Location
- Effortlessly import/export GPX files containing diverse paths, enabling you to save and view your preferred routes with a simple click.
- When spoofing your GPS location on an iOS device, you don’t need to jailbreak it when using Dr.Fone - Virtual Location.
- It offers you the flexibility to traverse at various simulated speeds, such as walking, cycling, driving, etc., ranging from 3.6 km/h to 108 km/h.
Steps To Enhance Your Gaming Experience With One-Click Location Spoofer of 2024
Save time and energy by using Wondershare Dr.Fone - Virtual Location feature. There is no need to physically travel to different places by simply adjusting your virtual location.
When coupled with powerful Pokémon GO Plus +, it can increase your chances of encountering Sleeping Snorlax significantly. Here is how to enhance your gaming experience and get help in capturing Pokémon sleeping Snorlax via Dr.Fone - Virtual Location:
- Step 1. Activate Teleport Mode in Dr.Fone - Virtual Location
Open Wondershare Dr.Fone - Virtual Location, connect your smartphone with an original USB cable, and choose the “Teleport Mode” option located in the top-right section. The specific icon for Teleport Mode is the first one from the left in that section. Once Teleport Mode is activated, click on the search bar at the top-left to input the desired location. After entering the location, press “Enter” to continue.
- Step 2. Teleport to the Chosen Location
As you enter the desired location, the map will confirm your selection. If you wish to teleport to this designated location, click on “Move Here.” The smartphone’s location will promptly switch to the chosen destination and reflect on the map. You can then verify that the Apple iPhone 7 device’s current location matches the updated location by opening the maps app on the Apple iPhone 7 device.
- Step 3. Simulate Movement with One-Stop Route
To simulate movement, navigate to the top-right section and click “One-Stop Route.” It is the third icon from the left. After moving to the desired location, tap anywhere on the map to designate your destination. Specify the number of round trips and opt for either a Round or Loop trip. Adjust the walking speed by sliding the speed option. Finally, tap “Move Here” for the movement simulation.

- Step 4. Enable the Multi-Stop Route Feature
If you want to visit more than one stop, enable the Multi-Stop Route mode. You can do it by accessing the top-right section adjacent to the One-Stop Route mode. Once activated, designate multiple locations on the map by selecting your desired points. Specify the number of trips and speed settings. Initiate the process by clicking on “Start Moving.” During the simulation, you can “Pause” the sequence at any point.

Conclusion
In conclusion, the pursuit of capturing a Snorlax Pokémon sleeping in Pokémon GO is an ever-evolving adventure. To enhance your gaming experience and increase your chances of success, consider incorporating Wondershare Dr.Fone - Virtual Location. With its one-click location spoofer, Dr.Fone adds versatility and efficiency to your exploration. It allows you to enjoy the thrill of the hunt without physical constraints.
Also read:
- [New] Streamlining Sonic Selection A Guide to Curating YouTube Content
- A Quest for Collective Ownership Art Without Boundaries
- Close-Up Power in VideoLeap Zooming Made Easy
- Enhancing YouTube Videos for Superior Quality
- Etiquette Essentials When Speaking to Alexa or Similar Tech
- How to Migrate Android Data From OnePlus Ace 2 Pro to New Android Phone? | Dr.fone
- How to Remove Activation Lock On the iPhone 6s Plus Without Previous Owner?
- In 2024, Catch or Beat Sleeping Snorlax on Pokemon Go For Apple iPhone 11 Pro Max | Dr.fone
- In 2024, Hacks to do pokemon go trainer battles For Apple iPhone 15 | Dr.fone
- In 2024, How Can I Catch the Regional Pokémon without Traveling On Apple iPhone 12 Pro | Dr.fone
- In 2024, How to Come up With the Best Pokemon Team On Apple iPhone 15 Pro Max? | Dr.fone
- In 2024, How to enter the iSpoofer discord server On Apple iPhone 12 Pro | Dr.fone
- In 2024, How to Get and Use Pokemon Go Promo Codes On Apple iPhone 6s | Dr.fone
- In 2024, Why cant I install the ipogo On Apple iPhone 13 Pro Max | Dr.fone
- New Free WMV Video Cutter Tools Top Picks for 2024
- Preparation to Beat Giovani in Pokemon Go For Apple iPhone 13 | Dr.fone
- Strategic Advantages in Business with VR Tech for 2024
- Top 10 Asus ROG Phone 7 Android SIM Unlock APK
- What is the best Pokemon for pokemon pvp ranking On Apple iPhone 7 Plus? | Dr.fone
- Title: In 2024, Pokemon Go Error 12 Failed to Detect Location On Apple iPhone 7? | Dr.fone
- Author: Iris
- Created at : 2024-10-21 17:07:13
- Updated at : 2024-10-24 03:33:16
- Link: https://ios-pokemon-go.techidaily.com/in-2024-pokemon-go-error-12-failed-to-detect-location-on-apple-iphone-7-drfone-by-drfone-virtual-ios/
- License: This work is licensed under CC BY-NC-SA 4.0.