
In 2024, Why cant I install the ipogo On Apple iPhone 14 Pro Max | Dr.fone
Why can’t I install the ipogo On Apple iPhone 14 Pro Max
For tweaking the official Pokemon Go app right there in AppStore, iPogo is a choice to have. But sometimes iPogo can’t install, and users face a lot of difficulties. At that moment, some users feel furious and look forward to the solutions to get rid of it. If you also hit in the same category, you are on the right page. Let’s discuss it more and look forward to the solution that will help you to install it again.
Part 1: Reasons that you can’t install the ipogo
There are multiple reasons that contribute to the difficulty when you can’t install the iPogo. Some of them are as follows:
- iPhone version:
The current iPhone version you are choosing may be responsible for the problem for iPogo can’t install. It is important to have iOS version 13. It works on all the known jailbreak devices having the same iOS. In case you have upgraded the iOS 13 to iOS 14, the chances are quite less to use it.
- iPogo version:
iPogo version is also an important factor of consideration. Time to time regular updates keep coming, and if you are stuck on the previous version, you will not be able to use it. Sometimes the iPogo is down whenever there is an update, and when you try to update it, the problem arises. At that moment, you need to be patient and try re-installation.
- Direct download method:
If a user is considering direct downloading method, they might also face this trouble because Apple now targets certificate. Now you need to create your certificate with the help of a computer or a paid service like Signulous and others.
Bonus: Simple steps to install iPogo
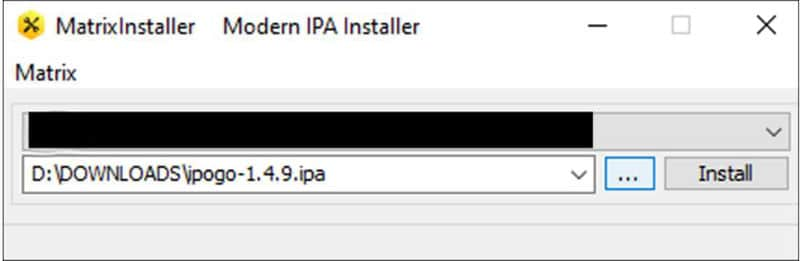
To install iPogo, we suggest you avoid the direct download method and instead follow the steps to follow with “Matrix installer.”
Steps to follow:
Step 1: Upgrade the iTunes version of your computer to latest version.
Step 2: Now remove the original app from your iDevice.
Step 3: Get IPA from the website download and save it.
Step 4: Launch the “Matrix Installer”.
Step 5: With the help of USB cable connect your Apple iPhone 14 Pro Max to the PC.
Step 6: Let the installer to detect the iDevice.
Step 7: Now click on “Device” then “Install Package” option.
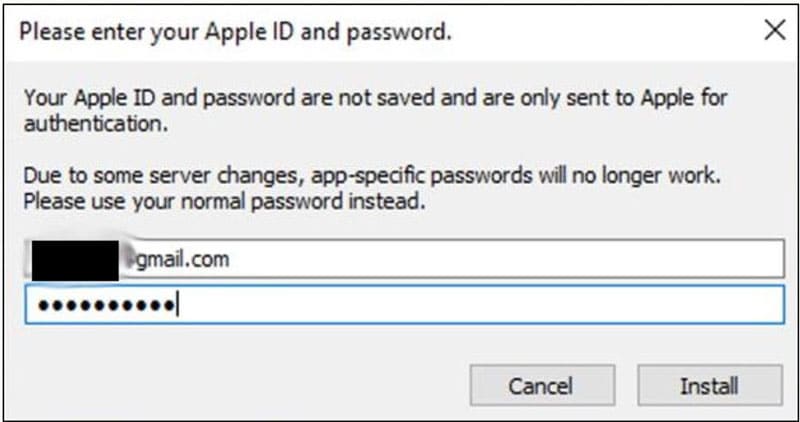
Step 8: Now the installer asks for the Apple ID username, and Password mentions the same. Make sure these are the ones used to fetch the developer certificate from the Apple Server. (We suggest you create a new Apple ID)
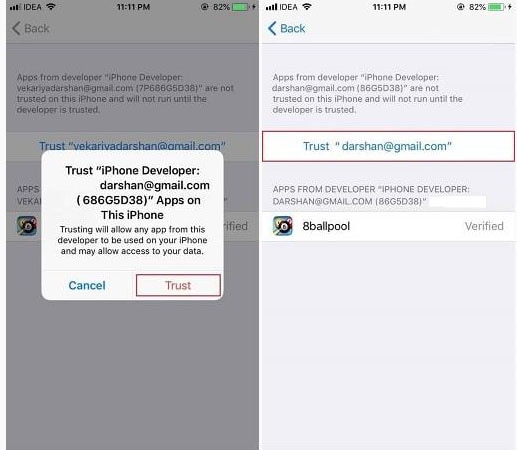
Step 9: Be patient for a while and let the impact or to perform all the work.
Step 10: “Complete” message will appear and unlock your Apple iPhone 14 Pro Max Screen and move to “settings->General-> device management.”
Step 11: Now hit on the developer Apple ID and trust it.
Part 2: Risk of installing ipogo and running
You can come across a certain risks also when you are installing and running iPogo. These are as follows:
Jailbreaking is required:
For using iPogo, jailbreaking is required, and it refers to the privilege to Apple devices through which they can remove all the software restrictions. If there is any loss to the data, a user will be responsible for it.
Chances to get banned:
iPogo is an application that can be used after jailbreaking only. After doing the jailbreaking, the chances are there that your device might get banned. You are at a high risk where certain problems may arise.
Can lose access to content:
There might be a chance you have will lose access to content as well. Therefore we suggest you avoid. If you still want to jailbreak your device and want to install iPogo, it is entirely your choice.
Part 3: is there a software like iPogo without jailbreak?
If you are wondering about the same question, then the answer is “Yes”. Dr.Fone Virtual Location is an iOS location changer helping you to enjoy the same features without any hassle. This application will help you to simulate GPS movement along real road or paths you draw. A user can also integrate joystick to make the movement of GPS effortless. It helps you to teleport iPhone GPS to anywhere in the world. The best part is it supports up to five device location management at a time.
Let us understand how this tool can help you spoofing your location.
We are mentioning the steps which will help you to teleport to anywhere in the world. The steps for it are as follows:
Step 1: Get the tool on PC
Start with downloading Dr.Fone Virtual Location on your PC using the official website. And then install it. Once done, launch the program. Now hit on “Virtual Location” from all the options and connect your Apple iPhone 14 Pro Max to the computer.

Step 2: Get the Apple iPhone 14 Pro Max device Connected
You now need to get your iPgone plugged with PC via a USB cord. Once you do this, simply click on “Get Started.”

Step 3: Check Location Accuracy
A new window will appear indicating the actual location on the map. If the location does not appear to be accurate hit on “Centre on” icon at the lower right part to get an accurate location.
Step 4: Turn on Teleport Mode
By clicking on the Corresponding icon in the upper right activates “Teleport Mode”. Now mention the place you want to teleport in the upper left field. Click “Go” (consider a Rome in Italy as an example)


Step 5: Start Spoof
After selecting it, the system will understand the desired place in Rome and hit on “Move here” in the popup box.

Finally, the location has been changed to Rome now. Whatever you do whether you click on “centre on” icon or try to relocate yourself on iPhone ROM is the fixed location that will appear, and in all the location app as well Rome is the fixed place.
Conclusion
Here, we have agreed to do to the conclusion that if iPogo won’t install there is nothing for you to worry about because certain other solutions are there that help you to switch the locations without any hassle.
4 solution to get rid of pokemon fail to detect location On Apple iPhone 14 Pro Max
Pokémon go failed to detect location is an error that is frequently faced by the players and there are several reasons for it. From device to server-based all the reasons amount to the error and therefore the right solution must be applied to get the work done with ease and perfection. The location-based attribute of the game is something that has been one of the best features. It is the sole reason for which the game is not only popular but also one of the most downloaded games of all time. It is therefore important to overcome fail to detect location error in this game.
Part 1: Why does Pokémon fail to detect location?
The two main and frequent errors that are related to the Pokémon are error 11 and error 12. These not only frustrate the users but also hamper the game experience. Failed to detect location Pokémon go is the result. This part of the article will make sure that you get all the information that is needed to overcome the issue. The GPS joystick failed to detect location error will also be overcome and you will also be able to guide others.
Causes of Error 11
- If the game failed to detect location Pokémon go fake GPS then the most common reason is the fact that the GPS has been disabled. The internet and GPS are the two important aspects of this game. If anyone is not available then it is a must that the game will not work at all.
- Once the game has been installed it requires certain permissions that should be granted for proper working. All the permissions must be accepted for the game to work fine. If the GPS access has not been granted then it should be so that the GPS joystick Pokémon go failed to detect location error is resolved and you can enjoy the game.
- To install some applications and to enhance the features of the phone it is at times rooted in the case of android or jailbroken in the case of iPhone. In both cases, you will get the Pokémon to go failed to detect location fake GPS error. It is therefore important that the issue is resolved by getting the Apple iPhone 14 Pro Max device back to its original shape. It can be done by unrooting the Apple iPhone 14 Pro Max devices so that the issue is resolved.
Causes of Error 12
- The Mock location on the Apple iPhone 14 Pro Max device is enabled can lead to failed to detect location GPS joystick or error 12 on the Apple iPhone 14 Pro Max device. It is therefore advised to make sure that the location in question is disabled to get the gaming experience back on track.
- The other and the most common reason for the error 12 is the fact that the GPS signals are not received by the Apple iPhone 14 Pro Max device. It also leads to Pokémon failed to detect location error and will make sure that you get all the enjoyment for which the game has been downloaded.
Part 2: 3 solutions to fix Pokémon fails to detect the location
Solution 1: Turn on GPS
This is the most common method that can be applied to make sure that the game works perfectly.
i. Drag the notification panel down on your device.
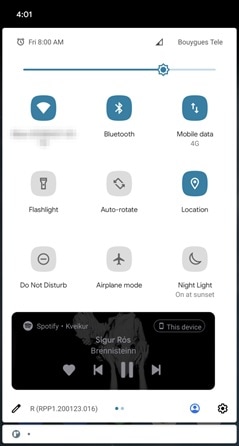
ii. Click on the location to turn it ON.

Solution 2: Setting Permissions for the application
If the right permissions are not given to the application then it can also lead to the fake GPS failed to detect location. To make sure that this is overcome you need to follow the steps as under.
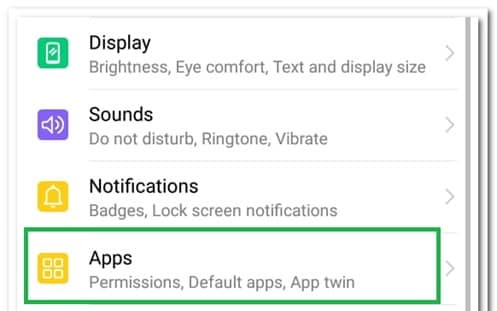
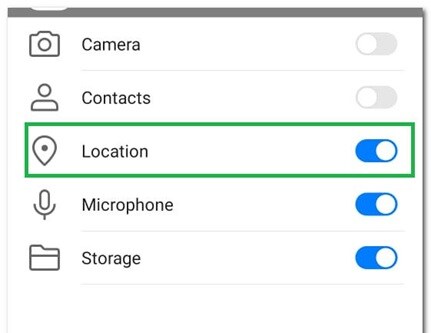
i. Go to Settings > Applications > Apps to access the permissions for the application.
ii. Go to Pokémon Go > Permissions > Turn on location to get the issue resolved.
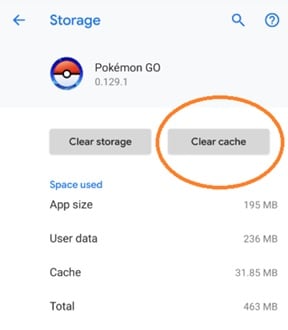
Solution 3: Clear Cache
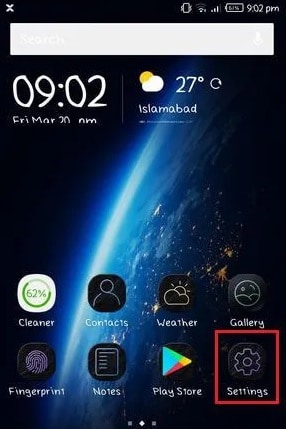
i. Go to the Settings of your device
ii. Click on the app’s icon on the next screen
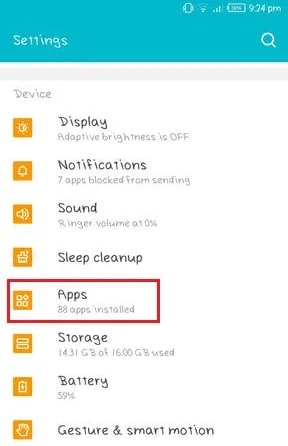
iii. Click on the storage option.
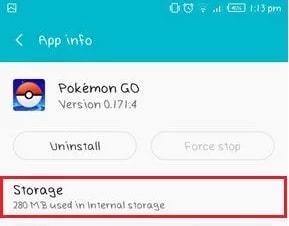
iv. Clear data and cache and restart the Apple iPhone 14 Pro Max device to get the issue fixed.
Part 3: Dr.Fone Virtual location change your location in one click
To fix the fake GPS Pokémon go failed to detect location Dr. Fone’s virtual location is the best and the state of the art program that can be used. It is not only the best but also allows the users to overcome the issues that are presented by the other similar programs. With this program, it is easy to make sure that the overall game performance improves in terms of location detection. You can teleport with ease using this program. With an intuitive interface and a professional team backing the program, you get the ultimate results. Not only Pokémon but all the location-based and AR games this program is a boon.
How to use Dr. Fone Virtual Location
Step 1: Program Installation
First of all download and install the program to get started.
Step 2: Enable Virtual Location
Click the get started icon once the iPhone has been connected to the system and the virtual location has been enabled.
Step 3: Locate the Apple iPhone 14 Pro Max device
Click the center on a button to make sure that your location is detected by the program.

Step 4: Change Location
The third icon on the upper right corner is to be pressed to teleport. In the bar type the name of the location you want to teleport to.
Step 5: Move to a teleported location
Click on move here to get to the location that has been selected.
Step 6: Validation
Your iPhone will show the same location as on the program and this finishes the process.

Conclusion
Dr. Fone’s virtual location is the best and the most advanced program that will make sure that you get the best results. It will not only enhance your gaming experience but will also remove the Pokémon go GPS joystick that failed to detect location error with perfection. It is the best program that is easy to use and there are guides online that further foster the process. With this program, it is easy to get a step ahead for all AR and location-based games and to enjoy to your fullest.
How and Where to Find a Shiny Stone Pokémon For Apple iPhone 14 Pro Max?
Shiny Stone Pokémon is an important evolution item in Pokémon Sword and Shield. If you are a Pokémon player, you understand how great it is to capture a Shiny Stone. However, the Shiny Stone is a rare item, and you will have to put more work to grab one. In this article, we will to explain to you everything you ought to know about Shiny Stone Pokémon, including how to get them with less effort. Let’s get started.
Part 1. Shiny Stone Pokémon
What is Shiny Stone Evolution?
A Shiny Stone is an item in Pokémon Go that is used to evolve certain Pokémon. Shiny Stone was introduced in Generation IV and is no different from other evolution stones such as dusk stones, dawn stone, and ice stone, to mention but a few. The major differences could be their location as well as the type of Pokémon they help to evolve. You can identify this peculiar stone by its dazzling, shining light.

How and where to find a Shiny Stone evolution
In Pokémon Sword and Shield, the easiest way to get any evolution stone, including Shiny Stone, is by completing poke jobs. When you earn a water badge and then the gym badge, you can access the third tier poke jobs. Everything further will depend on whether your Pokémon perform great in their assigned jobs. If it performs great, you will be rewarded with an evolution stone that could be a Shiny Stone. If you want your Pokémon to do a great job, make sure you meticulously read through the summary of every given poke job. This is vital because it provides you a clue of what Pokémon you should pick.
Shiny Stone Evolution
In Pokémon Go, Shiny Stone is used to evolve certain Pokémon species. The following are some of the Pokémon that evolve using Shiny Stone. Evolving them is pretty simple. Just launch the menu and navigate to the bag. Select the “Other items” tab and use it to evolve any of the Pokémon listed below.
1. Roselia
Roselia is small, light green in color grass and poison type Pokémon. It has stats of 50 hp, 60 attacks, 65 speed, and 45 defense. This Pokémon was introduced in Generation III and had three thorns on its head and black eyes with long eyelashes. It holds a rose on the one hand and a red one on the other hand. Its aroma draws serenity, but the thorns on its head contain poison. The healthier it is, the stronger its aroma is. This Pokémon evolves from Budew through friendship level up in the day. When it is subjected to a Shiny Stone, it evolves into Roserade.
2. Minccino
This is a normal type of Pokémon that was introduced in Generation 5. It is also referred to as Chinchilla Pokémon. Its abilities include cute charm, technician, and skill link. Its stats are hp-55, attack-50, defence-40, speed-75, and total combat points-75. A Minccino evolves into a Cincino using a Shiny Stone. In Pokémon Sword and Shield, Minccino is located in rolling fields, East Lake Axewell, Route 5, and Giant’s cap.
3. Togetic
Togetic is a fairy and flying type of Pokémon that has ten hatch cycles. Its abilities include hustle, serene grace, and super luck. Togetic itself evolves from Togepi with leveled up friendship through camp play and cooking curry. It can float in midair without having to flip it wings. It appears and showers happiness to kindhearted and caring people. It, however, becomes dispirited if it encounters people who aren’t kind. Togetic is located in Stony Wilderness and from an evolving Togepi. Togetic evolves to Togekiss with the help of a Shiny Stone.
Part 2. Tricks and Hacks to Find Shiny Stone Pokémon
Finding a Shiny Stone in Pokémon Sword and Shield is challenging because it is a rare item. Nevertheless, some hacks and tricks can reduce your curve of finding a Shiny Stone, as explained below.
1. Use the iOS spoofing tool-Dr. Fone Virtual Location
Since the game of Pokémon is location-based, you can fake your GPS location by simply teleporting to an appropriate Shiny Stone location while you are seated at your home. This is achievable with the help of Dr. Fone Virtual Location . The program is powerful, simple, and easy to use. You can teleport to whatever place you want, simulate movements along a route set by two or multiple points. To teleport to the location where it is easier to grab a Shiny Stone using Dr. Fone Virtual Location, follow the steps below.
Step 1. Download and install Dr. Fone Virtual Location on your computer. Now run it and click on the “Virtual Location” tab.
Step 2. After that, connect your iOS to the PC and click the “Get Started” button.
Step 3. On the next page, click the third icon on the top-right to provide the teleport mode. Choose the location you want to teleport to within the filed at the top and press “Go.”
Step 4. Click “Move Here” on the dialog box that pops up once the program finds the location.
2. Use Android spoofing tool- Pgsharp
Pgsharp i8s an Android application that enables users to be fake their GPS location and fools location-based apps like Pokémon Go to enter a territory that is easy to grab a Shiny Stone or Pokémon. It has a joystick feature for easy and smooth movement, coordinates to move to specific locations, auto walkthrough several pokestops, and saves your last location, among others.
3. Use a Drone
Some YouTube channels teach you how to use drones to cheat in Pokémon Go. A good example of a drone is DJI PantomDrone. When this drone is integrated with some smart software, you can easily control a phone that is attached to the drone. This way, you can sit at home while visiting gyms and pokestops.
Also read:
- 2024 Approved Navigating Through the Process of TikTok's Slow Motion Filming
- 2024 Approved The Foundations of VSCO Photo Manipulation
- 2024 Approved Valheim Agronomy Explained Choosing Superior Saplings
- Catch or Beat Sleeping Snorlax on Pokemon Go For Apple iPhone 11 Pro | Dr.fone
- Catch or Beat Sleeping Snorlax on Pokemon Go For Apple iPhone 8 | Dr.fone
- Here are Some of the Best Pokemon Discord Servers to Join On Apple iPhone 13 | Dr.fone
- Here Are Some Reliable Ways to Get Pokemon Go Friend Codes For Apple iPhone 14 | Dr.fone
- How Can I Catch the Regional Pokémon without Traveling On Apple iPhone 14 Pro | Dr.fone
- In 2024, Unleashing Your GoPro Potential - Must-Have Additions
- In-Depth Analysis of GIMP: Your Go-To No-Cost, Versatile Image Editing Solution for All Systems
- Should I Prepare My Mac for the New Monterey Release?
- Title: In 2024, Why cant I install the ipogo On Apple iPhone 14 Pro Max | Dr.fone
- Author: Iris
- Created at : 2024-10-07 16:00:02
- Updated at : 2024-10-12 16:00:03
- Link: https://ios-pokemon-go.techidaily.com/in-2024-why-cant-i-install-the-ipogo-on-apple-iphone-14-pro-max-drfone-by-drfone-virtual-ios/
- License: This work is licensed under CC BY-NC-SA 4.0.