
Pokemon Go Error 12 Failed to Detect Location On Apple iPhone 11 Pro? | Dr.fone
Pokemon Go Error 12 Failed to Detect Location On Apple iPhone 11 Pro?
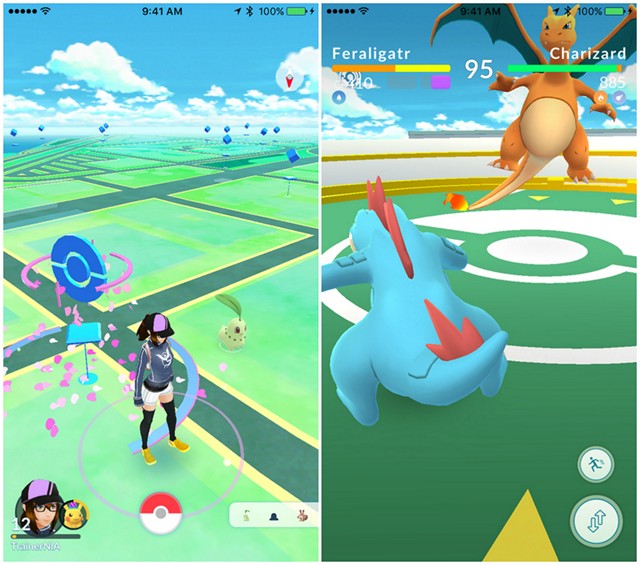
Pokemon Go is a popular game that has taken the world by storm. It is an augmented reality game that allows players to catch Pokemon in the real world using their smartphones. However, many players have reported encountering the “Failed to detect location (12)” error while playing the game. This error can be frustrating as it prevents players from playing the game properly. In this article, we will discuss what causes the “Failed to detect location (12)” error in Pokemon Go and how you can fix it on your Apple iPhone 11 Pro.
Pokémon Go has been on the nerves of its players and this is all because of the AR notion that it presents. The failed to detect location 12 is one of the most common errors that are faced by the players while playing this game. You might not believe but the GPS signals and the location settings on iPhone or Android are the two main reasons for this error. It can be resolved with ease and this article has been written to get the work done with ease. Applying the methods explained will ensure that you get the best results overall.
Part 1: Why is Location Important in Pokémon Go?
The best part of this game is that it has been compiled keeping in view the location mechanics. The location analytics of the game has made sure that it becomes the overnight sensation. Three main attributes are associated with the location framework of the game. These attributes also show how important the location is for the game. Understanding these attributes will also make sure that the user can overcome the errors such as failed to detect location 12 GPS joystick 2019.

i. Physical World Attribute
The best part of this attribute is that it is the center of the user experience of the game. The second part is the fact that this map has evolved and there are no shortcuts to its success. Ingress was the previous game that was developed by Niantic and the crowdsourcing of this map started with the evolution of this application. This was developed by the same team that is working on the core of Google Earth.
ii. Real World Gestures
The augmented reality is another important aspect that is related to Pokemon Go and this also means that the location services are relied on when it comes to this application. The android and the iOS location services are continuously used by the game to provide the pinpoint locations as well as the game features that are not found in other applications. The use of location through GPS satellites even becomes more important for such gestures. Especially when the player is outdoors it becomes too important to deal with using GPS location.
iii. Place Attribution
The system within the system that has been designed by the game developers makes sure that the location inaccuracies are accounted for. This also means that the 4-meter accuracy of the GPS is further enhanced to deal with the perfect location identification of each player.
Part 2: Ways to Fix Error 12 on Pokémon Go
Several ways can be used to make sure that the subject error is resolved with ease. This section of the article will deal with all such ways that can be used to get the work done with ease and perfection.
Method 1: Enable Mock Locations
As the name suggests it is to set the fake location using the build-in iPhone feature. It will also make sure that the feature of the game continues to work perfectly.
Step 1. Go to the developer options of your device. To get to the developer options simply head over to the settings > About Phone > Software Info > Build number and tap it 7 times to enable the mock locations.
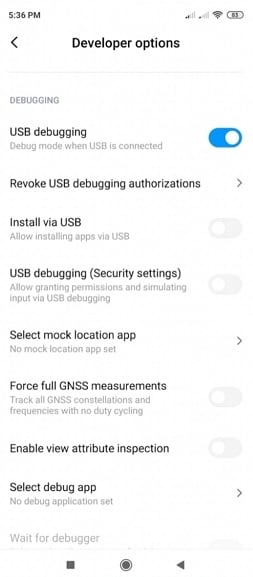
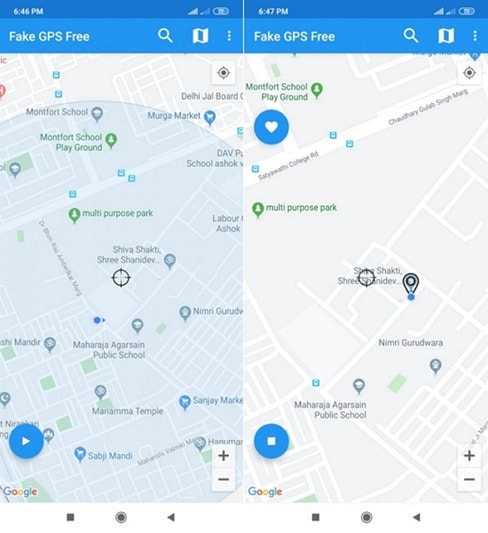
Step 2. Install the Fake GPS that is a free application and can easily be found on the Play Store.
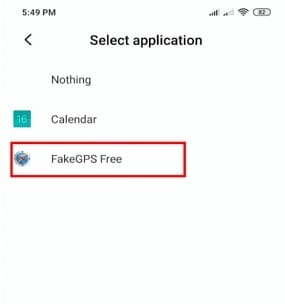
Step 3. Launch the application and you can easily enjoy Pokémon Go without any hassle and trouble and resolve the Pokémon go failed to detect location 12 fake GPS error.
Method 2: Location Activation
This is another important and easy way to make sure that the Pokémon failed to detect location 12 error is resolved with ease and perfection. To execute the process the steps are mentioned as follows:
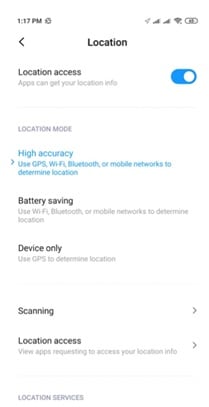
Step 1. Open the settings on your Phone to start with:
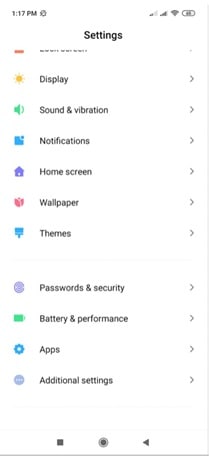
Step 2. Tap on the passwords and security to proceed with the process:
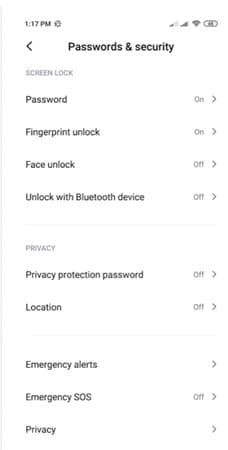
Step 3. Tap to turn on the location to finish the process and eliminate the failed to detect location 12 Pokémon Go errors.
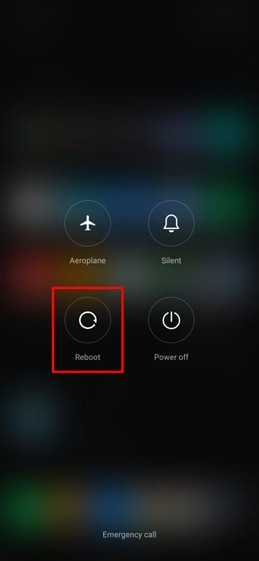
Method 3: Reboot the Apple iPhone 11 Pro device
This might seems weird but this trick has been working to quiet some time now and has been proven to eliminate the failed location 12 Pokémon Go issue. There is a possibility that the server location is not synced with the Apple iPhone 11 Pro device. Restarting the Apple iPhone 11 Pro device will make sure that both the locations are sync and the problem is resolved with ease.
Just long-press the power button and choose the reboot option from the menu that appears to complete the process in full.
Part 3: Best Way to Overcome Location Error 12 on Pokémon Go for iOS Devices
Dr. Fone Virtual location is the best tool to overcome issues such as failure to detect location 12 Pokémon go on iPhone. The program has been designed to make sure that the GPS location is spoofed and you get the perfect outcome in resolving the error under discussion.
The Process
Step 1: Program Installation
To begin the process, download and install the program to get going with the process.

Step 2: Enable Virtual Location
Connect your Apple iPhone 11 Pro and enable virtual location from the options of the program. Hit get started to begin the spoof.

Step 3: Locate yourself
The center on the button on the next screen is to be clicked to get the accurate location.

Step 4: Teleportation
On the upper right corner click the icon on the third to begin teleportation or spoofing to be precise. Enter the name of the place where you want to teleport to.

Step 5: Move to the teleported location
Click on move here and the system will move you to the location that has been entered.

Step 6: Validate and Completion
The location will be locked by the program and your Apple iPhone 11 Pro will also show the same location as on Dr. Fone. This also completes the process in full:

Conclusion
Dr.Fone - Virtual Location is the best and the state-of-the-art program to overcome Pokémon go unable to detect location 12 on iOS devices. It has an intuitive interface and it also allows the users to overcome the issues that traditional spoofing programs present. It is being updated constantly which also means that you will be able to get the best results. There is no program on the internet that can resolve the error that failed to detect location 12 in Pokémon go as easily as this one does.
What Pokémon Evolve with A Dawn Stone For Apple iPhone 11 Pro?
If you are a diehard Pokémon Go player, you probably know how exciting it is when your Pokémon evolves. Evolutions mean a boost in stats and strength in raids. Plenty of Pokémon users are conversant with the traditional raiding as a way to evolve. However, you can use special items to evolve your Pokémon. One such item is the dawn stone. In this article, we are going to take you through a detailed guide on dawn stone evolutions and how to get it with ease.
Part 1. Dawn Stone Pokémon Evolutions
What is Dawn Stone in Pokémon Sword and Shield?
Like Shiny Stone, dusk stone, Sun Stone, and Moon Stone, Dawn Stone is another peculiar evolution item in Pokémon Sword and Shield. If you combine Dawn Stone with certain Pokémon, they will evolve to another level. This peculiar stone was introduced in Generation IV, and in terms of appearance, Dawn Stone sparkles like a glittering eye.

You can get dawn stone from the Digging Duo found near the Wild Area nursery. You will, however, be required to pay them 500 watts before digging random items for you. Remember, this is a trial and error thing, and you might have to spend a lot of watts before finding a dawn stone. Also, you can get any evolutionary stone, including the Dawn Stone in the Lake of Outrage. Here, you will have to first obtain a Rotom Bike on route 9 to move across the water.
Pokémon that Evolve with Dawn Stone
As aforementioned, dawn stone is an evolution item that is used to evolve certain species of Pokémon. To evolve your Pokémon using Dawn Stone in Pokémon Sword and Shield, enter the bag menu and choose the “Other Items” tab. Hover on the Dawn Stone and select the “Use this item” option. Finally, select the Pokémon to evolve. These Pokémon that can be evolved using dawn stone include:
1. Kirlia
Kirlia is a small humanoid Pokémon whose upper body and arms are white while the waist and legs are light green. This makes it appear as though it is wearing tights. Kirlia’s natural abilities include synchronization and trace. It loves dancing on sunny mornings and becomes more beautiful when they sense e positive emotions of trainers. A vast majority of Kirlia live in the cities, although some are still found in the forest. Kirlia evolved from Ralts and has two possible evolutions, namely Gardevoir and Gallade. If it reaches level 30, it evolves to Gardevoir. However, if it is male and given a dawn stone, it will evolve to Gallade.
2. Snorunt
Snorunt is an ice-type Pokémon that was introduced in Generation III. It is also referred to as the “Snow Hat Pokémon.” You can find Snorunt in seafoam café, snow canyon, or even in Mysterious Grotto. Furthermore, you can obtain it by trading or Pokémon Roulette. Snorunt can evolve into Glalie or Froslass. If it reaches level 42, Snorunt evolves to Glalie. For Snorunt to evolve into Froslass, it requires a dawn stone. However, the Snorunt must be a female to evolve to Froslass.
Part 2. Hacks and Tricks to get Dawn Stone Pokémon
It is every player’s wish to avoid the long hunt for a Dawn Stone into their Podex. This issue has given birth to some of the hacks and tricks to help players cross territory and find the intended evolution item or Pokémon. Some of these tricks include:
1. Use iOS spoofing tool- Dr. Fone Virtual Location
Dr. Fone Virtual Location is an amazing iOS spoofer tool that allows users to fake their actual location. This makes it a good tool for location-based games like Pokémon Go. With Dr. Fone Virtual Location, you can teleport to whichever place across the globe by a click of a button. If you want to simulate movements to confuse the game app, you can simulate two or multiple points. Furthermore, you can leverage the joystick to improve the flexibility of GPS control. To teleport to any place in the world with Dr. Fone Virtual Location’s help, follow the steps below.
Step 1. Download Dr. Fone Virtual Location and install it on your computer. Once installed, launch it and then select the “Virtual Location” tab on the primary window. Also, connect your iOS device to the computer.
Step 2. On the next page, click the “Get Started” button to proceed.
Step 3. You should see three icons on the top-right of the subsequent page. Click the third icon to switch to the teleport mode. At the top-left, enter the location of the place you want to teleport to and click “Go.”
Step 4. When the program has found the location, a dialog box will appear in the background. Click “Move Here” to teleport to this location.
2. Use Pokémon Gotcha
Pokémon Go-tcha makes hunting Pokémon and evolution items much easier. With this tool, you can go for a hunt without looking at your smartphone. When you run Go-tcha Evolve on the Pokémon Go application, you can set color animations and vibrations to alert you about Pokémon and pokestops that are in range. Moreover, you can use the auto-catch feature so that you don’t have to respond to alerts. You can also check on time, your stats, and leverage the new pedometer feature to count your steps. This program comes with various exciting colors for you to choose from and a bunch of other great features.
3. Use iTools
iTools location spoofer is another good GPS mocking tool that is suitable for Pokémon Go games. By faking the GPS location, you can easily access territories where rare Pokémon or evolution items are available while seated at home or in the office. This program supports iOS 12 devices or earlier versions. However, there are scores of people who have complained about several crashes. Nevertheless, you can try it if you have got some penny to spare.
Latest way to get Shiny Meltan Box in Pokémon Go Mystery Box On Apple iPhone 11 Pro
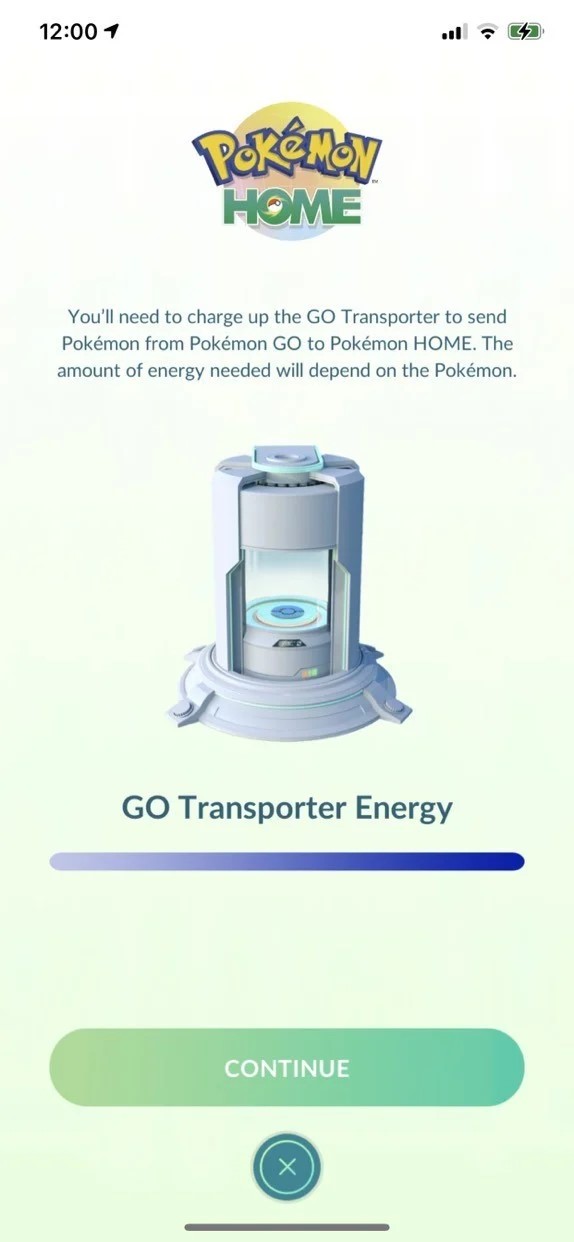
The news of every Pokémon Go player being able to shift to Pokémon Home was taken in with a flavorsome acceptance from the community of trainers. Home Event for the highly successful mobile game is advancing towards termination, and this has ensued in reckless people demanding to know ways to get a Mystery Box so they can acquire a Shiny Meltan.
Part 1: How to get a mystery box in Pokémon Go?
The Mystery Box is a particular object in Pokémon Go that briefly roots the mythical Pokémon Meltan to emerge in the wild. To receive a Mystery Box in the game, you should connect your Pokémon Go and Home accounts in the first place. Furthermore, you should relocate one Pokémon Go character at the very least to Home to attain a Mystery Box that can entice Shiny Meltan.

Reportedly, you are required to have the mobile version of Home connected to your Nintendo Account. This can be carried out simply by downloading the Home app from Your Apple iPhone 11 Pro store and tracking the instructions given on your screen in the initialization process of your app. After connecting the mobile Home application to your Nintendo account, track the steps below to connect Pokémon go to Home App:
- Start Pokémon Go.
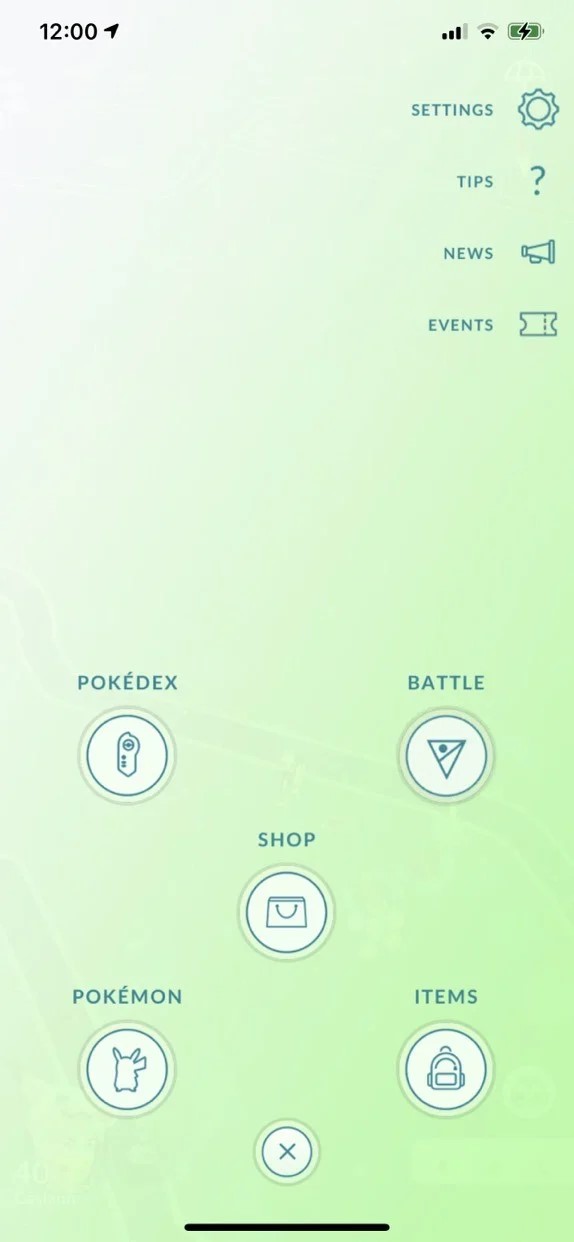
- Click the PokeBall icon on the map at the bottom.
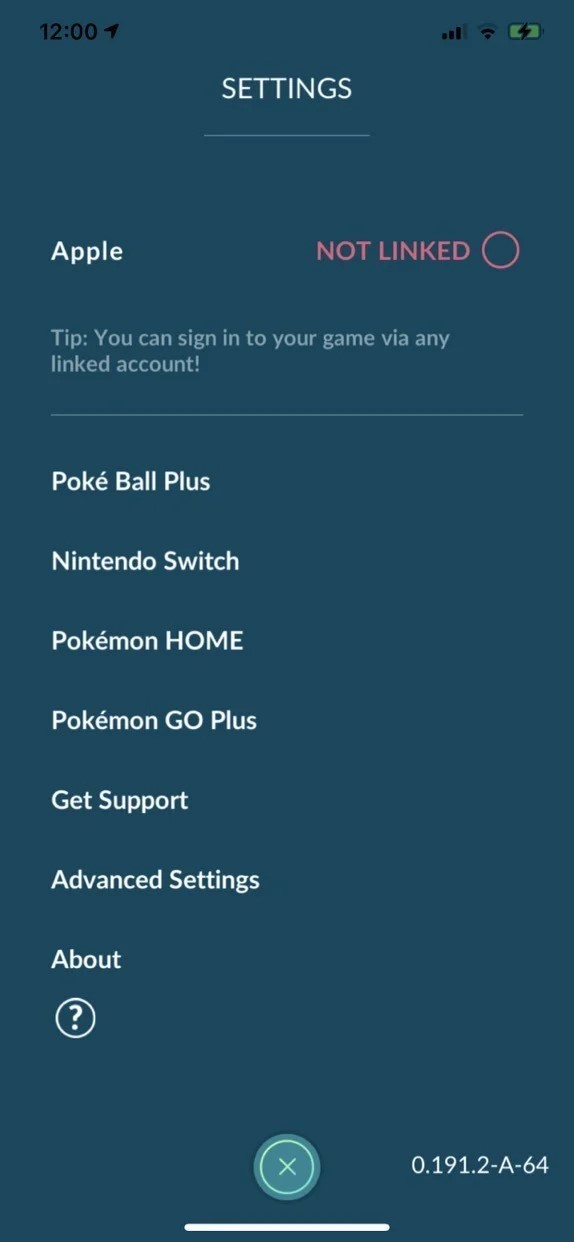
- Advance to ‘Settings’ and scroll downwards and click Pokémon Home
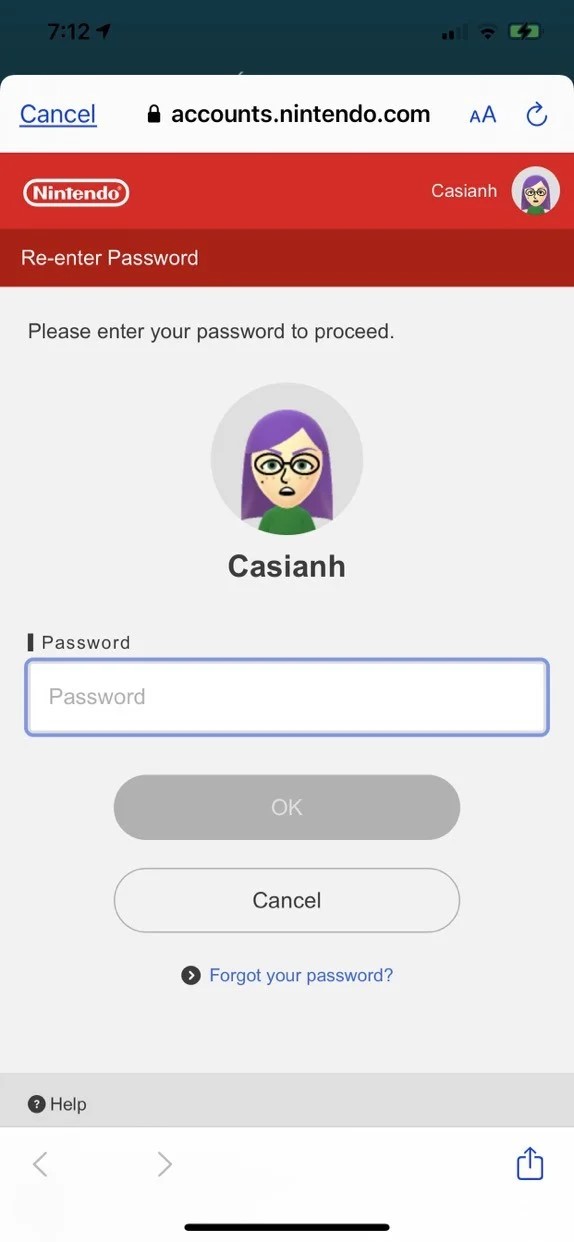
- Click ‘Sign In’ in your Nintendo Account. A pop up will appear asking for permission to sign in to ‘nintendo.com,’ pressing “Continue” will redirect to the website to log in.

- Enter your username and password. Press ‘OK’ to return to the previous screen.
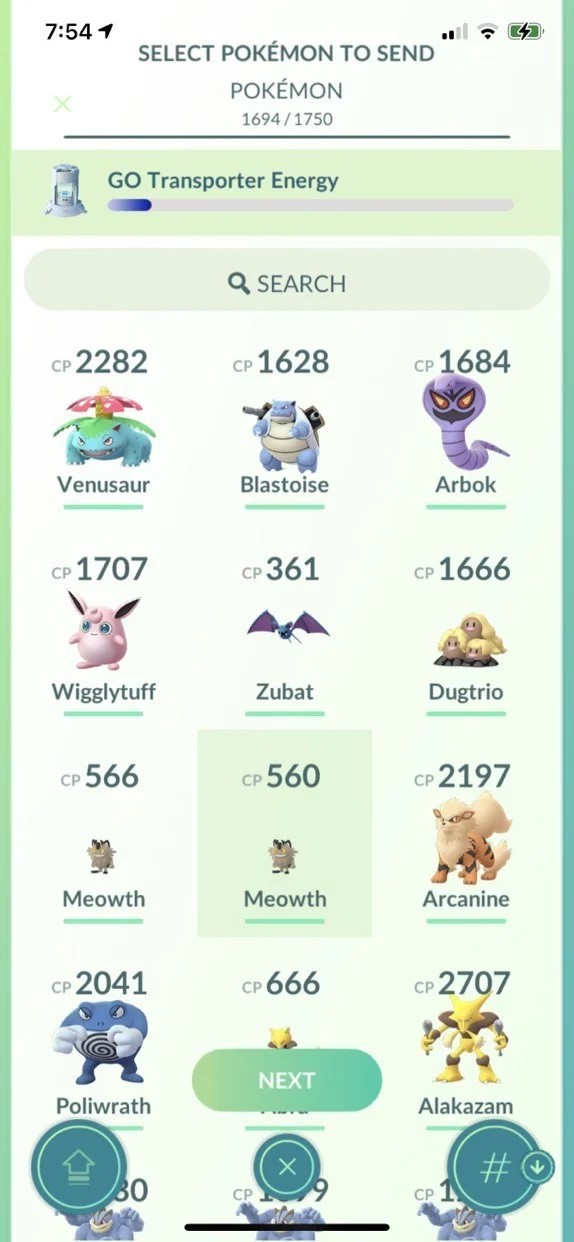
On execution of the above instructions, follow the directions below to move a Pokémon Go creature to Home App:- Open Pokémon Go and access the ‘Main Menu’ by pressing the PokeBall icon.
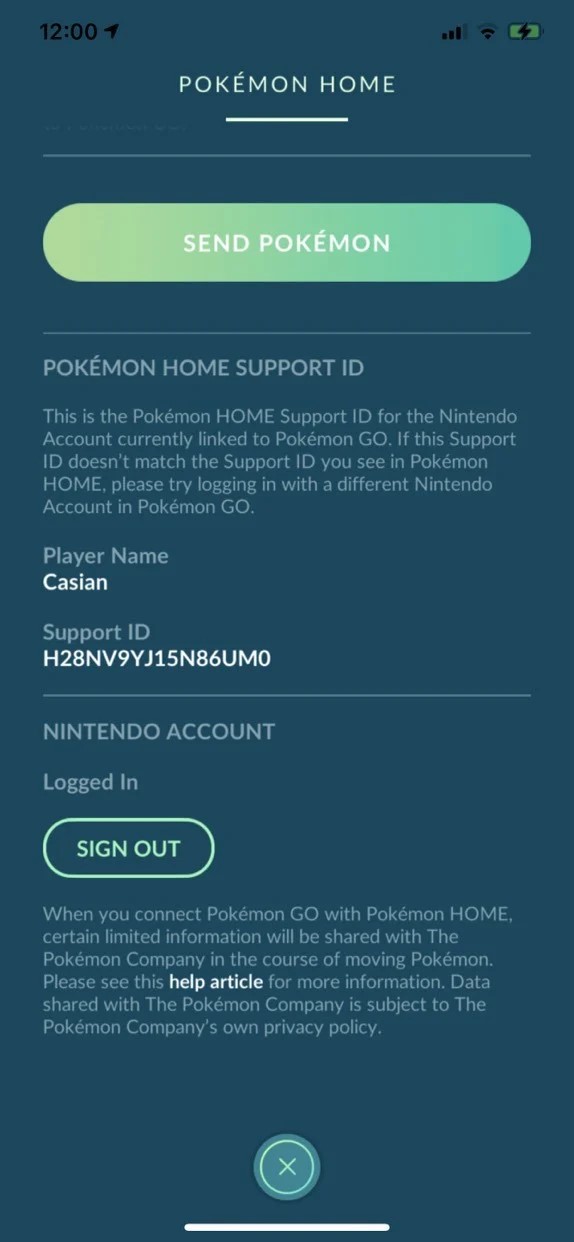
- Open ‘Settings’ and go to Home.

- Press on ‘Send Pokémon’
- Press Continue
- Select the Pokémon you want to relocate
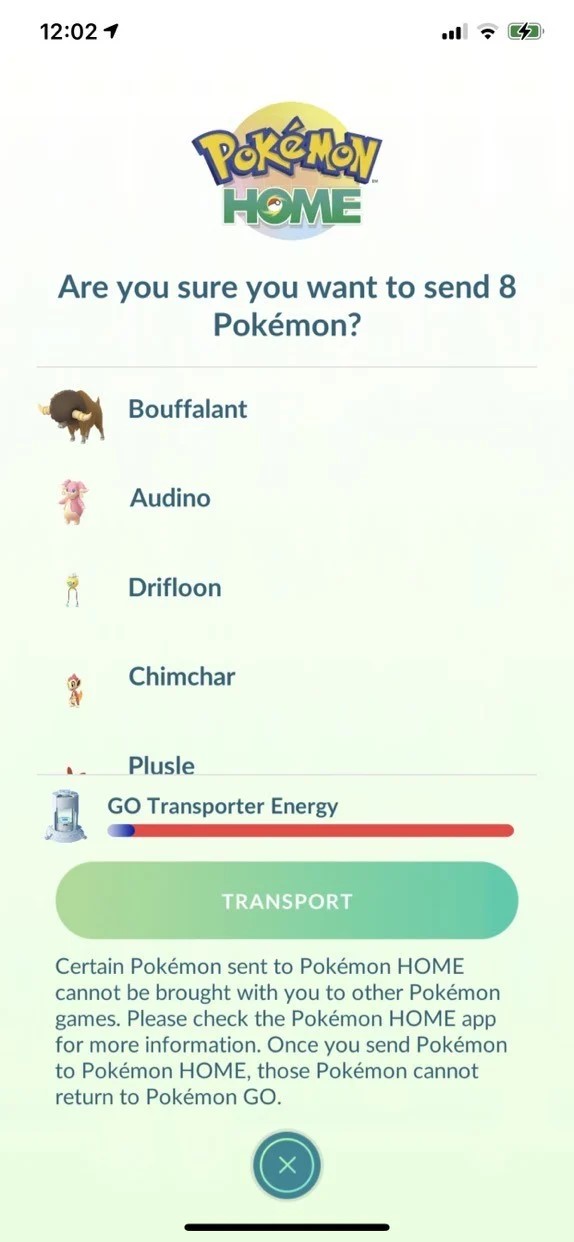
- Click ‘Next’
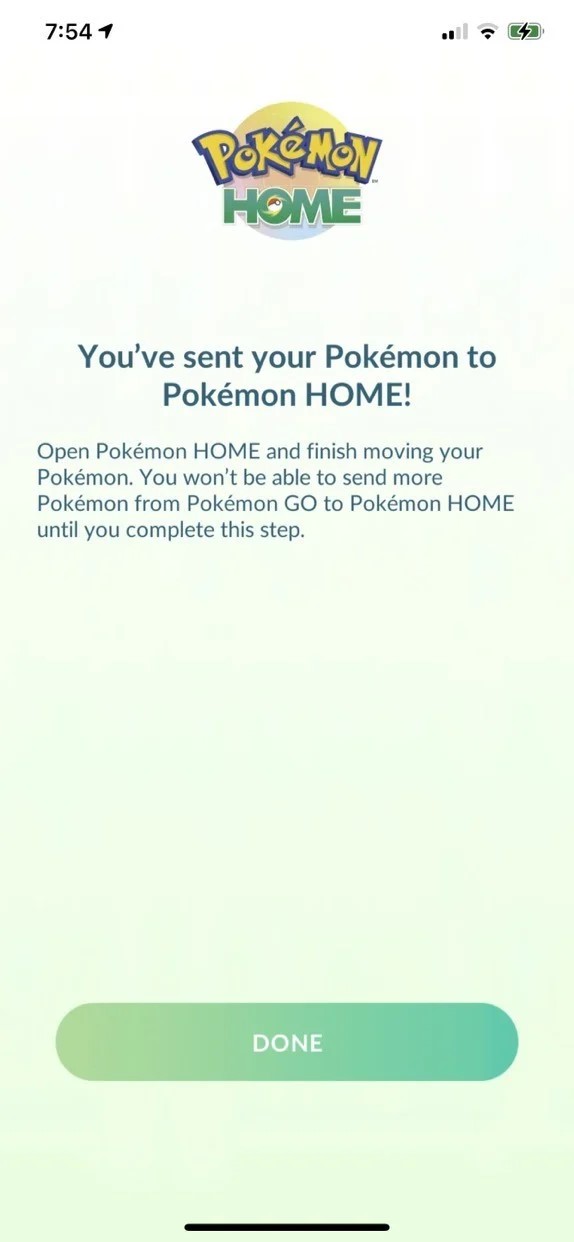
- Tap ‘Transport’ to accept after confirming your pick.
- Press ‘Done’
- Open Pokémon Home on mobile.
- Click on the screen to start.

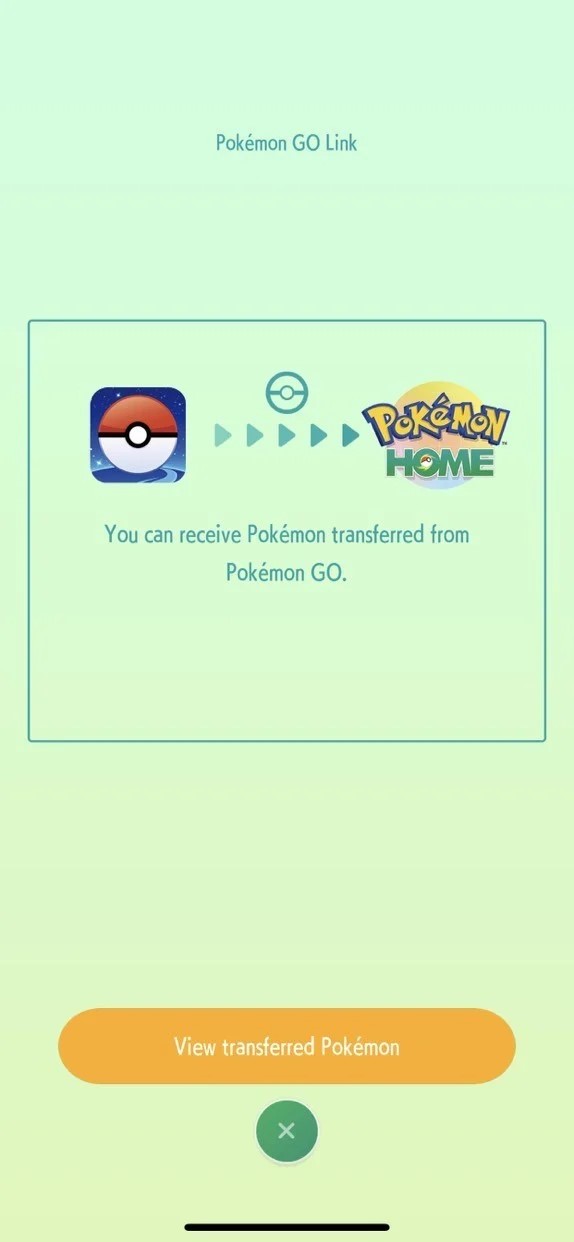
- Click ‘Yes’ on the Pokémon Go Link message.
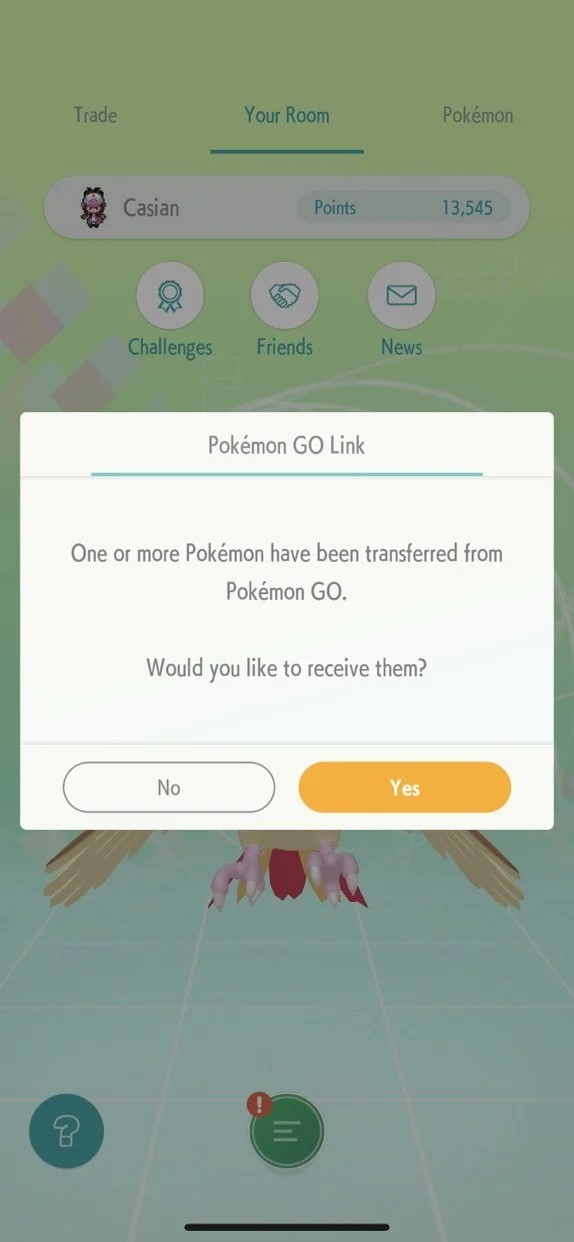
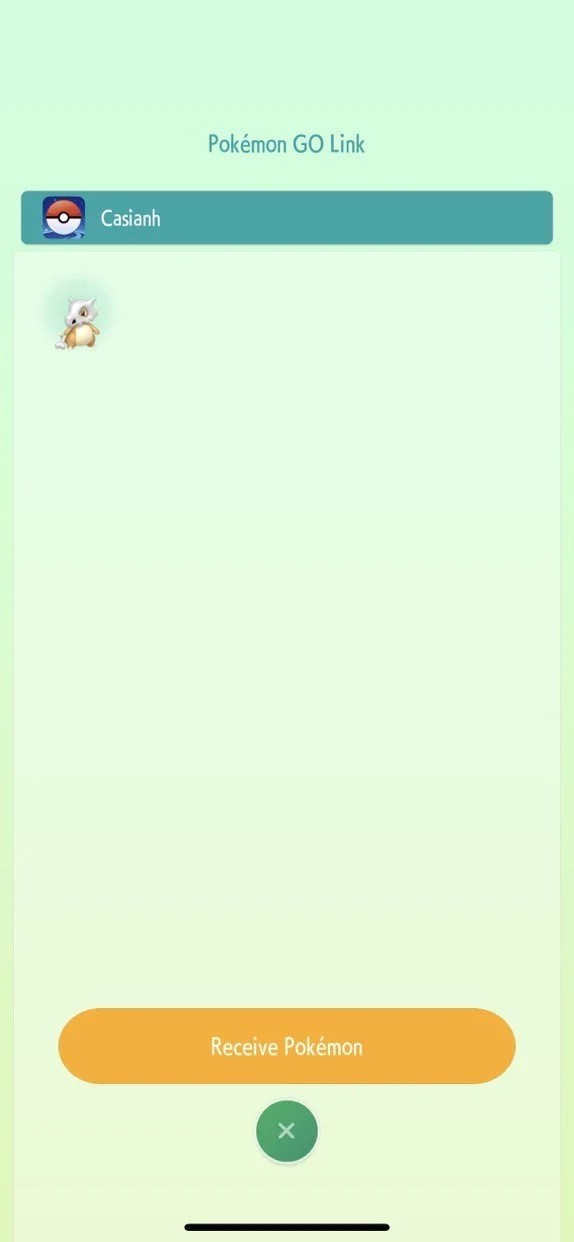
- Select ‘View Transferred Pokémon’
- Confirm that you want to Receive by pressing ‘Receive Pokémon’
By following the steps above, you will be awarded a Mystery Box in Pokémon Go, and you can activate it by advancing to your item bag.
Use Virtual Location to catch the Pokémon Go creature
You can use the faux location of Dr. Fone to imitate your orientation without making a move and collect exclusive Pokémon. The mock location of Dr.Fone lets you simulate your position and permits your mobile application to presume that you have selected the application interface of Dr.Fone without any restrain or recognition from developers of Pokémon Go. Follow the instructions below to catch Pokémon any place without making any movement.
Step 1: Install:
Install the ‘Dr. Fone toolkit’ from the official website after downloading it. After installation, launch the toolkit and select the ‘Virtual Location’ tab.
Step 2: Connect:
Subsequently, connect your PC or laptop with the Dr. Fone application. Also, permit the location services to retrieve the location of your device. Then, press on the ‘Get Started’ button to use the services of Dr. Fone.
Step 3: Imitate your GPS position:
Select your current location on the map. Next, click the leftmost button on the top-right corner of the window to start the ‘Teleport’ mode. Then search the places you wish to mock your position with, and press ‘Go’ after the selection.

Step 4: Imitate Movement between steps:
To start the simulation, make a movement and traverse to the ‘Move Here’ button to reach multiple times. By default, the motion is adjusted to ‘1’, but it can be replaced by the user to switch the program correspondingly.

The simulated position will emerge as genuine for the Pokémon Go app, and it will believe that you are moving between the two designated positions chosen on the Dr. Fone GUI screen. At the foot of the screen, the motion speed can also be tuned using the sliding menu. This way, you can use the false maneuver of the position of Dr. Virtual Fone without having the need to understand it. Also, your application will not be banned.


Step 5: Movement Simulation between more than two spots:
Dr. Fone’s application also permits you to replicate activity between more than two sites. The component is called after the multi-stop path that can be chosen from the GUI toolbox class positioned at the top-right nook that lets you put numerous specified destinations on the map, and your position will behave appropriately as controlled by the virtual location application of Dr.Fone.
To grant permission to the system to mock movement by picking out the right options, press the ‘March’ button. You will be required to do the Pokémon Go walking illusion at some point. Dr. Fone’s virtual movement imitation application eases your life and lets you do the job without being concerned about travel costs.

Part 2: How to get Shiny Meltan in Pokémon Go?
Meltan is a legendary steel-type Pokémon that was initially launched in Pokémon Go. It is original since each and every other Pokémon has been announced in either the main games or using the Pokémon animation. Meltan has very restricted accessibility and Meltan evolution, Melmetal can yet solely be evolved in Pokémon Go. Until now, there were only two ways of catching Meltan - transferring a Pokémon from Pokémon Go to Pokémon Home or associating your Pokémon Go account to Let’s Go, Pikachu! or Let’s Go, Eevee! Now there is another way of capturing Meltan, that is, by opening a mystery box. You can get a Mystery Box that opens once a week by connecting your ‘Pokémon Go’ and ‘Pokémon Home’ accounts as described earlier.
The Mystery Box will act as an essence precisely for Meltan, attracting a large amount of the small Hex Nut Pokémon to your locality for one hour. It takes time to recharge, about three days, but after it is charged, you have to transfer another Pokémon to HOME to be able to use it again for an hour. If you get to use the Mystery Box in the course of specific events, you can even grab a Shiny Meltan.

Conclusion
Pokémon is one of the most enjoyable games, not only because it yields prizes such as the mystery box Pokémon, Meltan Pokémon, shiny Meltan Pokémon go, but it also develops players’ interest completely. It manifests a 3D view making it appear as the actual life. Furthermore, with an application like Dr. Fone Virtual Location, you turn out to be an addict as it helps you imitate your GPS position and proceed across the path you set up on the map.
Also read:
- [New] 2024 Approved Youtube Shorts Earning Strategies What You Need, How Much You Can Make
- [New] Discover Your Inner Artist with These Leading Android Graphics Tools for 2024
- 2024 Approved Kickstart Your Webinar Skills with Easy-to-Follow Zoom Steps
- 2024 Approved The Breathtaking Beijing Winter Games of 2022
- 4 solution to get rid of pokemon fail to detect location On Apple iPhone 14 Pro Max | Dr.fone
- Apple Unveils Plans for Home-Based Robot Assistants – Discover the Future Developments | Insights From ZDNET
- How Can I Catch the Regional Pokémon without Traveling On Apple iPhone 6 Plus | Dr.fone
- How To Erase Private Data From Apple iPhone 12 mini | Dr.fone
- How to Get and Use Pokemon Go Promo Codes On Apple iPhone 15 Pro | Dr.fone
- How to Remove MDM from iPhone 13 Pro Max without Apple ID?
- How to Use Pokémon Emerald Master Ball Cheat On Apple iPhone 12 Pro Max | Dr.fone
- In 2024, CatchEmAll Celebrate National Pokémon Day with Virtual Location On Apple iPhone 8 Plus | Dr.fone
- In 2024, Ways to trade pokemon go from far away On Apple iPhone 6s Plus? | Dr.fone
- Pokemon Go No GPS Signal? Heres Every Possible Solution On Apple iPhone 11 Pro Max | Dr.fone
- Updated FCPX Not Working? Try Resetting A Simple Solution to Common Issues
- What is the best Pokemon for pokemon pvp ranking On Apple iPhone 15 Pro? | Dr.fone
- WhatsApp or Signal? Exploring the Critical Differences Between Them
- Title: Pokemon Go Error 12 Failed to Detect Location On Apple iPhone 11 Pro? | Dr.fone
- Author: Iris
- Created at : 2024-10-10 07:06:43
- Updated at : 2024-10-11 18:03:02
- Link: https://ios-pokemon-go.techidaily.com/pokemon-go-error-12-failed-to-detect-location-on-apple-iphone-11-pro-drfone-by-drfone-virtual-ios/
- License: This work is licensed under CC BY-NC-SA 4.0.