
The Best iSpoofer Alternative to Try On Apple iPhone 14 Plus | Dr.fone
The Best iSpoofer Alternative to Try On Apple iPhone 14 Plus
“Is iSpoofer for Pokemon Go not working anymore? Can someone tell me how to spoof my iPhone X location now when the iSpoofer tool is shut down?”
If you have been using iSpoofer for a while to change your Apple iPhone 14 Plus location, you can encounter a similar situation. Since iSpoofer is no longer available, users are actively looking for its alternative. In this post, I will let you know the iSpoofer use and why we can’t take its assistance to change the Pokemon Go location anymore. I will also make you familiar with the best iSpoofer alternative for iPhone and Android.

Part 1: Why did iSpoofer shutdown?
Earlier, iSpoofer used to be one of the most popular apps to change our location on Pokemon Go. Sadly, the application is no longer working and you can’t even do iSpoofer download from its website.
Why did iSpoofer shutdown?
- The use of iSpoofer for Pokemon Go is against the terms of the game (as it doesn’t allow the use of third-party apps).
- Recently, Niantic caught many people using iSpoofer for Pokemon Go and this got their accounts banned.
- Since the iSpoofer use is no longer applicable, the company has shut down the product’s availability.
- Even if you have already done the iSpoofer download, the application will not be supported by Pokemon Go and its use will get your account terminated.

Will iSpoofer work again?
Most likely, the chances of iSpoofer working again are pretty bleak. This is because Pokemon Go users were the major target customers of the product. Since Niantic has blocklisted iSpoofer a while back, Pokemon Go players can no longer use it. Therefore, it is better to look for a reliable iSpoofer alternative instead.

Part 2: The Best iSpoofer Alternative to Change your Apple iPhone 14 Plus Location
If you are looking for an iSpoofer alternative to spoof your phone location, consider picking Dr.Fone – Virtual Location (iOS & Android) . The application is extremely easy to use and can instantly change your device location. Here are some of the reasons why Dr.Fone – Virtual Location (iOS & Android) is the best iSpoofer alternative:
- Compared to iSpoofer, using Dr.Fone – Virtual Location is extremely easy and it will not need jailbreak access as well.
- Since it is a 100% secure way to spoof your Apple iPhone 14 Plus location, your Pokemon Go account won’t be compromised in the process.
- You can spoof your device location to anywhere you want by entering the place’s address or coordinates using the application.
- There is also a provision to simulate the Apple iPhone 14 Plus device’s movement between multiple spots at any speed of your choice.
- The interface will also display a GPS joystick that you can use to move realistically on the map.
You can follow these simple steps to use this iSpoofer alternative to change your Apple iPhone 14 Plus location easily.
Step 1: Connect your Apple iPhone 14 Plus to the system
To begin with, you can connect your Apple iPhone 14 Plus to the system and launch the Dr.Fone – Virtual Location on it. Now, agree to its terms and click on the “Get Started” button.

Step 2: Enter the target location
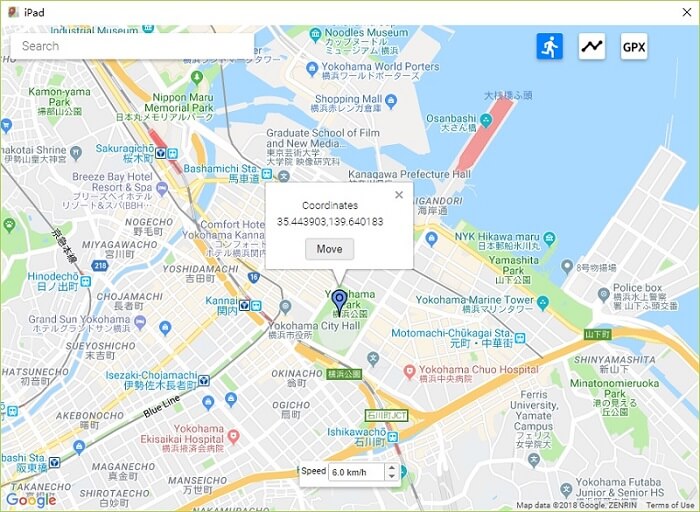
Once your Apple iPhone 14 Plus is detected, the interface will display its present location. You can now click on the teleport mode icon from the top.

Now, please enter the address or the coordinates of the target location and load it on the map.

Step 3: Spoof your Apple iPhone 14 Plus location
As you would select the target location, the application will automatically change the interface. You can now drag the pin around and even zoom in/out the map to select the target location. Lastly, you can select the “Move Here” button and the location of your Apple iPhone 14 Plus would be changed automatically.

You can now launch Pokemon Go or any other GPS-based app to check the spoofed location of your Apple iPhone 14 Plus.

Note: Keep in mind the cooldown duration before changing your location to ensure your account won’t get banned by Niantic while using the location spoofer. For instance, wait for a few minutes and only change your location realistically.
Part 3: How to Spoof your Android Device’s Location for Pokemon Go?
Unlike iOS devices, it is pretty easy to spoof location in Android devices. This is because Google allows us to mock the location of our device using any reliable mobile app (unlike Apple). Therefore, if you are looking for an iSpoofer alternative for Android devices, you can follow these basic instructions.
Step 1: Enable the Mock Location feature
At first, you need to turn on the Developer Options to enable the Mock Location feature. For this, go to your phone’s Settings > About Phone and tap the “Build Number” seven times to turn on Developer Options.
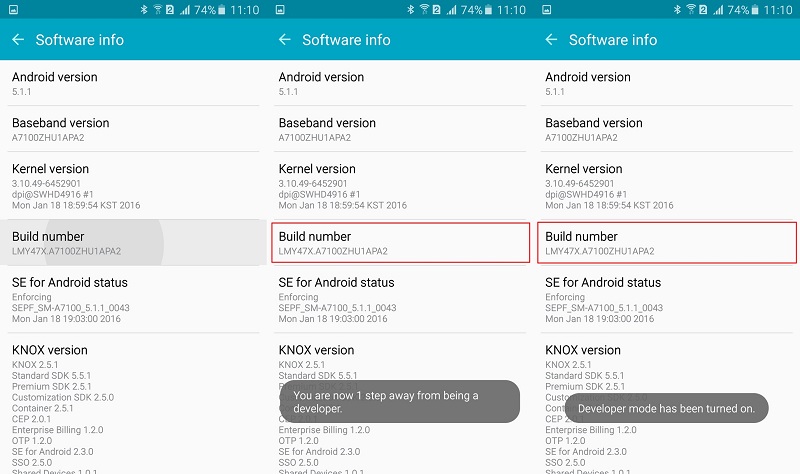
Great! Now you can go to your phone’s Settings > Developer Options and turn on the Mock Location option.

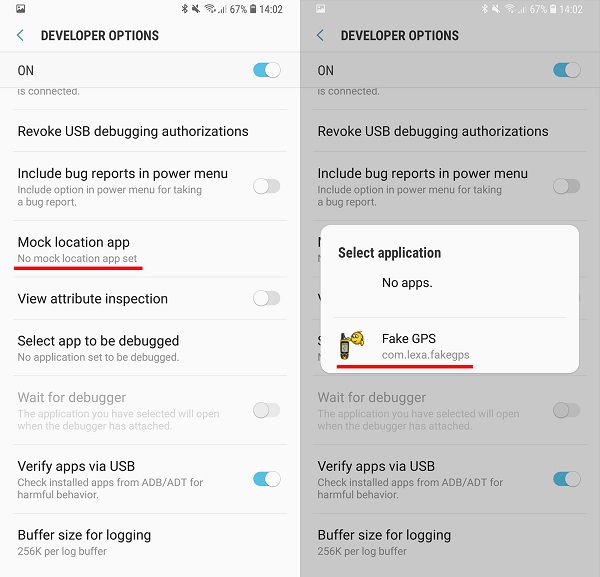
Step 2: Install a Mock Location App
Afterward, you can go to the Play Store and install any reliable mock location app from developers like Hola or Lexa. Let’s suppose we have installed the Mock GPS app by Lexa on the Apple iPhone 14 Plus device.

Once the app has been downloaded, you can again go to your phone’s Settings > Developer Options and set the app as a default tool to spoof your location.
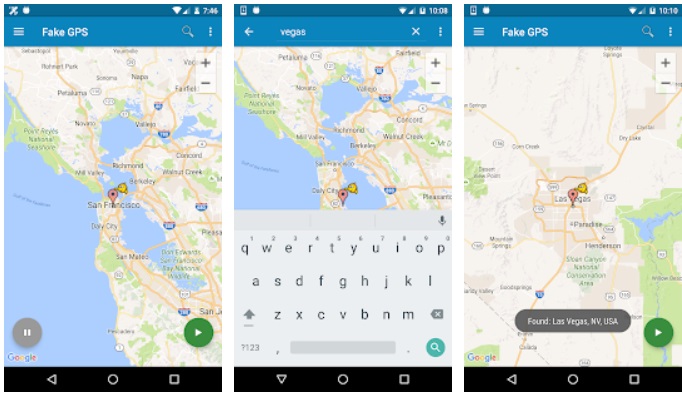
Step 3: Change your device’s location
That’s it! Now you can launch the mock location app and enter the address or coordinates of any target location. You can further adjust the pin and drop it anywhere you like to spoof the Apple iPhone 14 Plus device’s location.
There you go! After reading this post, I’m sure that you would be able to know about the iSpoofer use for Pokemon Go. Since iSpoofer has been shut down, you can no longer use it to change your Apple iPhone 14 Plus location. Therefore, you can consider Dr.Fone - Virtual Location (iOS & Android) as an ideal iSpoofer alternative for your device. In just a few clicks, you can change the location of your Apple iPhone 14 Plus anywhere you like and that too without jailbreaking your phone.
Where Is the Best Place to Catch Dratini On Apple iPhone 14 Plus
Dratini is a rare Pokemon that can be found in the wild. It is a Dragon-type Pokemon that evolves into Dragonair and then into Dragonite. Dratini is a popular Pokemon among players due to its rarity and powerful evolution. If you are looking to catch Dratini on your Apple iPhone 14 Plus, you may be wondering where the best place to find them is.
Dratini is one of the Pokémon creatures that resemble a snake. It has an elongated blue body with a blue white underside. It carries three-pronged fins on each side of its head which are white in color. Dratini also has a white bump on the forehead.
Dratini has an energy level that is constantly increasing, which makes it grow and can reach a length of more than 6 feet. It sheds its skin every time it has to grow, and usually hide behind a waterfall when shedding. The colony of Dratini lives underwater, living at the bottom feeding on food that falls from the upper levels. Outrage is the signature move for this Pokémon creature.
Part 1: What’s the evolution of Dratini?
Dratini undergoes two different evolutions
The first un-evolved version is the serpentine Dratini that looks like a snake and continues shedding its skin as it grows. When you get to level 30, Dratini evolves into Dragonair, and at level 55 it becomes Dragonite
Dragonair
This is an evolution of Dratini, which has a long scaly serpent-like body. It still retails the blue body with a white underside. The white bump on the forehead now becomes a white horn. The budding wings on the side of the head have now grown into full wings. It also carries three crystal orbs, with one on the neck and the other two on the tail.
Dragonair has the ability to stretch its wings so it can fly. It has a huge amount of energy in the body and can discharge the energy through the crystals. The energy that it releases has the ability to change the weather wherever it is. Dragonair can be found in seas and lakes.
Dragonite
This is a Pokémon character that truly resembles a dragon and is the second evolution of Dratini. It has a yellow thick body, and a couple of antennae that come out of its forehead. It has a striated underbelly. The body is quite large when compared to the small wings.
Dragonite can fly at very high speeds despite its bulky appearance. It is a kindhearted Pokémon, which is as intelligent as a human being. It has been found to have tendencies to save humans from disasters, such as saving those who have come from a capsized ship on the high seas. It lives near the sea and is extremely rare in the Pokémon world.
Part 2: Where can I find the Dratini nest?
Dratini is a Pokémon that lives in the water. Since it loves lakes and seas, you can find it when you visit areas that are near water. For example, in the United States, the most famous nests for Dratini are found in North Eastern San Francisco, Pier 39 and Pier 15. You will always find Dratini at these sites and they are famous for people who want to farm Dratini.
You may also g West to Squirtle Nest where you can get a lot of Dratini.
Dratini has a 5% spawning chance every day, so if you have the time, you can spend it on these sites as you enjoy the watery view and wait for it to appear.
Dratini nests can also be found in other parts of the world, such as Tokyo, Japan; Sydney and New South Wales, Australia; Paris, France and others.
Part 3: Are the Dratini nest and spawn spot in the same place?
This is quite a common question for those who are new to the Pokémon universe. Basically, Dratini nests and spawn points are the same for a period of two weeks. The nests then migrate leaving the spawn points to spawn different types of Pokémon.
If the Dratini nest migrates, it can still come back in the future. You should always keep an eye at the spawn point where you first encountered your first Dratini Nest; it may come back once more and you can continue farming Dratini.
Dratini nests will migrate on alternate Thursdays at midnight. The nest migrations are random, so make sure that you visit and hit them many times over the two weeks in order to get the most Dratini that you can.
Part 4: How to increase the possibility of earning Pokémon Go Dratini?
As mentioned earlier, Dratini can be found in certain places around the world. If you live outside these regions, you cannot be able to get Dratini. The best way to go about getting Dratini in such cases is to virtually relocate your device. This means that you can take your device to Tokyo nest sites even if you live in Africa.
The best app to use for teleportation is Dr.Fone - Virtual Location (iOS)
Features of Dr.Fone - Virtual Location (iOS)
- Instantly teleport to an area where a Dratini nest has been found and remotely collect as many as you can.
- Use the joystick feature to move around the map until you come across Dratini.
- The app allows you to seem to be walking, riding a bike, or in a vehicle, on the map. This simulates real-time travel data, which is important when playing Pokémon Go.
- Any app that relies on geo-location data can safely use Dr.Fone - Virtual Location for teleportation.
A step-by-step guide to spoof your location using Dr.Fone Virtual Location (iOS)
On the official Dr.Fone page, download and install Dr.Fone on your computer or you can click the Download button below to download it directly. Launch it and then go to the Home screen and click on “Virtual Location”.

After entering the virtual location module, connect your iOS device to your computer using an original USB cable.
Next, click on “Get Started”; you will now be able to start the spoofing process.
Looking at the map, you can now see the actual location of your device. If the coordinates are not the correct ones, go to the bottom of your computer screen and click on the “Current Virtual location” icon. This will instantly point to the current virtual location of your device.
Now go to the top side of your computer screen and click on the third icon on the bar. This instantly puts you in “teleport” mode. Now enter the coordinates of the Dratini nest that you have located. Hit the “Go” button and your device will instantly be teleported to the coordinates you entered.
The image below shows an example of coordinates entered for Rome, Italy.
Once you have successfully teleported your device, you will be able to navigate to the area where the Dratini nest has been found. You can use the joystick feature for this. You should also click on “Move here” so your location is permanently moved to that place.
You may now camp and keep hitting the Dratini nest so you can farm as many as possible within the two weeks before the nest migrates to another location.
Camping and looking for other Pokémon in the area will help you cool down and therefore avoid being banned from the game for spoofing your iOS device.
This is how your location will be viewed on the map.

This is how your location will be viewed on another iPhone device.
In conclusion
Dratini is one of the most friendly but rare Pokémon to get. It can evolve from a small serpentine worm, into a might, good-hearted dragon. This is one of the Pokémon that people love to farm for trading and taking part in raids and such events.
When you need to, you can teleport your device to an area where Dratini is popular using Dr.Fone - Virtual Location (iOS). Use the Dratini nest maps to find Dratini, and then visit the area or teleport there.
Most Asked Questions about Pokemon Go Battle League Rewards On Apple iPhone 14 Plus
Ever since Pokemon Go Battle League matches have been introduced, players have shifted their focus on ranking up. After all, once the season ends, you can collect amazing Pokemon Go Battle league rewards. You might already know that the 5th season of Battle League is currently running with tons of Pokemon Go PvP rewards up for grabs. Let’s get to know more about these Pokemon Go League rewards and how we can level up in the game easily.

What are the Pokemon Go Battle League Rewards?
Pokemon Go Battle League runs different seasons and once a season would end, players are awarded PvP rewards in Pokemon Go. Your Battle League Pokemon Go rewards would depend on your final rank (higher the ranks, better the rewards).
- Rank 1 to 3: Stardust will be given for free based on your rank
- Rank 4 to 10: Stardust, Charged/Fast TMs, and premium battle pass/raid pass would be awarded
- Rank 7: While Rank 4-6 will get Elite Charged TMs, if you finish at Rank 7+, you will get Elite Fast TMs instead.
- Rank 10: If you finish at the highest rank, you will get a free avatar post and avatar items (Libre or Stone inspired)
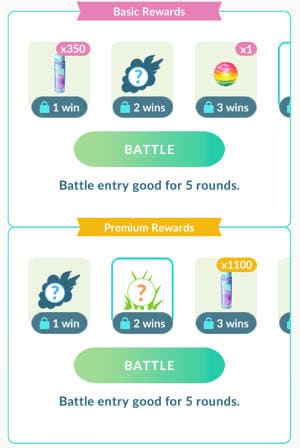
Apart from these Pokemon Go League awards, you will also get a free encounter with different Pokemons. For instance, if you finish at Rank 10, then you can even get a chance to catch a Pikachu Libre.
| Rank | Pokemon Encounter (Guaranteed) | Pokemon Encounter (Optional) |
|---|---|---|
| 1 | Pidgeot | Machop, Mudkip, Treecko, or Torchic |
| 2 | Pidgeot | Previous Pokemons |
| 3 | Pidgeot | Previous Pokemons |
| 4 | Galarian Zigzagoon | Dratini |
| 5 | Galarian Zigzagoon | Previous Pokemons |
| 6 | Galarian Zigzagoon | Previous Pokemons |
| 7 | Galarian Farfetch’d | Scyther |
| 8 | Rufflet | Previous Pokemons |
| 9 | Scraggy | Previous Pokemons |
| 10 | Pikachu Libre | Previous Pokemons |

How to Get Battle League Pokemon Go Rewards?
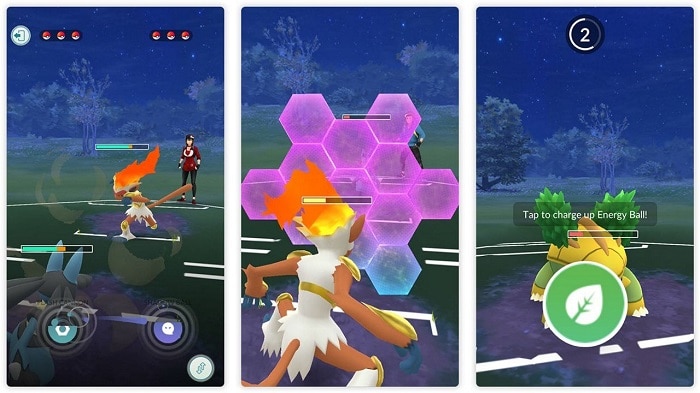
To get more Pokemon Go league rewards, you need to rank-up by playing with other trainers and winning more matches. The battles take place under three primary leagues:
- Great League: Max 1500 CP for Pokemons
- Ultra League: Max 2500 CP for Pokemons
- Master League: No CP limit for Pokemons
Apart from that, three different cups would be organized in the season 5 Pokemon Go Battle League.
- Little Cup (9th to 16th November): Pokemons with only the first stage of evolution cycle and maximum CP of 500.
- Kanto Cup (16th to 23rd November): Pokemons from the Kanto index with a maximum CP of 1500.
- Catch Cup (23rd to 30th November): Pokemons that are caught from the starting of season 5 (excluding mythical Pokemons) of maximum 1500 CP.

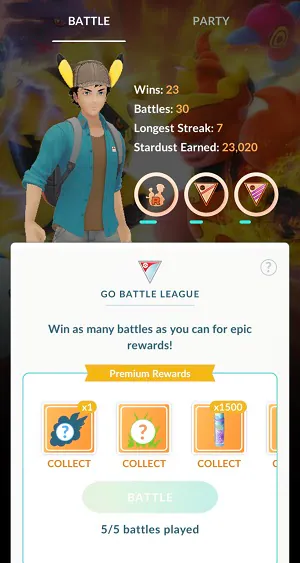
When you start playing in Pokemon Go Battle League, Rank 1 would be unlocked. As you would keep winning more matches, your rank will improve. Though, to reach Rank 10, you also need an additional Go League Battle rating of 3000+.
![]()
Once the Battle League season is finished, you can just go to your profile to see the eligible Pokemon Go PvP rewards. Now, you can just tap on the “Collect” button to claim your rewards.
Tips to Level-up in Pokemon Battle Leagues
As stated, if you want to get more battle league Pokemon rewards, then you must level-up higher. Here are some of the tips that you can follow to level-up in the game easily.
Tip 1: Have a Balanced Team
Most of the rookie PvP trainers make the common mistake of only picking attack-based Pokemons with fewer defense stats. Try not to make this mistake and have a balanced team in which you have both attacking and defensive Pokemons. Also, try to get Pokemons of different types to counter your opponent’s picks.
Tip 2: Know the Current Meta Tier
Just like any other PvP game, Pokemon Go Battle Leagues also has a tier-list. That is, some Pokemons are just more powerful than others. Therefore, before you pick your Pokemons, get to know about the current meta-list. This will help you pick more powerful Pokemons that can easily carry a game.

Tip 3: Catch More Pokemons Easily
Since it is not feasible to step out and look for Pokemons, you can use a location spoofer tool instead. If you are an iPhone user, then you can try Dr.Fone – Virtual Location (iOS) . It is a 100% reliable solution that can spoof your Apple iPhone 14 Plus location anywhere you want without jailbreaking your device.
- Users can look for a target location (Pokemon’s spawning location) by entering its coordinates, name, or address.
- The application has a map interface that would let you drop the pin anywhere you want in the world.
- Besides that, you can also simulate your movement between multiple stops at a preferred speed.
- A GPS joystick would also be enabled by the tool so that you can simulate your movement realistically.
- Using Dr.Fone – Virtual Location (iOS) is extremely simple and it doesn’t need jailbreak access as well.
Now when you know about the updated Pokemon Go Battle League rewards, you must be inspired to rank-up in the game. To do that, you can follow the above-listed tips and collect more powerful Pokemons. For this, a location spoofer tool like Dr.Fone – Virtual Location (iOS) would certainly come in handy as it will help you catch your favorite Pokemons remotely.
Also read:
- [Updated] 2024 Approved Altering Who Can Access Your YouTube Videos
- [Updated] How to Verify Your YouTube Account, In 2024
- [Updated] In 2024, Snicker Snapshots JokeFrame
- 2024 Approved Proven Methods to Infuse Engaging Dialogue in Videos
- 9 Mind-Blowing Tricks to Hatch Eggs in Pokemon Go Without Walking On Apple iPhone 6s Plus | Dr.fone
- Easy and Secure Methods for Full iPhone System Reset While Preserving All Personal Information
- In 2024, 9 Mind-Blowing Tricks to Hatch Eggs in Pokemon Go Without Walking On Apple iPhone SE | Dr.fone
- In 2024, How to get the dragon scale and evolution-enabled pokemon On Apple iPhone 12? | Dr.fone
- In 2024, Latest way to get Shiny Meltan Box in Pokémon Go Mystery Box On Apple iPhone 13 Pro | Dr.fone
- In 2024, Prevent Cross-Site Tracking on Motorola Edge 2023 and Browser | Dr.fone
- In 2024, Which Pokémon can Evolve with a Moon Stone For Apple iPhone 7? | Dr.fone
- In 2024, Why does the pokemon go battle league not available On Apple iPhone XS Max | Dr.fone
- In-Depth Look at Google's WiFi Networking Device - Ideal for Home and Office Use
- Resolving the Unfixable 'WHEA Uncorrectable Error': A Step-by-Step Guide
- Title: The Best iSpoofer Alternative to Try On Apple iPhone 14 Plus | Dr.fone
- Author: Iris
- Created at : 2024-09-30 18:08:27
- Updated at : 2024-10-06 22:22:13
- Link: https://ios-pokemon-go.techidaily.com/the-best-ispoofer-alternative-to-try-on-apple-iphone-14-plus-drfone-by-drfone-virtual-ios/
- License: This work is licensed under CC BY-NC-SA 4.0.