
Ultimate guide to get the meltan box pokemon go For Apple iPhone 15 Pro | Dr.fone
Ultimate guide to get the meltan box pokemon go For Apple iPhone 15 Pro
If you are a huge Pokemon fan and loves to play pokemon go, you will definitely be aware of the latest addition to this family- meltan. It’s the only 8th generation pokemon. The first appearance of this pokemon was via Pokemon Go, as a mysterious silhouette. There are a huge hue and cry among the pokemon lovers about this mystery box pokemon. With its unannounced entry, it has sent the internet raving mad. It’s not an easy task to catch this pokemon, though. Let us take you through an ultimate guide regarding how you can get the meltan box pokemon go in 2020. Stay tuned and keep reading!

Part 1: What is the meltan box and how does it work?
Meltan, the mythical Pokemon is also described as a Hex Nut Pokemon. A major part of its body is built from liquid metal and its shape is fluid. It generates electricity using the metal that it absorbs from the outside sources. The pokemon uses its arms and legs to corrode metal and absorb it into its own body.

The meltan box is actually a mystery box that you cannot receive through the traditional method. It requires you to make an unconventional move to get this box and catch this different pokemon. The process involved to get the meltan box pokemon go include the following:
- The first and foremost thing you need to do is deport a Pokemon from Pokemon Go to Pokemon Let’s Go. You don’t have to transfer it to your own copy of Let’s Go. A friend’s copy would come in great help here.
- For making the transfer, you will get a mystery box in Pokemon Go. This box will allow the meltan to run into the wild for about 30 minutes. It gives you the chance to latch the pokemon.
- If you cannot catch meltan in 30 minutes, you will have to wait and repeat the above process again. As the mystery box will close after 30 minutes, and meltan will vanish from the wild.
Part 2: How to connect pokemon go to pokemon switch
The trainers with Pokemon let can send Pokemon from Pokemon Go to Nintendo switch. Like transferring the pokemon to Professor Willow, the trainers will earn candy to send their Pokemon to the switch. These pokemons will appear in the Go Park complex of your Pokemon Let’s Go.
Rewarding you for sending Pokemon to the switch, you will receive the meltan box pokemon go. This mystery box will allow you to catch the mythical pokemon.
The steps to connect Pokemon Go to Switch is clearly defined in the following points:
Step 1: The first step you need to take to connect the Pokemon Go to Switch is to launch the Pokemon Let’s Go from the Home Menu.
Step 2: During the game, press the “X” button to access the in-game menu, followed by the “Y” button to open the Options Menu.
Step 3: Choose the option “Open Pokemon GO Settings”.

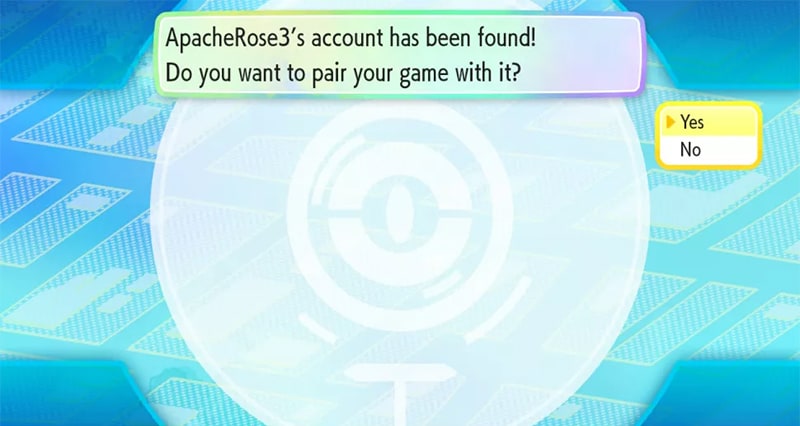
Step 4: When asked, select the option “YES”. This will allow the game to begin the search for a Pokemon Go account that you can pair with.
Step 5: The next step will require you to set up your Pokemon Go account to pair with the Nintendo Switch game.
Step 6: For pairing up, you will need to tap the Poke Ball icon on your screen and then select the “Settings” option.
Step 7: Scroll down to the option “Nintendo Switch” and select it.
Step 8: Then choose the “Connect to Nintendo Switch”.
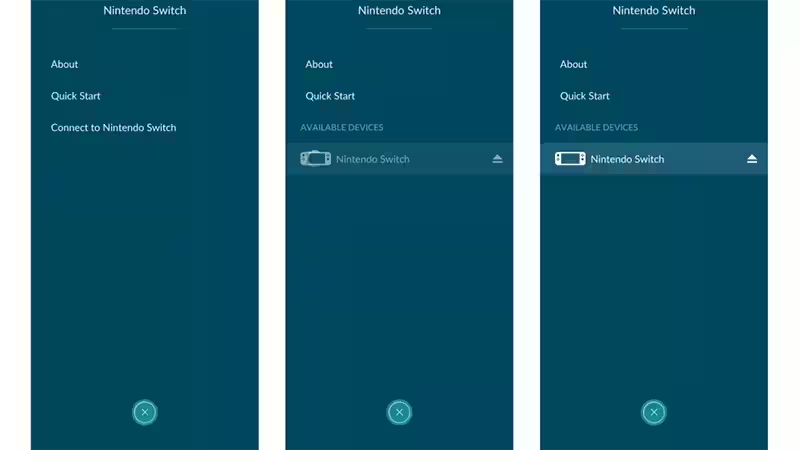
Step 9: This will allow Pokemon Go to search for a Nintendo Switch game to connect with.
Step 10: When you finally see that the Nintendo Switch console is locating the Pokemon Go account, select the “Yes” button on the console to establish the pairing.
Step 11: Once the pairing is done, you can now transfer the Pokemon from the Pokemon Go smoothly. Let’s get to know that too.
After the pairing is complete, you are now ready to send your Pokemon to the Go complex Park in Pokemon Let’s Go. This can be done by following the process:
Step 1: Open the Pokemon Let’s Go app.
Step 2: In Fuschia City, talk to the Go Park Complex Attendant and select the “Bring Pokemon” option.

Step 3: Open Pokemon Go.
Step 4: In the map view, tap on the button “Main menu”.
Step 5: Then, tap the “Pokemon” Button.
Step 6: At the top-right section of your screen, you will find the “Nintendo Switch”, tap on that.
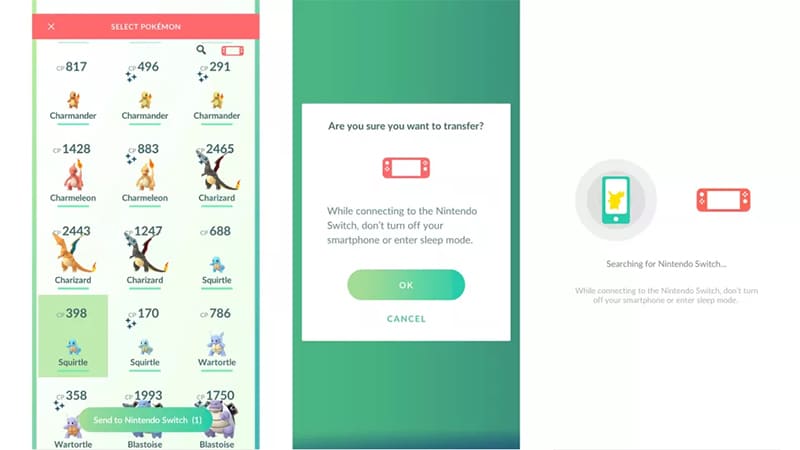
Step 7: Now select the Pokemon you want to transfer. Please note that you can only send the Pokemon you have originally discovered in the Kanto Region.
Step 8: Now, click on the “Send to Nintendo Switch”, when you have finally decided which Pokemon you want to send.
Following the aforementioned steps will allow you to get the pokemon go mystery box.
Part 3: Tips to get more meltan boxes
There is a lot of confusion among the Pokemon trainers regarding how to get meltan in pokemon go. Here, we share a few tips for doing the same and reducing your confusion to zero.
Tip No.1: Transfer Pokemon to Win a Mystery Box
With the help of pairing and connecting your Pokemon Go to the Nintendo Switch, you can actually get the opportunity to transfer the Pokemon and win a mystery box for yourself.
Tip No.2: Transfer Pokemon to Friend’s Switch
If you cannot establish a pair with your Nintendo Switch, you can always look for your friends. In case you don’t have a Nintendo Switch with a copy of Let’s Go Pikachu, do not worry. You can still obtain a shiny meltan pokemon go mystery box. You can send Pokemon to your friend’s Nintendo switch and bang… you get the chance to catch the mythical pokemon.
Tip No.3: Use Dr. Fone Virtual Location Service
You can catch not just one but several Meltans through the mystery box. All you need to do is move around in your area and discover the meltan available near you. But not every time, you can get this lucky to obtain the opportunity to maximize your mystery box. If this is what you are thinking, then we are happy to say that you are wrong!
With the help of Dr.Fone- Virtual Location service that is developed and designed for iOS devices, you can change your GPS location with just one click.
It is well-known that Pokemon Go is a location-based game that offers several services only according to your location. You might find it difficult to maximize your pokemon go meltan box without moving or looking for services out of your region. Dr.Fone Virtual Location is here to help. With this service provider’s help, you can change your location and enjoy the unlimited fun that you had always desired. It will also be a great rescue for you if you cannot catch a meltan in your region. Try it and get the Hex Nut Pokemon.
Conclusion
Resolving your query about getting meltan box and offering you a detailed guide and assistance, we aim to help you continue your fun-experience with the game. Play, look for and find all the meltan! You can then evolve your meltan into a formidable Melmetal. You will need around 400 meltan candy to evolve into Melmetal, so be sure to catch as many as possible and enjoy!
Where Is the Best Place to Catch Dratini On Apple iPhone 15 Pro
Dratini is a rare Pokemon that can be found in the wild. It is a Dragon-type Pokemon that evolves into Dragonair and then into Dragonite. Dratini is a popular Pokemon among players due to its rarity and powerful evolution. If you are looking to catch Dratini on your Apple iPhone 15 Pro, you may be wondering where the best place to find them is.
Dratini is one of the Pokémon creatures that resemble a snake. It has an elongated blue body with a blue white underside. It carries three-pronged fins on each side of its head which are white in color. Dratini also has a white bump on the forehead.
Dratini has an energy level that is constantly increasing, which makes it grow and can reach a length of more than 6 feet. It sheds its skin every time it has to grow, and usually hide behind a waterfall when shedding. The colony of Dratini lives underwater, living at the bottom feeding on food that falls from the upper levels. Outrage is the signature move for this Pokémon creature.
Part 1: What’s the evolution of Dratini?
Dratini undergoes two different evolutions
The first un-evolved version is the serpentine Dratini that looks like a snake and continues shedding its skin as it grows. When you get to level 30, Dratini evolves into Dragonair, and at level 55 it becomes Dragonite
Dragonair
This is an evolution of Dratini, which has a long scaly serpent-like body. It still retails the blue body with a white underside. The white bump on the forehead now becomes a white horn. The budding wings on the side of the head have now grown into full wings. It also carries three crystal orbs, with one on the neck and the other two on the tail.
Dragonair has the ability to stretch its wings so it can fly. It has a huge amount of energy in the body and can discharge the energy through the crystals. The energy that it releases has the ability to change the weather wherever it is. Dragonair can be found in seas and lakes.
Dragonite
This is a Pokémon character that truly resembles a dragon and is the second evolution of Dratini. It has a yellow thick body, and a couple of antennae that come out of its forehead. It has a striated underbelly. The body is quite large when compared to the small wings.
Dragonite can fly at very high speeds despite its bulky appearance. It is a kindhearted Pokémon, which is as intelligent as a human being. It has been found to have tendencies to save humans from disasters, such as saving those who have come from a capsized ship on the high seas. It lives near the sea and is extremely rare in the Pokémon world.
Part 2: Where can I find the Dratini nest?
Dratini is a Pokémon that lives in the water. Since it loves lakes and seas, you can find it when you visit areas that are near water. For example, in the United States, the most famous nests for Dratini are found in North Eastern San Francisco, Pier 39 and Pier 15. You will always find Dratini at these sites and they are famous for people who want to farm Dratini.
You may also g West to Squirtle Nest where you can get a lot of Dratini.
Dratini has a 5% spawning chance every day, so if you have the time, you can spend it on these sites as you enjoy the watery view and wait for it to appear.
Dratini nests can also be found in other parts of the world, such as Tokyo, Japan; Sydney and New South Wales, Australia; Paris, France and others.
Part 3: Are the Dratini nest and spawn spot in the same place?
This is quite a common question for those who are new to the Pokémon universe. Basically, Dratini nests and spawn points are the same for a period of two weeks. The nests then migrate leaving the spawn points to spawn different types of Pokémon.
If the Dratini nest migrates, it can still come back in the future. You should always keep an eye at the spawn point where you first encountered your first Dratini Nest; it may come back once more and you can continue farming Dratini.
Dratini nests will migrate on alternate Thursdays at midnight. The nest migrations are random, so make sure that you visit and hit them many times over the two weeks in order to get the most Dratini that you can.
Part 4: How to increase the possibility of earning Pokémon Go Dratini?
As mentioned earlier, Dratini can be found in certain places around the world. If you live outside these regions, you cannot be able to get Dratini. The best way to go about getting Dratini in such cases is to virtually relocate your device. This means that you can take your device to Tokyo nest sites even if you live in Africa.
The best app to use for teleportation is Dr.Fone - Virtual Location (iOS)
Features of Dr.Fone - Virtual Location (iOS)
- Instantly teleport to an area where a Dratini nest has been found and remotely collect as many as you can.
- Use the joystick feature to move around the map until you come across Dratini.
- The app allows you to seem to be walking, riding a bike, or in a vehicle, on the map. This simulates real-time travel data, which is important when playing Pokémon Go.
- Any app that relies on geo-location data can safely use Dr.Fone - Virtual Location for teleportation.
A step-by-step guide to spoof your location using Dr.Fone Virtual Location (iOS)
On the official Dr.Fone page, download and install Dr.Fone on your computer or you can click the Download button below to download it directly. Launch it and then go to the Home screen and click on “Virtual Location”.

After entering the virtual location module, connect your iOS device to your computer using an original USB cable.
Next, click on “Get Started”; you will now be able to start the spoofing process.

Looking at the map, you can now see the actual location of your device. If the coordinates are not the correct ones, go to the bottom of your computer screen and click on the “Current Virtual location” icon. This will instantly point to the current virtual location of your device.

Now go to the top side of your computer screen and click on the third icon on the bar. This instantly puts you in “teleport” mode. Now enter the coordinates of the Dratini nest that you have located. Hit the “Go” button and your device will instantly be teleported to the coordinates you entered.
The image below shows an example of coordinates entered for Rome, Italy.

Once you have successfully teleported your device, you will be able to navigate to the area where the Dratini nest has been found. You can use the joystick feature for this. You should also click on “Move here” so your location is permanently moved to that place.
You may now camp and keep hitting the Dratini nest so you can farm as many as possible within the two weeks before the nest migrates to another location.
Camping and looking for other Pokémon in the area will help you cool down and therefore avoid being banned from the game for spoofing your iOS device.

This is how your location will be viewed on the map.

This is how your location will be viewed on another iPhone device.

In conclusion
Dratini is one of the most friendly but rare Pokémon to get. It can evolve from a small serpentine worm, into a might, good-hearted dragon. This is one of the Pokémon that people love to farm for trading and taking part in raids and such events.
When you need to, you can teleport your device to an area where Dratini is popular using Dr.Fone - Virtual Location (iOS). Use the Dratini nest maps to find Dratini, and then visit the area or teleport there.
Why can’t I install the ipogo On Apple iPhone 15 Pro
For tweaking the official Pokemon Go app right there in AppStore, iPogo is a choice to have. But sometimes iPogo can’t install, and users face a lot of difficulties. At that moment, some users feel furious and look forward to the solutions to get rid of it. If you also hit in the same category, you are on the right page. Let’s discuss it more and look forward to the solution that will help you to install it again.
Part 1: Reasons that you can’t install the ipogo
There are multiple reasons that contribute to the difficulty when you can’t install the iPogo. Some of them are as follows:
- iPhone version:
The current iPhone version you are choosing may be responsible for the problem for iPogo can’t install. It is important to have iOS version 13. It works on all the known jailbreak devices having the same iOS. In case you have upgraded the iOS 13 to iOS 14, the chances are quite less to use it.
- iPogo version:
iPogo version is also an important factor of consideration. Time to time regular updates keep coming, and if you are stuck on the previous version, you will not be able to use it. Sometimes the iPogo is down whenever there is an update, and when you try to update it, the problem arises. At that moment, you need to be patient and try re-installation.
- Direct download method:
If a user is considering direct downloading method, they might also face this trouble because Apple now targets certificate. Now you need to create your certificate with the help of a computer or a paid service like Signulous and others.
Bonus: Simple steps to install iPogo
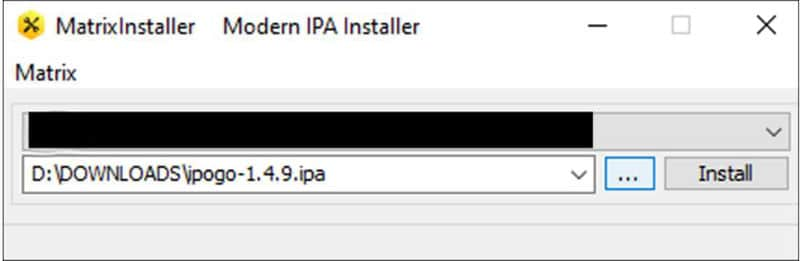
To install iPogo, we suggest you avoid the direct download method and instead follow the steps to follow with “Matrix installer.”
Steps to follow:
Step 1: Upgrade the iTunes version of your computer to latest version.
Step 2: Now remove the original app from your iDevice.
Step 3: Get IPA from the website download and save it.
Step 4: Launch the “Matrix Installer”.
Step 5: With the help of USB cable connect your Apple iPhone 15 Pro to the PC.
Step 6: Let the installer to detect the iDevice.
Step 7: Now click on “Device” then “Install Package” option.
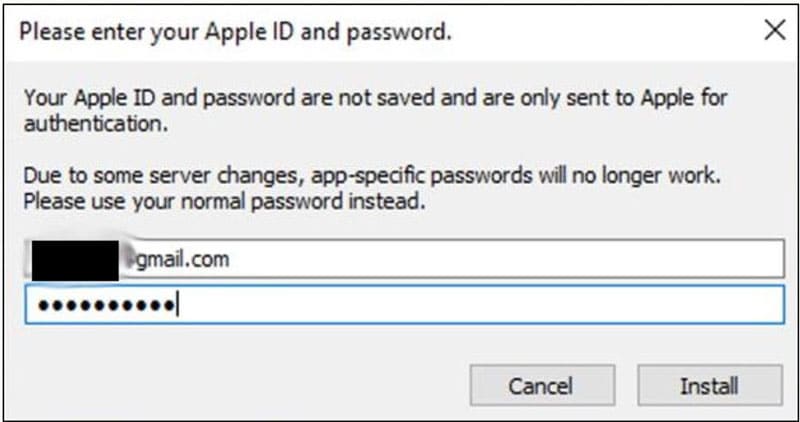
Step 8: Now the installer asks for the Apple ID username, and Password mentions the same. Make sure these are the ones used to fetch the developer certificate from the Apple Server. (We suggest you create a new Apple ID)
Step 9: Be patient for a while and let the impact or to perform all the work.
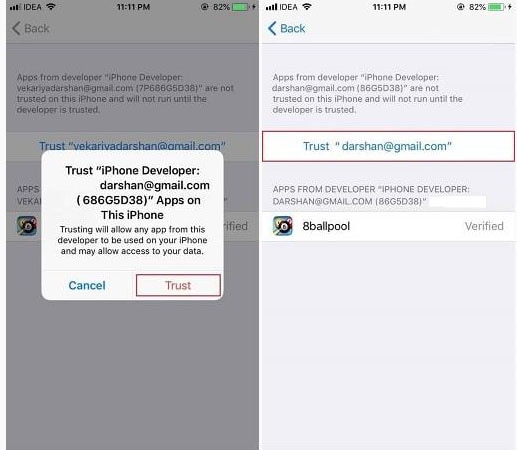
Step 10: “Complete” message will appear and unlock your Apple iPhone 15 Pro Screen and move to “settings->General-> device management.”
Step 11: Now hit on the developer Apple ID and trust it.
Part 2: Risk of installing ipogo and running
You can come across a certain risks also when you are installing and running iPogo. These are as follows:
Jailbreaking is required:
For using iPogo, jailbreaking is required, and it refers to the privilege to Apple devices through which they can remove all the software restrictions. If there is any loss to the data, a user will be responsible for it.
Chances to get banned:
iPogo is an application that can be used after jailbreaking only. After doing the jailbreaking, the chances are there that your device might get banned. You are at a high risk where certain problems may arise.
Can lose access to content:
There might be a chance you have will lose access to content as well. Therefore we suggest you avoid. If you still want to jailbreak your device and want to install iPogo, it is entirely your choice.
Part 3: is there a software like iPogo without jailbreak?
If you are wondering about the same question, then the answer is “Yes”. Dr.Fone Virtual Location is an iOS location changer helping you to enjoy the same features without any hassle. This application will help you to simulate GPS movement along real road or paths you draw. A user can also integrate joystick to make the movement of GPS effortless. It helps you to teleport iPhone GPS to anywhere in the world. The best part is it supports up to five device location management at a time.
Let us understand how this tool can help you spoofing your location.
We are mentioning the steps which will help you to teleport to anywhere in the world. The steps for it are as follows:
Step 1: Get the tool on PC
Start with downloading Dr.Fone Virtual Location on your PC using the official website. And then install it. Once done, launch the program. Now hit on “Virtual Location” from all the options and connect your Apple iPhone 15 Pro to the computer.
Step 2: Get the Apple iPhone 15 Pro device Connected
You now need to get your iPgone plugged with PC via a USB cord. Once you do this, simply click on “Get Started.”
Step 3: Check Location Accuracy
A new window will appear indicating the actual location on the map. If the location does not appear to be accurate hit on “Centre on” icon at the lower right part to get an accurate location.
Step 4: Turn on Teleport Mode
By clicking on the Corresponding icon in the upper right activates “Teleport Mode”. Now mention the place you want to teleport in the upper left field. Click “Go” (consider a Rome in Italy as an example)
Step 5: Start Spoof
After selecting it, the system will understand the desired place in Rome and hit on “Move here” in the popup box.
Finally, the location has been changed to Rome now. Whatever you do whether you click on “centre on” icon or try to relocate yourself on iPhone ROM is the fixed location that will appear, and in all the location app as well Rome is the fixed place.
Conclusion
Here, we have agreed to do to the conclusion that if iPogo won’t install there is nothing for you to worry about because certain other solutions are there that help you to switch the locations without any hassle.
Also read:
- [New] In 2024, Navigating OBS Setup for Zoom Streaming Excellence
- [Updated] 2024 Approved Blurred Lines The Art of Anonymizing YouTube Content
- [Updated] Escalate Your Channel with a Swift Move Towards YouTube Partner Status for 2024
- [Updated] In 2024, Unveiling Angles Strategic Composition Tips for iPhone Photography
- [Updated] YouTube & Brands United Strategic Collaborative Titles for 2024
- 2024 Approved Larger-than-Life Instagram Videos Tips to Break the Barrier
- Easy Guide to Samsung Galaxy XCover 6 Pro Tactical Edition FRP Bypass With Best Methods
- In 2024, 4 solution to get rid of pokemon fail to detect location On Apple iPhone 13 mini | Dr.fone
- In 2024, Here are Some Pro Tips for Pokemon Go PvP Battles On Apple iPhone 8 Plus | Dr.fone
- In 2024, How To Remove Flashlight From Apple iPhone 6s Plus Lock Screen | Dr.fone
- In 2024, Pokémon Go Cooldown Chart On Apple iPhone 15 Plus | Dr.fone
- In 2024, Ultimate guide to get the meltan box pokemon go For Apple iPhone 6 | Dr.fone
- In 2024, What Legendaries Are In Pokemon Platinum On Apple iPhone 14 Pro? | Dr.fone
- Pokemon Go No GPS Signal? Heres Every Possible Solution On Apple iPhone X | Dr.fone
- The Best iSpoofer Alternative to Try On Apple iPhone 7 Plus | Dr.fone
- Up-to-Date Driver Support for Your HP DeskJet 3700 Printer
- What Legendaries Are In Pokemon Platinum On Apple iPhone X? | Dr.fone
- Title: Ultimate guide to get the meltan box pokemon go For Apple iPhone 15 Pro | Dr.fone
- Author: Iris
- Created at : 2025-01-27 19:22:54
- Updated at : 2025-01-29 17:02:04
- Link: https://ios-pokemon-go.techidaily.com/ultimate-guide-to-get-the-meltan-box-pokemon-go-for-apple-iphone-15-pro-drfone-by-drfone-virtual-ios/
- License: This work is licensed under CC BY-NC-SA 4.0.