
Why cant I install the ipogo On Apple iPhone 11 | Dr.fone
Why can’t I install the ipogo On Apple iPhone 11
For tweaking the official Pokemon Go app right there in AppStore, iPogo is a choice to have. But sometimes iPogo can’t install, and users face a lot of difficulties. At that moment, some users feel furious and look forward to the solutions to get rid of it. If you also hit in the same category, you are on the right page. Let’s discuss it more and look forward to the solution that will help you to install it again.
Part 1: Reasons that you can’t install the ipogo
There are multiple reasons that contribute to the difficulty when you can’t install the iPogo. Some of them are as follows:
- iPhone version:
The current iPhone version you are choosing may be responsible for the problem for iPogo can’t install. It is important to have iOS version 13. It works on all the known jailbreak devices having the same iOS. In case you have upgraded the iOS 13 to iOS 14, the chances are quite less to use it.
- iPogo version:
iPogo version is also an important factor of consideration. Time to time regular updates keep coming, and if you are stuck on the previous version, you will not be able to use it. Sometimes the iPogo is down whenever there is an update, and when you try to update it, the problem arises. At that moment, you need to be patient and try re-installation.
- Direct download method:
If a user is considering direct downloading method, they might also face this trouble because Apple now targets certificate. Now you need to create your certificate with the help of a computer or a paid service like Signulous and others.
Bonus: Simple steps to install iPogo
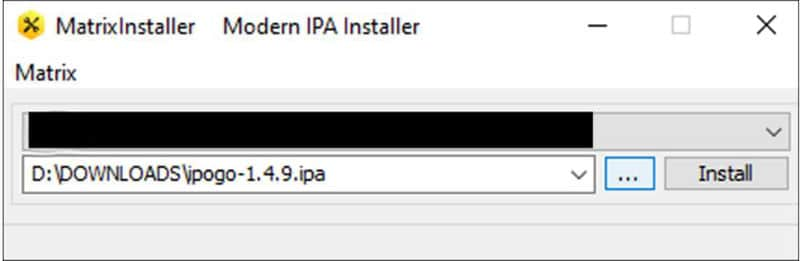
To install iPogo, we suggest you avoid the direct download method and instead follow the steps to follow with “Matrix installer.”
Steps to follow:
Step 1: Upgrade the iTunes version of your computer to latest version.
Step 2: Now remove the original app from your iDevice.
Step 3: Get IPA from the website download and save it.
Step 4: Launch the “Matrix Installer”.
Step 5: With the help of USB cable connect your Apple iPhone 11 to the PC.
Step 6: Let the installer to detect the iDevice.
Step 7: Now click on “Device” then “Install Package” option.
Step 8: Now the installer asks for the Apple ID username, and Password mentions the same. Make sure these are the ones used to fetch the developer certificate from the Apple Server. (We suggest you create a new Apple ID)
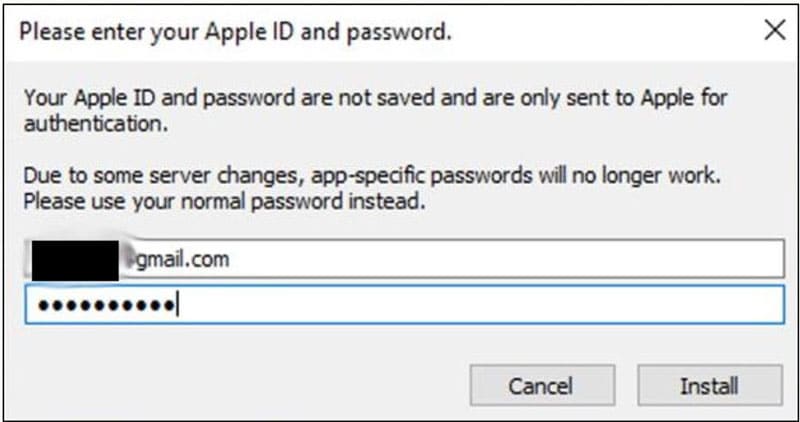
Step 9: Be patient for a while and let the impact or to perform all the work.
Step 10: “Complete” message will appear and unlock your Apple iPhone 11 Screen and move to “settings->General-> device management.”
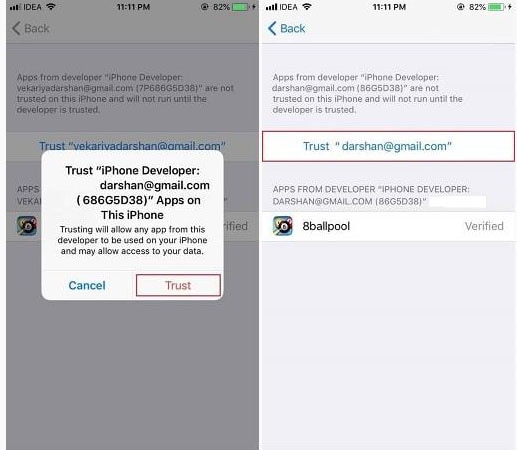
Step 11: Now hit on the developer Apple ID and trust it.
Part 2: Risk of installing ipogo and running
You can come across a certain risks also when you are installing and running iPogo. These are as follows:
Jailbreaking is required:
For using iPogo, jailbreaking is required, and it refers to the privilege to Apple devices through which they can remove all the software restrictions. If there is any loss to the data, a user will be responsible for it.
Chances to get banned:
iPogo is an application that can be used after jailbreaking only. After doing the jailbreaking, the chances are there that your device might get banned. You are at a high risk where certain problems may arise.
Can lose access to content:
There might be a chance you have will lose access to content as well. Therefore we suggest you avoid. If you still want to jailbreak your device and want to install iPogo, it is entirely your choice.
Part 3: is there a software like iPogo without jailbreak?
If you are wondering about the same question, then the answer is “Yes”. Dr.Fone Virtual Location is an iOS location changer helping you to enjoy the same features without any hassle. This application will help you to simulate GPS movement along real road or paths you draw. A user can also integrate joystick to make the movement of GPS effortless. It helps you to teleport iPhone GPS to anywhere in the world. The best part is it supports up to five device location management at a time.
Let us understand how this tool can help you spoofing your location.
We are mentioning the steps which will help you to teleport to anywhere in the world. The steps for it are as follows:
Step 1: Get the tool on PC
Start with downloading Dr.Fone Virtual Location on your PC using the official website. And then install it. Once done, launch the program. Now hit on “Virtual Location” from all the options and connect your Apple iPhone 11 to the computer.

Step 2: Get the Apple iPhone 11 device Connected
You now need to get your iPgone plugged with PC via a USB cord. Once you do this, simply click on “Get Started.”

Step 3: Check Location Accuracy
A new window will appear indicating the actual location on the map. If the location does not appear to be accurate hit on “Centre on” icon at the lower right part to get an accurate location.
Step 4: Turn on Teleport Mode
By clicking on the Corresponding icon in the upper right activates “Teleport Mode”. Now mention the place you want to teleport in the upper left field. Click “Go” (consider a Rome in Italy as an example)

Step 5: Start Spoof
After selecting it, the system will understand the desired place in Rome and hit on “Move here” in the popup box.

Finally, the location has been changed to Rome now. Whatever you do whether you click on “centre on” icon or try to relocate yourself on iPhone ROM is the fixed location that will appear, and in all the location app as well Rome is the fixed place.
Conclusion
Here, we have agreed to do to the conclusion that if iPogo won’t install there is nothing for you to worry about because certain other solutions are there that help you to switch the locations without any hassle.
How does the stardust trade cost In pokemon go On Apple iPhone 11?
Pokemon go has been around for a while now and has arisen as one of the most talked-about games in the gaming community. The fact that it is a location-based game and needs you to move around while playing the game makes it further interesting. Trading in Pokemon go is one of the most talked-about features. Today, we will help you explore more about stardust trade costs and how can you easily perform trades! Hang on as we dwell deeper into Pokemon go and trade stardust costs.
Part 1: How does Pokemon trading work?
So as we’ve discussed earlier, Pokemon go trading is one of the most interesting features of the game. So how does this trading work? In Pokemon Go, you can trade pokemon possessed by you with those possessed by your friends if both you and your friend, decide to mutually trade the pokemon with each other! For trading in Pokemon go, there are certain criteria you need to satisfy to qualify for trading in Pokemon go! Given below are the requirements to qualify for trading in Pokemon go
- Be at least level 10
- Be friends with the person you’re trading on Pokemon go
- Be in a radius of 100 m while you’re trading
However, Pokemon go also has levels of friendship and you can trade pokemon of different levels with friends with whom you have different friendship levels. Higher is the friendship level, higher is the level of Pokemon which you can trade. every trade requires you and your partner to spend stardust points. So There are basically 4 levels of friendship in Pokemon go
- Friend
- Good friend
- Ultra friend
- Best friend
The levels of your friendship with a player on Pokemon go increase with the increase in the number of days you stay friends with them. Within a month of friendship, you can become best friends with a player on Pokemon go! You also need stardust points on Pokemon go. So what is stardust trade cost? Before you trade any pokemon you must spend stardust coins. Not having enough stardust trade coins will not allow the trade of pokemon to happen. Hence, you must have enough stardust trade costs.
Part 2: How much stardust do you need in pokemon trading costs?
Trading in Pokemon go is quite complex. This is because the needed Stardust points will be different in every case and will depend on several factors. Factors such as whether you already half got that Pokemon in your pokedesk or not, the friendship level of you and your friend who are interested in trading, or whether the Pokemon is rare or common. Given below are the Stardust trade costs for each Pokemon.
Standard trades
- Good friend:100
- Great friends:80
- Ultra Friends: 8
- Best friend: 4
Shiny or legendary (caught by you)
- Good Friend: 20,000
- Great Friend: 16,000
- Ultra Friend: 1,600
- Best Friend: 800
Shiny or Legendary (not caught by you)
- Good Friend: 1,000,000
- Great Friend: 800,000
- Ultra Friend: 80,000
- Best Friend: 40,000
However, this Stardust trade cost may vary according to the friendship levels! Before trading, you must think of the friendship level between you and your friend and also if the Pokemon which has been traded can be evolved through trading. Evolving Pokemon through trading is another beneficial tactic that could benefit you as a player of Pokemon go.
Part 3: Ways to increase stardust in pokemon go?
1. Use Dr.Fone – Virtual Location (iOS/Android)
Do you want to increase your Stardust trade cost in Pokemon go? There is no better way for doing so other than using Dr.Fone - Virtual location (iOS/Android) . Using this will easily help you to catch more Pokemon, as you can fake your location using this app. You can change your location to any given location on the map and catch Pokemons from different regions without having to move around. Doesn’t it sound fun? Catching the rarest Pokemon all by sitting at home!
Teleport to anywhere in the world
Step 1: Firstly, you need to install Dr.Fone- Virtual location (iOS/Android) on your computer(Win/Mac). Then, install and launch the program on your computer. Click on “Virtual Location” from the options on the main interface.
Step 2: Now, you need to connect your Apple iPhone 11 to the PC and click on “Get Started”.
Step 3: A new window would now pop up where you can see your current location. If you are unable to see your current location, then click on “center on” icon at the bottom. Doing so will lead you to show your location on the map.

Step 4: Now click on “Teleport mode” using the button on the top right corner of the window. Enter the place you want your location to be set to and then click on “Go”. Once done the click on “Move Here”. Well, that’s it! We’re done with changing our location to the desired location!
2. Exchange the gift with friends to level up a friendship
Pokemon go also allows you to send gifts to your game friends and receive gifts from your game friends. Well, this can help both of you grow and progress in the game and can be a helpful trick to increase Stardust!
3. Play the game as much as you can
Investing more and more time on the game will lead you to catching more pokemons which will, in turn, lead to getting more stardust! Hence play it regularly with continuity!
Conclusion
Well, the article did give us a lot of idea about stardust trade cost and how to increase Stardust trade points in Pokemon go. We dwelled more into major facts about the game and learned a lot about it. We also explored what is drfone-Virtual location (iOS) and how it can help you to teleport from one place to another! Using the app will help you a lot in improving the game and wouldn’t require you to do much! All you’ve to do is teleport from one place to another, catch more and more pokemons and get more stardust! As a player, it shall improve your stats by a huge margin!
iPogo will be the new iSpoofer On Apple iPhone 11?
If you are a sincere Pokemon Go player who sticks by the rules and plays the game, then you probably don’t know how hard it is to eliminate a location spoofer from the picture. The game attains new spheres and seems more interesting with a location spoofer involved. If you are an iOS user or an Android enthusiast who is eager for iSpoofer’s return or worried about iSpoofer Pogo not working, then this might just be the right article for you.
Part 1 - Why am I unable to download iSpoofer for Pogo?
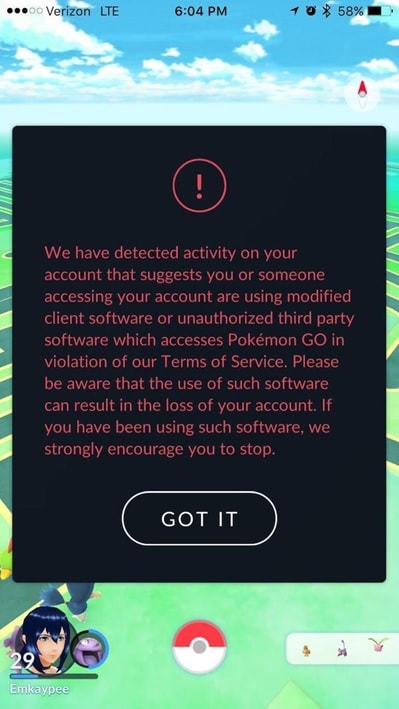
iSpoofer was discontinued two years ago, around 2019 and still remains out of action. This could possibly be because Pokemon Go makers have banned the application. The main target customers for iSpoofer were the PoGo players and having them gone, there is not much the app can offer.

The initial version remains unsupportive and shows ‘Maintenance’ pop up while you cannot download any new versions from their website. It still contains the old links on the site which are of no use to the current players. Tackling with too much will also result in account ban as Pokemon Go has strict rules that no third party applications will be entertained.
Since we haven’t heard from iSpoofer in 2020, we can assume that they won’t be here for long and it would be a wise choice to look for alternatives.
Part 2 - How to Find other alternatives for the iSpoofer
It is hard to handle change especially when you are an iPhone user. There aren’t many apps that you can find on the App Store and you never know their authenticity. Even if you find a good location spoofer, you never know how long that is going to keep your location changed or if it will remain undetected. That being said - your first obvious option for spoofing Pokemon Go would be -
Any App from the Apple App Store
If the iSpoofer for Pogo is not working, then you can make a simple search for some other GPS location changer on the App store and they would help you for a short time. If you are lucky then they might remain undetected for a very long time. However, we won’t suggest this to be the most stable option so we can move ahead to the next best thing for the iOS users.
In-built spoofing with VPNs
Virtual Private Networks are known for masking your IP on the world wide web but what most of you don’t know is that they can also spoof your location. But this is only restricted to a few VPN applications that have the feature. SurfShark and ExpressVPn are two of the most affordable and efficient VPNs that you can consider for your iOS devices.
The spoofer will help you play Pokemon Go for sure though I cannot give you assurance about other games in the market. However, the detection rate is a problem because Pokemon Go is capable of detecting these VPNs and blocking your account if you don’t play your cards well. That is, you need to be careful about where you are ‘changing’ your location to (not too far).

If you are looking for something long lasting and something that won’t pose a detection problem, then I would suggest you to go for WOnder share’s Dr.Fone. It is affordable, has some remarkable features and works great for both Android and iOS devices.
Unlike iSpoofer, this will not require jailbreak access, detects every location on the globe and poses no threat to your Pokemon Go account. Here are the simple steps that you need to follow to work with Dr.Fone for spoofing location
Dr.Fone - Virtual Location
1-Click Location Changer for both iOS and Android
- Teleport from one location to another across the world from the comfort of your home.
- With just a few selections on your computer, you can make members of your circle believe you’re anywhere you want.
- Stimulate and imitate movement and set the speed and stops you take along the way.
- Compatible with both iOS and Android systems.
- Work with location-based apps, like Pokemon Go , Snapchat , Instagram , Facebook , etc.
3981454 people have downloaded it
Step 1- Take the Apple iPhone 11 device you are playing Pokemon Go on and connect it to a computer system. Then open the Dr.Fone and application and the terms and conditions will be displayed. Read them carefully, agree and then click on the ‘Get Started’ option.
Step 2 - You will be led to a page hat will display the entire map of the world and also your location on the globe. You can easily zoom in and out to understand coordinates and location better. On the upper right corner of the page, you’ll find ‘Teleport Mode’ that you should opt for.
Step 3 - Then you can change your location from your current place to anywhere you want to go. This can be quite close or even as far as some other country. However, for Pokemon Go purposes, keep it close. Then click on ‘Move Here’.
Step 4 - Your location change will happen automatically and within a few minutes, the new location will be registered on every site that you go to. So, you are covered!

Part 3 - Tips to avoid being Banned
- You need to give enough time for the cool down. This means, as soon as you change your location, wait for a few minutes before you can play the game again so that the ‘vigilante’ does not catch this abrupt change.
- Try not to use apps that are too amateur, having fake reviews on Google/App stores because these will be too vulnerable and detectable.
- If you are not sure where to spoof, then there are certain safe co-ordinates that lon term gamers of Pokemon Go suggest so you can opt for them. They are just for starters until you find your way through
- Try not to make abrupt location changes - keep it nearby initially and slowly try to increase your radius. An abrupt change can draw attention.
That being said, there aren’t any well-researched and ground rules as to how your spoofing should be so that you remain undetected. All we can do is pick up tips from someone else’s expertise. Apps like Dr.Fone will help you change your virtual location without getting your account banned as they are designed to do this very job with perfection.
Also read:
- [New] 2024 Approved Cutting-Edge Techniques A Guide to Next-Level Effectiveness in Your YouTube Ads
- Easy steps to recover deleted photos from Asus ROG Phone 7 Ultimate.
- Hearing From You Simple Windows 10 Recorder Guide for 2024
- How to Unlock Nokia C12 Plus Phone Forgot Password
- In 2024, Heres Everything You Should Know About Pokemon Stops in Detail On Apple iPhone 13 mini | Dr.fone
- In 2024, How can I get more stardust in pokemon go On Apple iPhone 14 Plus? | Dr.fone
- In 2024, How to get the dragon scale and evolution-enabled pokemon On Apple iPhone XS? | Dr.fone
- In 2024, How to Use Pokémon Emerald Master Ball Cheat On Apple iPhone X | Dr.fone
- Most Asked Questions about Pokemon Go Battle League Rewards On Apple iPhone X | Dr.fone
- Secure Sharpening Hiding Unwanted Details
- Tips for Efficiently Implementing Windows 11'S Auto HDR Mode
- Top Picks for Free, High-Quality Screen Recorders in Chrome OS for 2024
- Troubleshooting 0X800700E9 Issue with Xbox Game Pass & Windows 11
- Trust Your Timing | Free Book
- Why does the pokemon go battle league not available On Apple iPhone 15 Pro | Dr.fone
- Will Pokémon Go Ban the Account if You Use PGSharp On Apple iPhone 12 | Dr.fone
- Title: Why cant I install the ipogo On Apple iPhone 11 | Dr.fone
- Author: Iris
- Created at : 2025-02-14 19:37:29
- Updated at : 2025-02-19 23:16:57
- Link: https://ios-pokemon-go.techidaily.com/why-cant-i-install-the-ipogo-on-apple-iphone-11-drfone-by-drfone-virtual-ios/
- License: This work is licensed under CC BY-NC-SA 4.0.